There is no single best coop floor. The right material depends on your climate, what predators are in your area, and how much scrubbing you are willing to do every week. That said, here is the short answer if you want one: a plywood subfloor topped with vinyl or linoleum sheet flooring is the best all-around choice for most backyard setups. If you are in a hot climate with heavy predator pressure, concrete or a hardware-cloth-over-frame design beats everything else. If budget is zero, a dirt floor managed with deep litter works fine.
Below I break down every realistic option, what it actually costs, and what you are signing up for on cleaning day.
Flooring Options at a Glance
| Flooring Material | Upfront Cost | Durability | Cleaning Effort | Predator Protection | Best For |
|---|---|---|---|---|---|
| Dirt | $0 | Low | Medium | Poor | Tight budgets, mild climates |
| Concrete | $150–$500 | Excellent | Low | Excellent | Large flocks, predator-heavy areas |
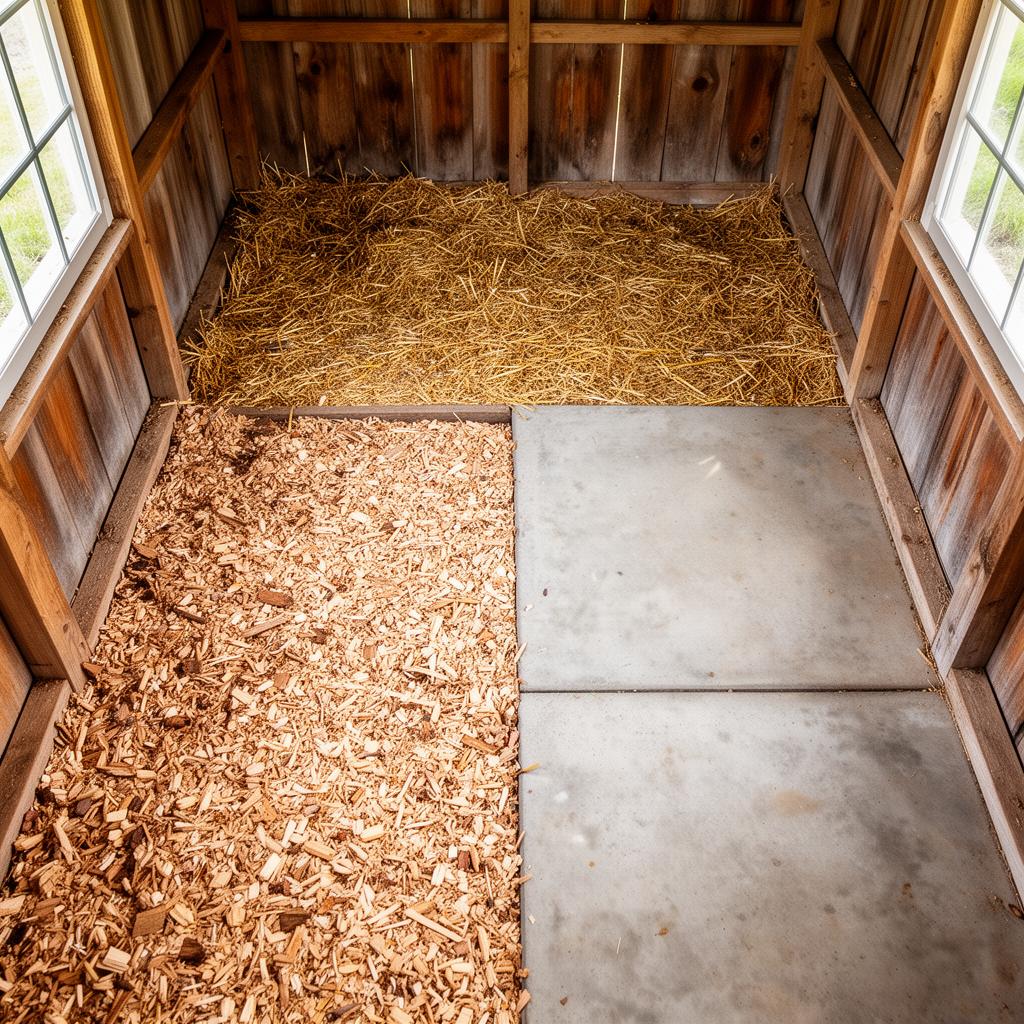
| Wood (plywood) | $30–$80 | Medium | Medium | Fair | Small coops, mild climates |
| Wood + Vinyl/Linoleum | $60–$150 | Good | Low | Fair | Most backyard setups |
| Sand | $20–$60 | Medium | Low | Poor | Hot/dry climates, small flocks |
| Rubber Mats | $40–$120 | Good | Low | Poor (add-on only) | Cold climates, supplemental use |
| Hardware Cloth/Wire | $30–$100 | Good | Very Low | Excellent | Elevated coops, brooder runs |
Concrete
Concrete is the heavy-duty choice. Pour it right and it lasts the lifetime of the structure. Predators cannot dig through it, it is easy to hose down, and it does not absorb moisture the way wood does.
The downsides are real though. Bare concrete is hard on legs and feet — especially in cold weather, when it pulls heat away from birds resting on it. It also costs more upfront and requires either a permanent structure or a willing commitment to the location. If you ever want to move the coop, you are leaving the floor behind.
For hot climates like Phoenix, concrete is my first pick for any permanent setup. Pair it with a thin layer of sand and good coop ventilation and you get a floor that dries fast, stays cool-ish, and cleans in 10 minutes. In cold climates, add rubber mats or a thick bedding layer to take the chill off.
Best for: Permanent coops, large flocks, areas with raccoons or dogs that dig.
Skip it if: You want to move the coop, you are on a tight budget, or you need to build fast.
Wood (Plywood)
Plywood is the default for most DIY coop builds because it is cheap, easy to cut, and fast to install. A sheet of 3/4-inch pressure-treated plywood runs $40–$60 and can floor a 4x8 coop in an afternoon.
The problem is moisture. Unprotected plywood absorbs droppings, urine, and water. Left alone it rots within 2–3 years in a working coop. You can extend the life significantly by painting the underside before install and sealing the top — but the better move is to cover it with vinyl.
Bare plywood also gives mites and bacteria places to hide in scratches and gaps. A thorough coop cleaning schedule matters more with wood than with any other floor type.
Best for: Budget builds, beginner coops, raised coops where concrete is not practical.
Skip it if: You are in a wet climate or want a floor that lasts more than 5 years without maintenance.
Wood + Vinyl or Linoleum
This is the combination I use and recommend most. Plywood gives you the structure, and a sheet of vinyl or linoleum flooring laid on top — stapled or glued at the edges — turns it into something you can wipe clean in minutes.
Sheet vinyl from a flooring remnant bin costs $20–$50 for a small coop. It is seamless enough that droppings sit on the surface rather than soaking in. Pull the vinyl, hose it down outside, let it dry, staple it back. The plywood underneath stays dry and can last 8–10 years before needing replacement.
Read more about choosing the right coop materials if you are planning the full build.
Best for: Most backyard coops, anyone who wants easy cleaning without pouring concrete.
Skip it if: Vinyl edges lift and moisture gets underneath — reseal edges immediately or it defeats the purpose.
Dirt
A dirt floor is free and surprisingly functional when managed correctly. Chickens scratch naturally in it, drainage happens on its own, and there is nothing to rot or crack.
The risks are real though. Predators can dig under the wall line — the solution is burying a hardware cloth apron 12 inches down and out around the perimeter (see the predator-proofing guide for how to do it). Parasites — especially coccidia and northern fowl mites — can establish in soil and become hard to break. In wet climates, a dirt floor gets soupy fast.
Deep litter management (letting bedding build up and compost in place over months) largely solves the moisture and parasite problem on a dirt floor. It requires consistent bedding additions and good ventilation to work without turning into a soggy, ammonia-soaked mess.
Best for: Dry climates, keepers who want minimal construction, deep litter systems.
Skip it if: You are in a wet region, have persistent predator pressure, or have had a parasite problem before.
Sand
Sand floors became popular in the backyard chicken world because they are scoopable — you can spot-clean droppings the same way you would a cat litter box. In a hot, dry climate that works well. Sand dries fast, stays relatively cool, and does not harbor moisture the way loose bedding can.
Use construction sand or all-purpose sand, not play sand. Play sand packs into a hard layer and does not drain. You want 3–4 inches minimum depth.
The downsides: sand is heavy to haul, it does not insulate (bad in cold climates), and it does not generate the composting heat that deep litter does. In wet climates it turns into a sponge.
Best for: Hot/dry climates, small flocks, keepers who prefer frequent spot-cleaning over periodic deep cleans.
Skip it if: You are in a cold or wet climate, or you want bedding that generates warmth in winter.
Rubber Mats
Rubber mats are not really a floor — they are a floor covering, meant to go over concrete or wood. They add traction, cushion for feet and legs, and insulation from cold concrete in winter.
They work well in a supplemental role. The main cleaning chore is lifting them periodically and hosing both the mat and whatever is under it. If moisture gets trapped under a mat for days, you create a perfect mold and bacteria environment. Lift them weekly and let both surfaces dry before replacing.
Interlocking rubber stable mats ($1–$2 per square foot) are cheaper than purpose-built coop mats and hold up just as well.
Best for: Adding warmth to concrete floors in cold climates, protecting older wood floors.
Skip it if: You are in a humid climate and cannot commit to regular mat removal and drying.
Hardware Cloth / Wire Floors
Wire or hardware cloth floors work best in elevated coops and brooder runs, where droppings fall through to the ground or a collection tray below. The coop floor itself stays clean with almost no effort.
The trade-off is foot health. Wire floors are hard on feet over long periods — bumblefoot (a staph infection from wire pressure cuts) is a real risk if birds spend most of their time on hardware cloth. Use 1/2-inch hardware cloth minimum, never chicken wire (which is too weak and the openings are wrong). Elevate the coop at least 12 inches off the ground.
For permanent coops where birds roost inside and free range during the day, wire is fine because they are only on it overnight. For confined flocks or winter setups, provide a solid section for them to stand on.
Best for: Elevated coops, seasonal brooder setups, runs where you want zero manual cleaning.
Skip it if: Birds are confined for long periods, or you live somewhere cold where drafts from below are a problem.
Best Bedding for Each Floor Type
Bedding sits on top of your floor material and handles the day-to-day moisture and odor load. Here is what works with each floor type:
Pine shavings — the standard. Works on plywood, vinyl, concrete, and dirt. Absorbent, compost-friendly, easy to find at any feed store. Buy it in compressed bales. Avoid cedar — the aromatic oils irritate respiratory tracts.
Sand — best on concrete and in hot/dry climates. Scoop daily, remove all of it and replace 1–2 times per year. Does not compost, so do not mix it into your garden pile.
Deep litter — best on dirt and concrete with a good bedding base. The idea is to let bedding accumulate and compost in place over months, adding fresh material on top rather than removing it. It generates mild heat, builds compost, and reduces cleaning frequency. Requires solid coop ventilation — if it smells, something is wrong with airflow or moisture management.
Straw — cheap and insulating, which makes it useful in winter. It mats up when wet and can harbor mites if you leave it too long. Change it out more frequently than shavings. Good for cold-climate nest boxes; less ideal as a primary floor bedding.
Climate-Specific Recommendations
Your climate matters as much as your budget when picking a floor.
Hot and humid climates:
- Best floor: Concrete or hardware cloth over a raised frame
- Best bedding: Sand or thin pine shavings
- Avoid: Unsealed plywood (rots fast), deep litter (mold risk with humidity)
- Priority: Drainage and airflow over insulation — see the ventilation guide and the insulation guide for what that balance looks like
Hot and dry climates (like Phoenix):
- Best floor: Concrete with sand, or wood + vinyl
- Best bedding: Sand or pine shavings
- Avoid: Deep litter in summer (heat plus dry material can get dusty fast)
- Priority: Foot health and easy cleaning during the long active season
Cold winters:
- Best floor: Insulated wood subfloor or concrete with rubber mats
- Best bedding: Pine shavings for warmth; deep litter if you want passive heat generation
- Avoid: Bare concrete (too cold without mats), wire floors (drafts from below)
- Priority: Insulation and moisture control together — a wet coop in cold weather is worse than a cold dry one
Bottom Line
Pick the floor you will actually maintain. A concrete floor with sand that gets cleaned every week beats a wood floor with vinyl that gets ignored for a month. The material matters less than the habit.
If I were building a small backyard coop today in Phoenix: plywood base, vinyl sheet on top, sealed edges, pine shavings 2–3 inches deep. Full cleanout every 6–8 weeks, spot-clean droppings 2–3 times a week. That setup has held up across every coop I have built or helped build.
If you are starting the build from scratch and have not picked your wall and roof materials yet, the coop materials guide covers everything else in the same level of detail.