CoopCraft

Free PDF · 22 pages · No email

8x12 Walk-In Shed Coop with Feed Room + 8x16 Run Plans

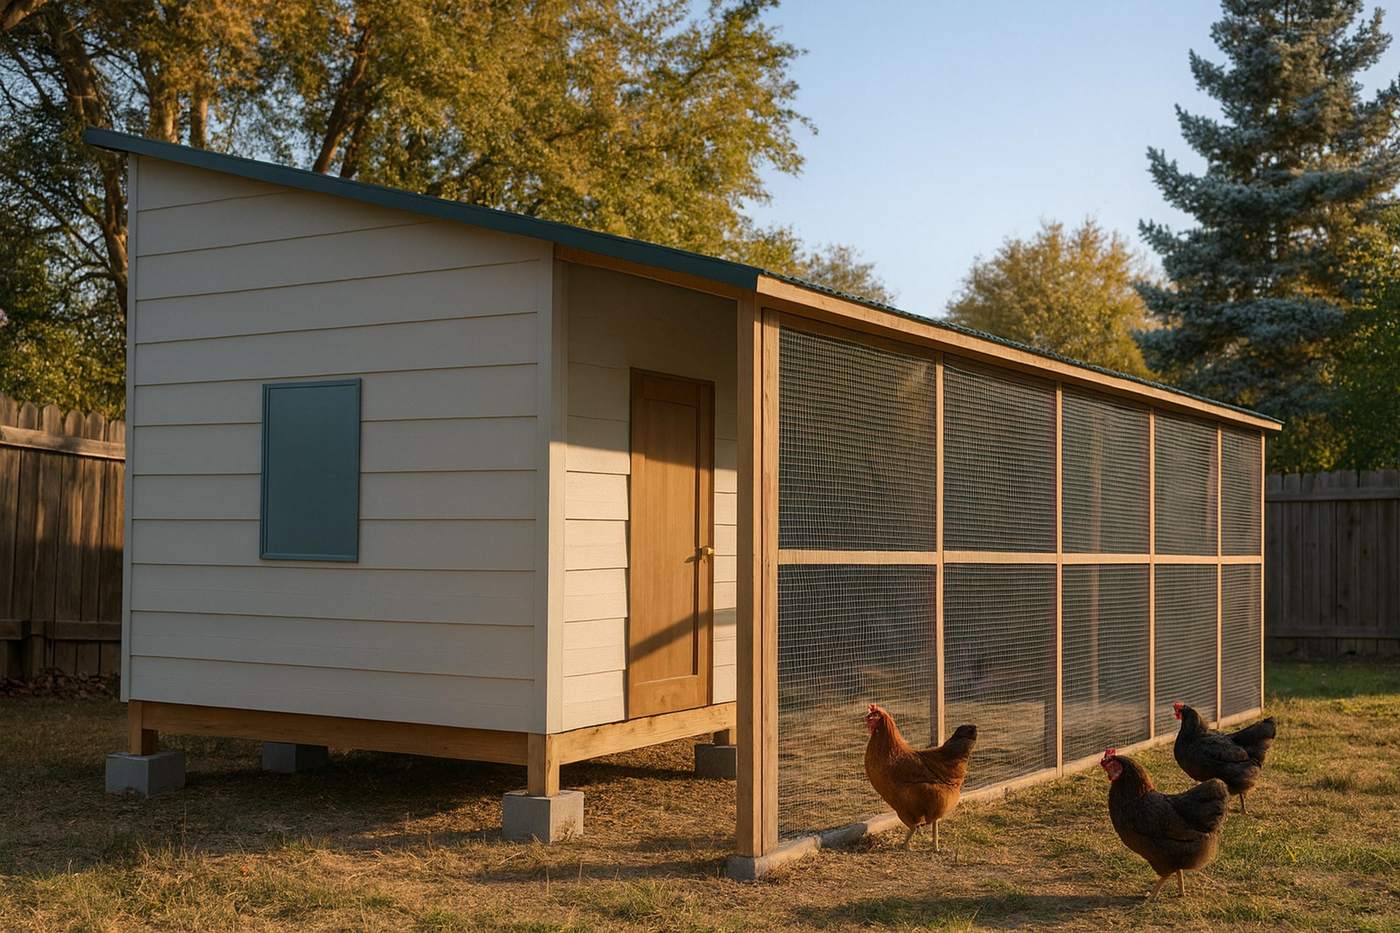
72 sq ft of coop and 128 sq ft of screened run for 16-18 hens. Dimensioned drawings, a complete material list, and every cut length across 19 assembly steps. Advanced build, eight to ten days (60-75 hrs).

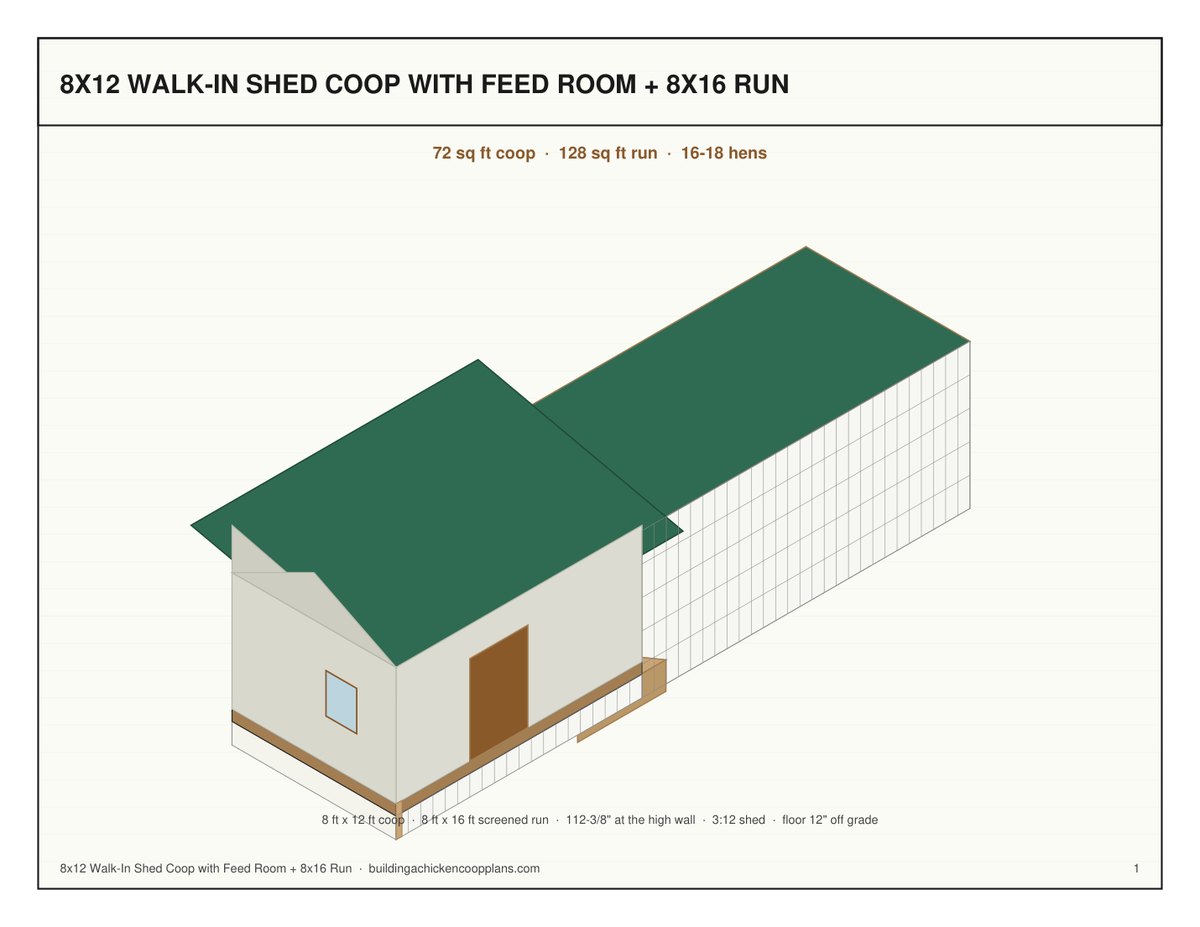
8x12 Walk-In Shed Coop with Feed Room + 8x16 Run plans — isometric view

Specifications

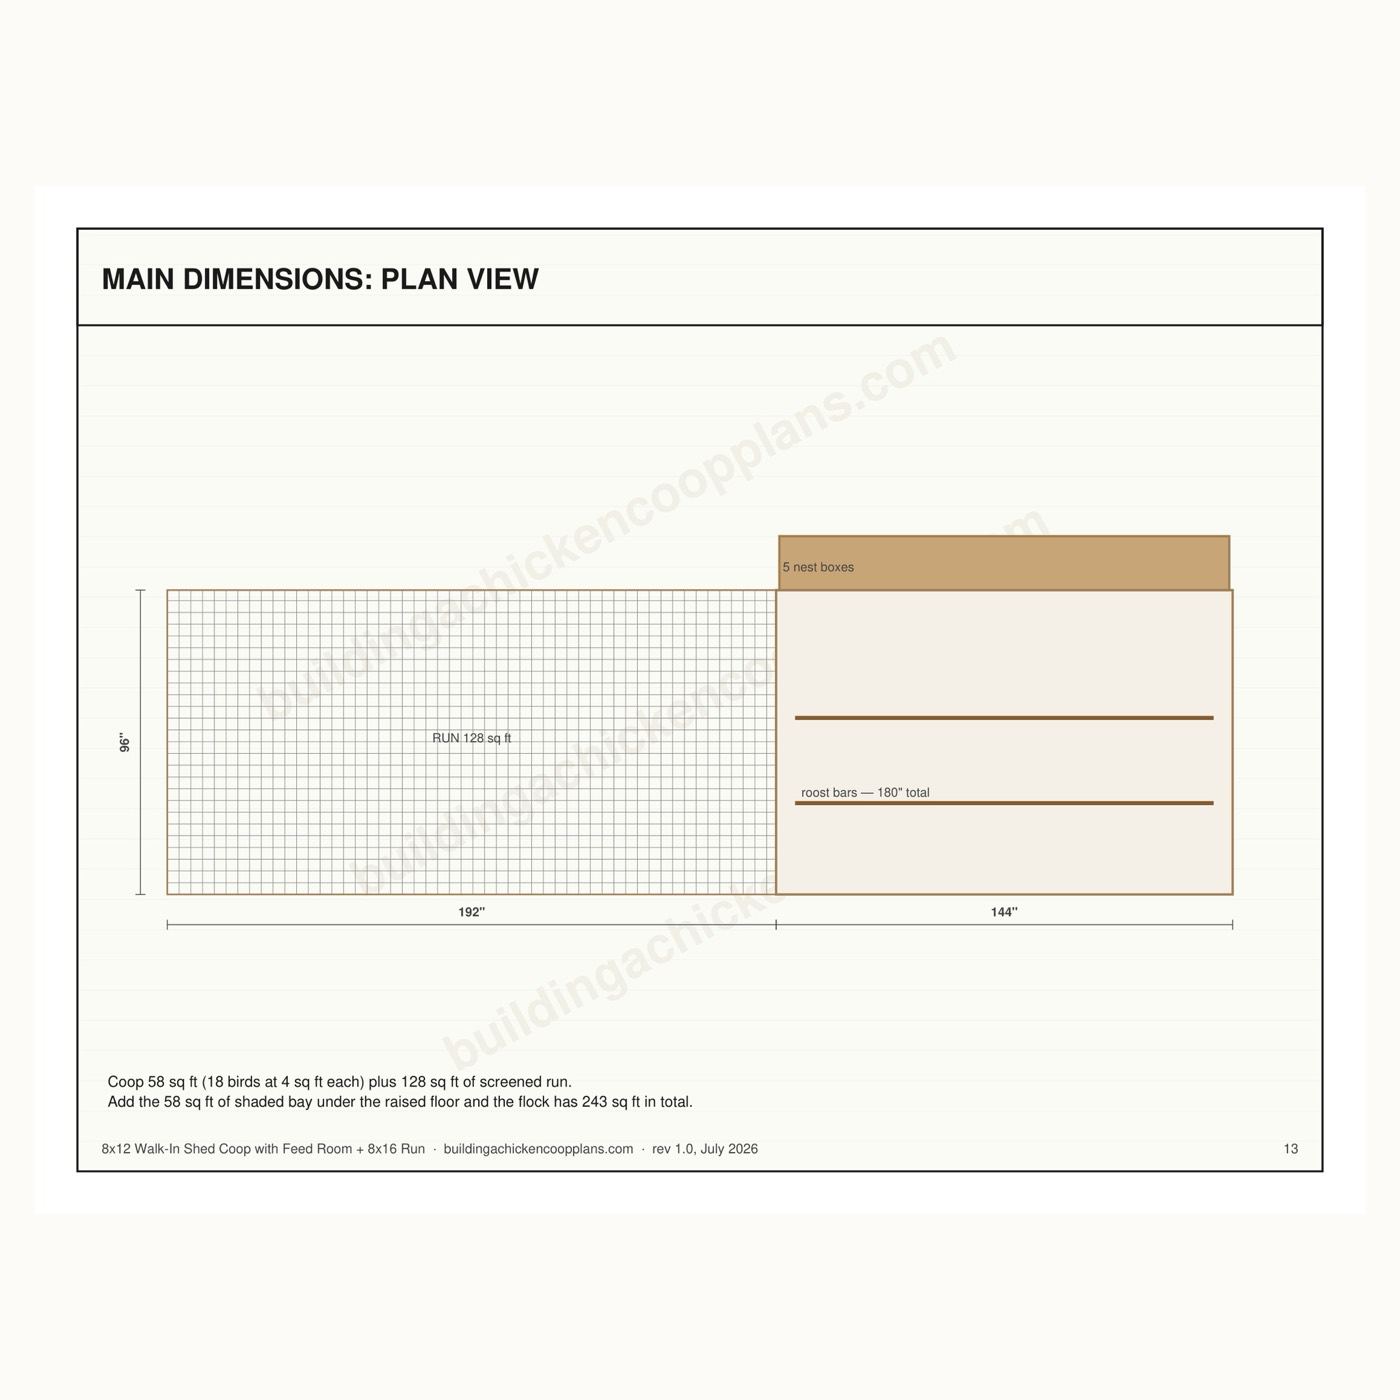
Coop footprint 8 ft × 12 ft (72 sq ft)
Run footprint 8 ft × 16 ft (128 sq ft), screened
Overall length 336" coop + run
Ridge height 123-5/8" (12:12 gable, 24" rise)
Access Walk-in — full standing headroom
Interior wall height 76"
Floor height 12" off grade — screened bay underneath
Capacity 16-18 hens at 4 sq ft per bird
Nest boxes 5 in a 74-1/2" exterior bank
Roost bar 180" total (10" per bird)
Ventilation 5.1 sq ft across 3 windows
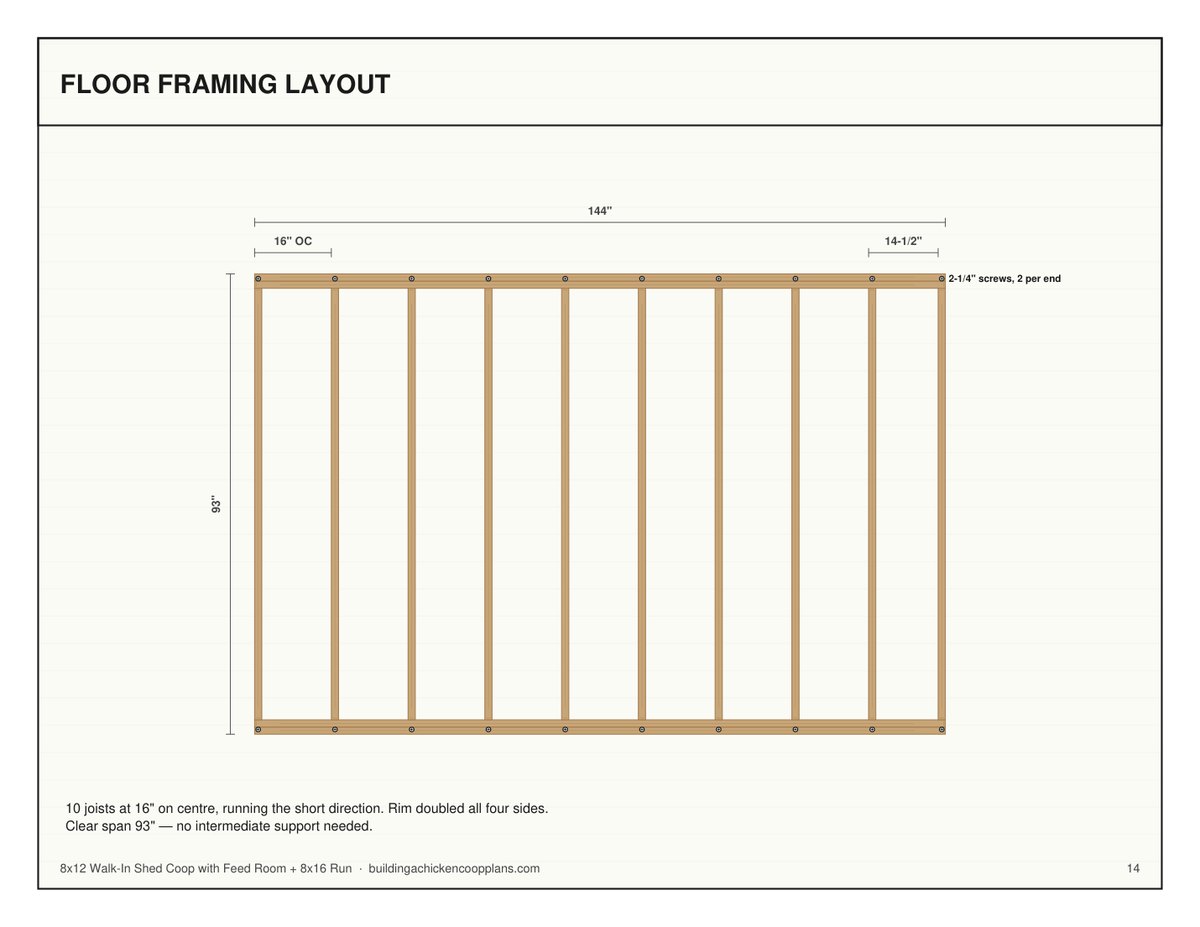
Floor framing 10 joists at 16" OC, 93" clear span
Build time Eight to ten days (60-75 hrs)
Difficulty Advanced
Materials cost $2,600–$3,900 at 2026 prices

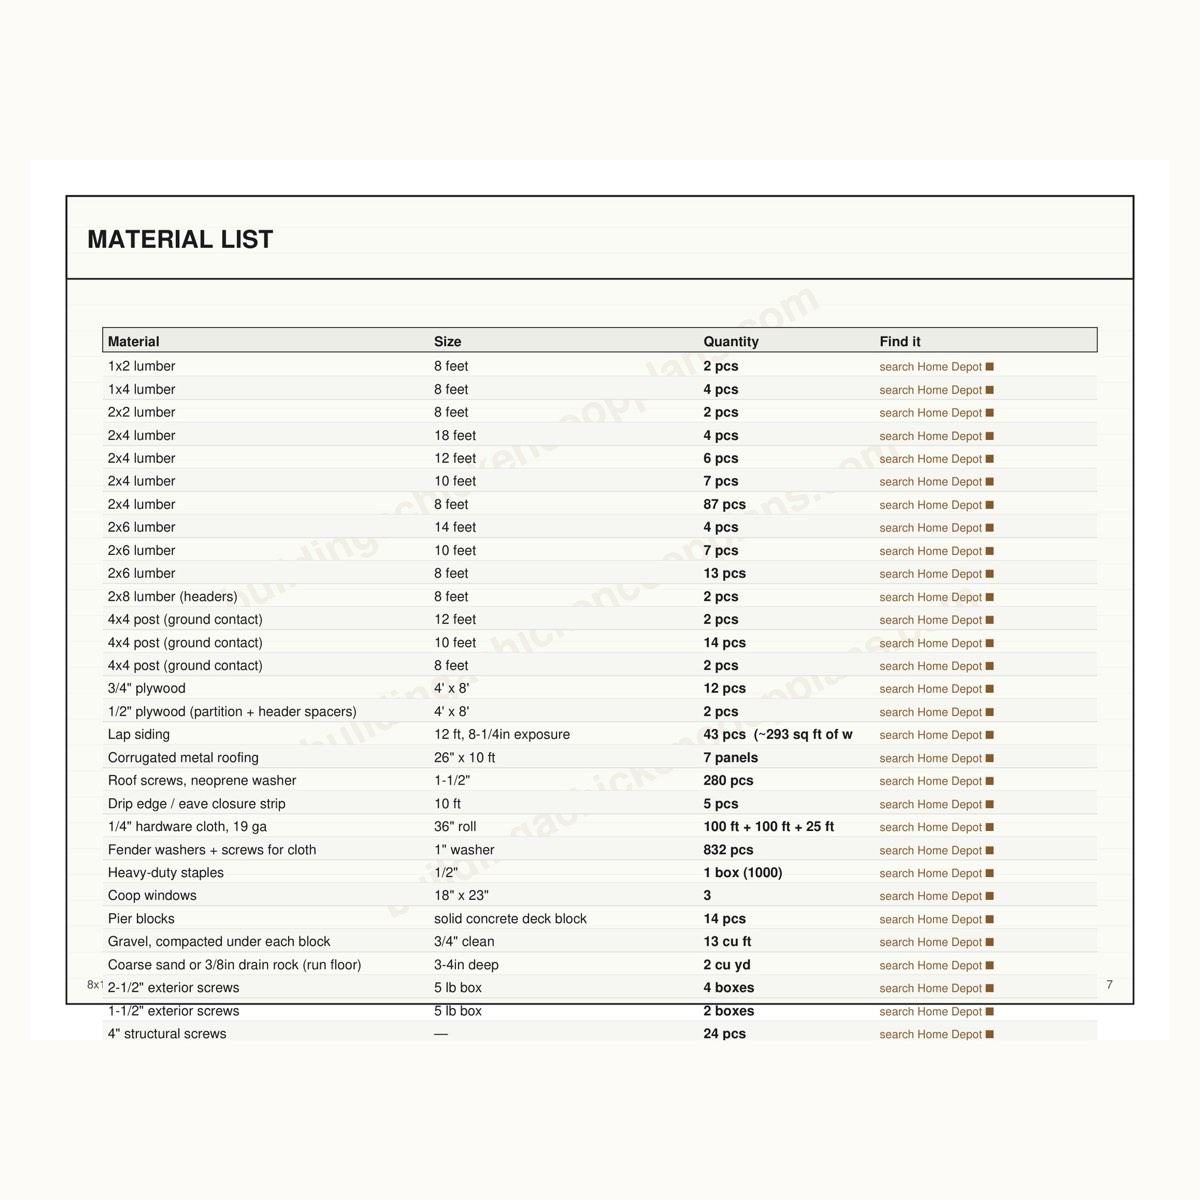
Material List

The complete bill of materials. Quantities carry no waste allowance — add two or three extra 2×4s if you are new to framing.

Material Size Quantity
2x4 lumber 8 feet 102 pcs
2x4 lumber (long runs — plates, rails, ridge) 16 feet 10 pcs
2x6 lumber (long runs — rim joists, rafters) 12 feet 11 pcs
4x4 post (long runs — base ring) 12 feet 6 pcs
2x6 lumber (floor joists) 8 feet 14 pcs
4x4 post 8 feet 9 pcs
3/4" plywood 4' x 8' 12 pcs
Lap siding 9 feet 113 pcs (~293 sq ft of wall)
Corrugated metal roofing 4' x 8' 6 pcs
1/4" hardware cloth, 19 ga 36" roll 102 lin ft
Coop windows 18" x 23" 3
2-1/4" wood screws 180 pcs (2 lbs) 2 packs
1-1/2" wood screws 100 pcs 2 packs
4" wood screws 16 pcs
Hinges 13 (5 openable parts)
Two-action latches 6
2x2 lumber (droppings-board rails) 8 feet 2 pcs
1x2 lumber (ramp cleats) 8 feet 1 pcs
1x4 lumber (door Z-braces) 8 feet 2 pcs
2x8 lumber (headers) 8 feet 2 pcs

Nominal vs actual: the list uses nominal sizes (2×4), the drawings use finished sizes (1-1/2" × 3-1/2"). Check your own stock before cutting.

Floor Framing

10 joists at 16" on centre running the short direction, rim doubled on all four sides, 93" clear span — comfortably within a 2×4's range, so no intermediate support is needed. True 16" spacing means plywood seams land on framing.

8x12 Walk-In Shed Coop with Feed Room + 8x16 Run floor framing layout

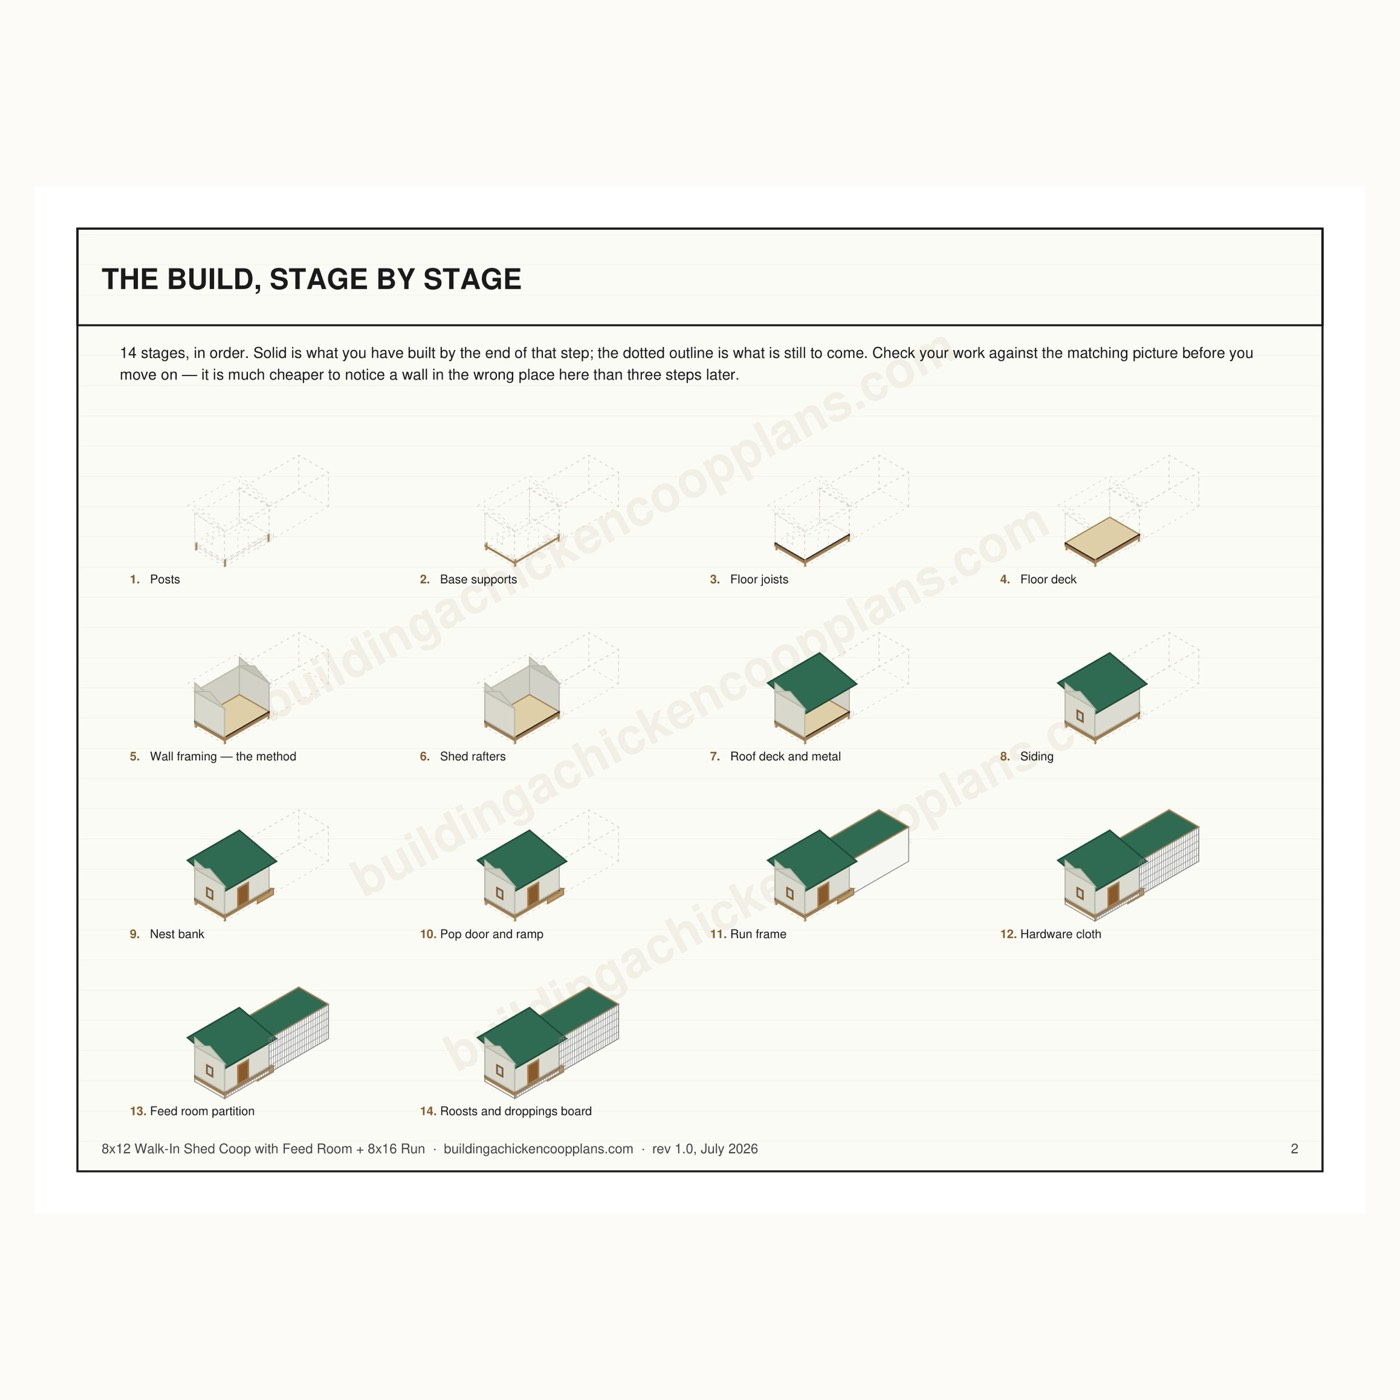
The 19 Assembly Steps

Every cut length below is computed from the same geometry that draws the PDF, so the numbers on this page and the numbers in the plan set cannot disagree.

1

Posts

Four 4x4 posts cut to 98-3/4" carry the structure from grade to the top plate. Setting the floor 12" up keeps the frame out of ground moisture and hands the flock the shaded space underneath.

Part Qty Length Stock Note
Post A 4 98-3/4" 4x4
2

Base supports

The base ring ties the four posts into a rigid square at grade. Use the 4-inch screws here — this joint carries the racking load for the life of the coop.

Part Qty Length Stock Note
Base support A (front/back) 2 89" 4x4
Base support B (sides) 2 137" 4x4
Base blocking 8 20-1/2" 2x4
3

Floor joists

Joists sit 12" above grade on 16" centres, running the short direction across 93" in 2x6, with the rim doubled on all four sides. At 93" the 2x6 joists span well inside the 8 ft 4 in that AWC DCA6 Table 2 allows at 16-inch centres, so no intermediate girder is needed. Crown every joist up before you fasten it. Fixing the floor frame to the posts. This is the joint everything above stands on and it is the one most plans leave to guesswork. Build the rim rectangle first, square it to the diagonals, then drop it over the four posts so the rim sits ON the base ring and CLOSES the outside face of each post. Fasten each corner with two 4in structural screws driven through the rim into the post, one 1-1/2in down from the top of the rim and one 1-1/2in up from the bottom, offset from each other so they are not in the same grain line. Eight screws in total, four corners. Predrill — a 4in screw close to the end of a 2x6 will split it otherwise.

Part Qty Length Stock Note
Rim joist (long sides) 4 144" 2x6 doubled
Floor joist 10 93" 2x6 16" OC, last bay short
4

Floor deck

Deck the floor in 3/4" plywood, notched 3-1/2" square at each corner so it drops cleanly around the posts. Fasten with 1-1/2 inch screws every 8 inches on the joists.

Part Qty Length Stock Note
Floor panel 1 96" x 144" 3/4" plywood notch corners
5

Wall framing — the method

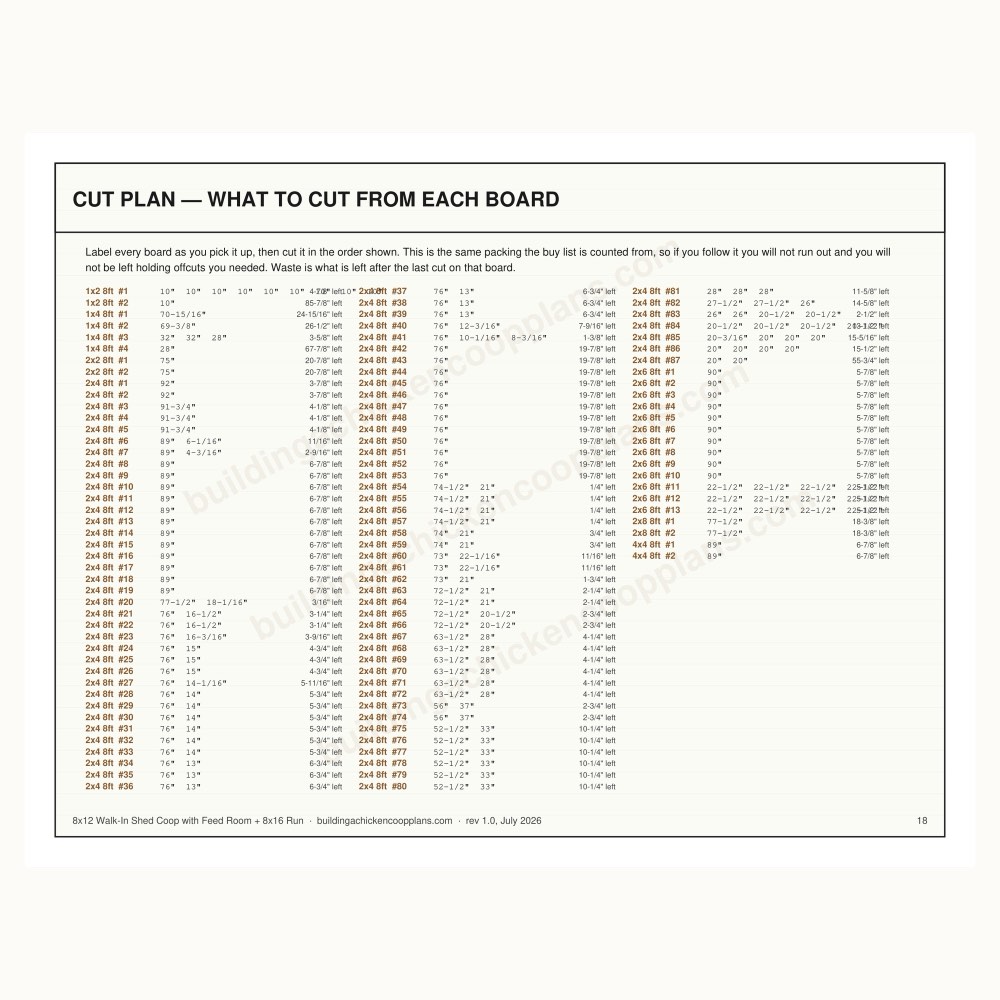
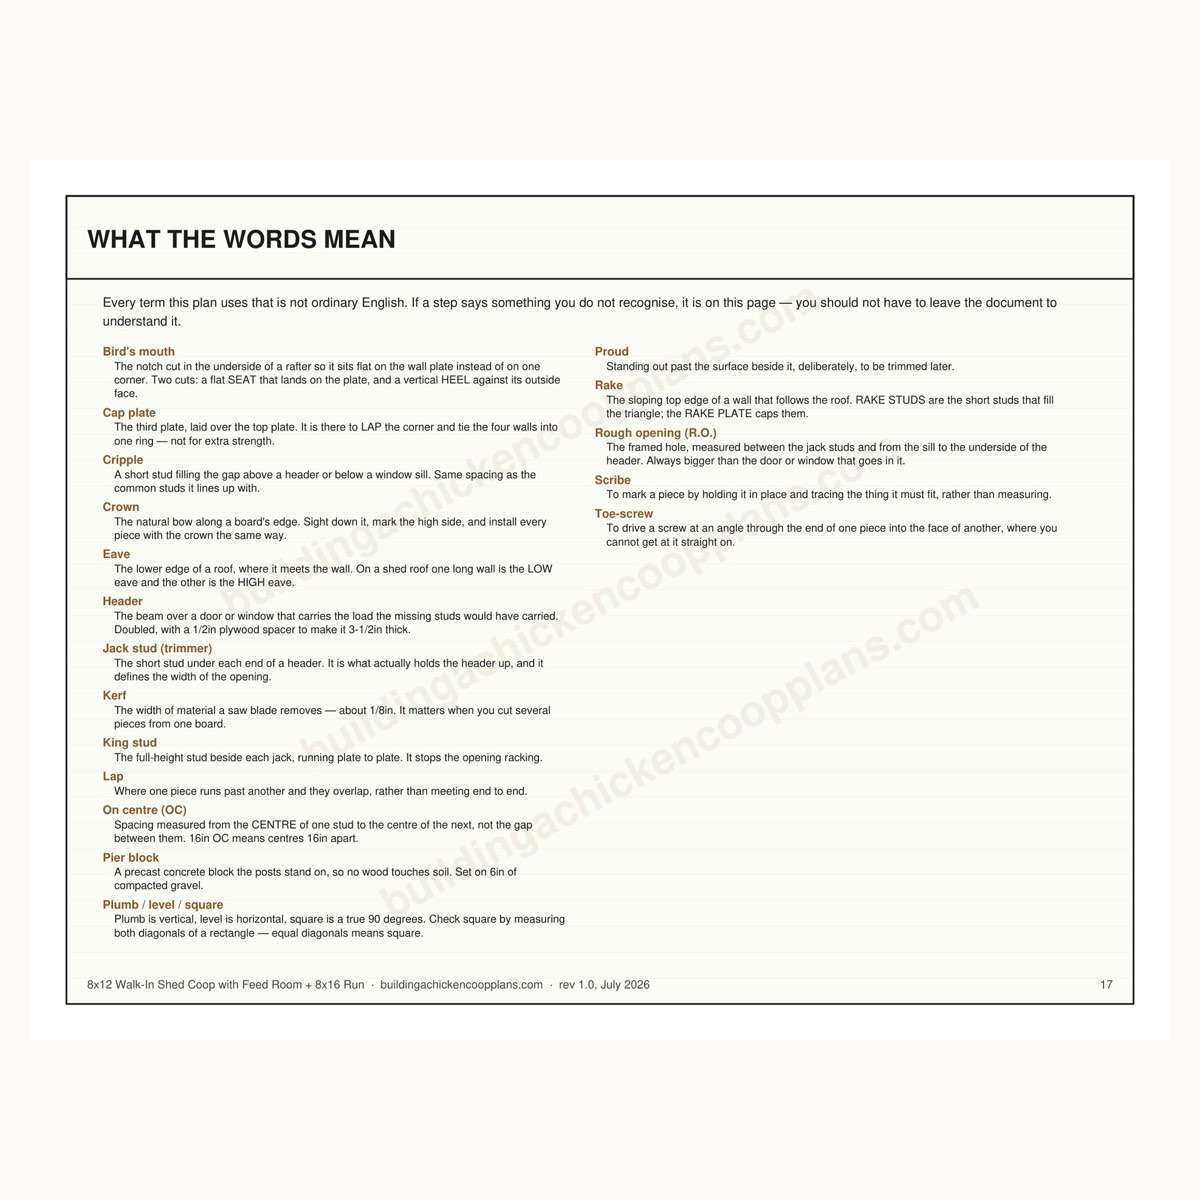
Every wall is framed FLAT ON THE DECK and then stood up. That is the whole trick: you are working on a level surface, gravity holds the parts where you put them, and you can push the frame square before a single screw goes in. Studs run 16" on centre so 4-foot sheet goods break on a stud. Build order matters. Front wall, back wall, then the two end walls. The long walls go up first and get braced to the deck; the end walls then drop between them and lock the box square. If you stand a short wall first it has nothing to brace against. Every wall gets three plates: a bottom plate, a top plate, and a cap plate over the top. The cap plate is not a second top plate for strength — it is there to LAP the corner. Hold the cap plate back 1-1/2" at one end of each long wall and run it 1-1/2" long at the other, so when the end walls go in the caps interlock and tie the four walls into one ring. A butt joint at all four corners is a box that racks. Cut the bottom plate CONTINUOUS through every door opening. Frame it, stand it, brace it, and only then saw the plate out of the doorway with a handsaw. It is what keeps the wall square while you move it.

5a

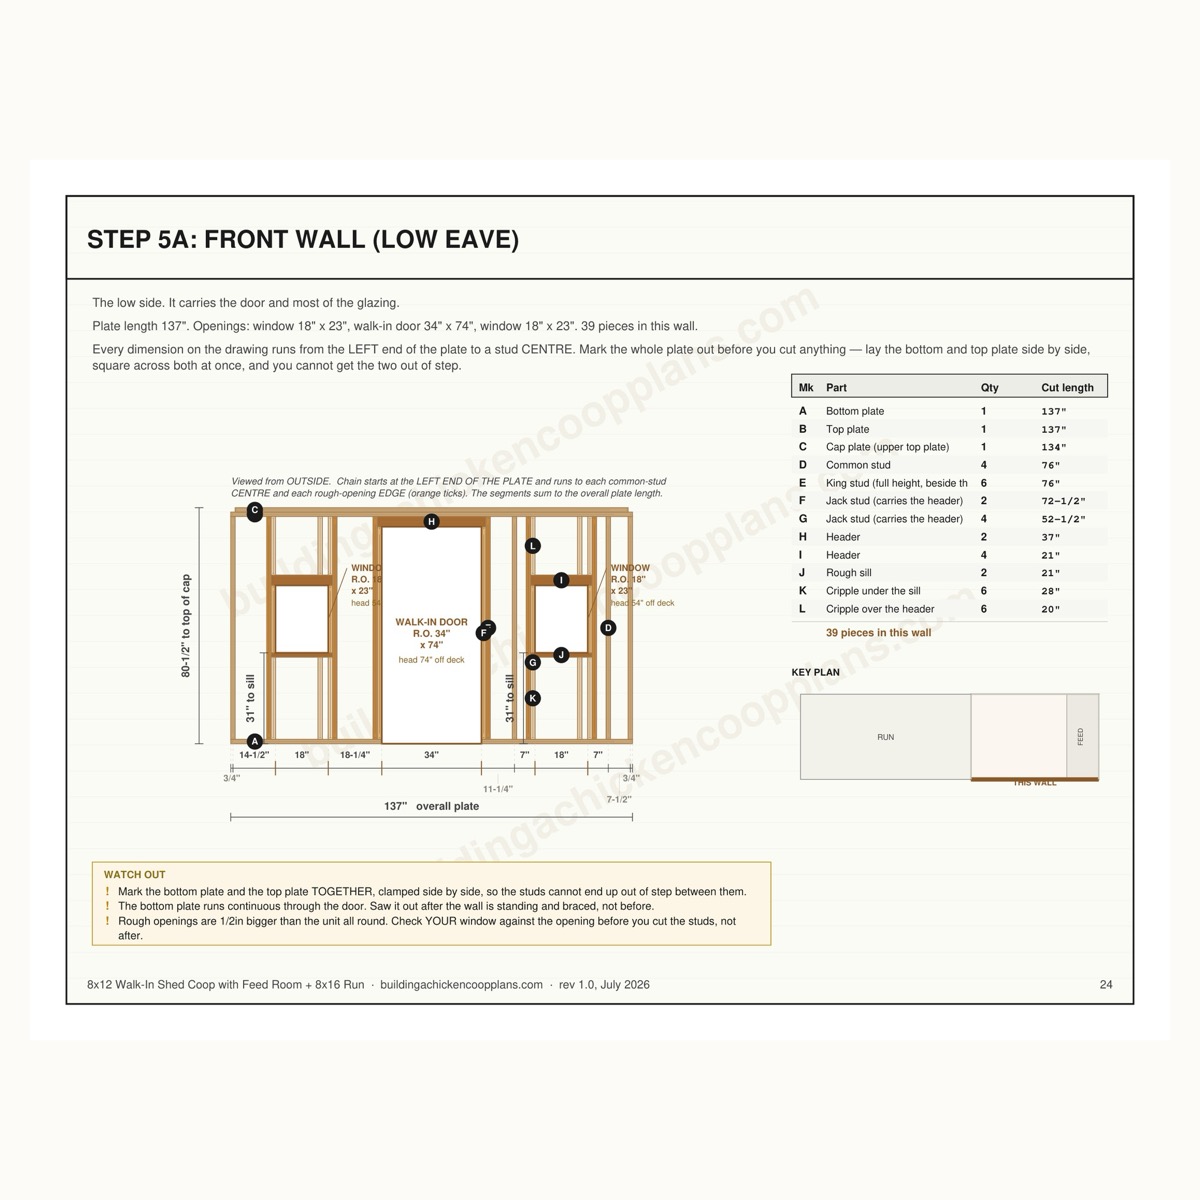
Front wall (low eave)

The wall you face when you walk up to the coop. It carries the door and most of the glazing. Plate length 137". Openings: window 18" x 23", walk-in door 34" x 74", window 18" x 23". 39 pieces in this wall. Every dimension on the drawing runs from the LEFT end of the plate to a stud CENTRE. Mark the whole plate out before you cut anything — lay the bottom and top plate side by side, square across both at once, and you cannot get the two out of step.

Part Qty Length Stock Note
A Bottom plate 1 137" 2x4 sits flat on the deck — cut out at the doors AFTER standing
B Top plate 1 137" 2x4 first plate over the studs
C Cap plate (upper top plate) 1 134" 2x4 laps the corner — hold back 1-1/2in one end, run 1-1/2in long the other
D Common stud 4 76" 2x4 16in OC, crown out
E King stud (full height, beside the opening) 6 76" 2x4 full height, outside the jack
F Jack stud (carries the header) 2 72-1/2" 2x4 carries the header, sits ON the bottom plate
G Jack stud (carries the header) 4 52-1/2" 2x4 carries the header, sits ON the bottom plate
H Header 2 37" 2x4 two pieces + a 1/2in plywood spacer = 3-1/2in thick, flush both faces
I Header 4 21" 2x4 two pieces + a 1/2in plywood spacer = 3-1/2in thick, flush both faces
J Rough sill 2 21" 2x4 rough sill under the window
K Cripple under the sill 6 28" 2x4 between bottom plate and rough sill
L Cripple over the header 6 20" 2x4 between header and top plate
5b

Back wall (high eave)

The nest bank hangs on the outside of this wall and the vent strip runs along the top of it, so keep the top two stud bays clear. Plate length 137". Openings: nest bank opening 74-1/2" x 13". 27 pieces in this wall. Every dimension on the drawing runs from the LEFT end of the plate to a stud CENTRE. Mark the whole plate out before you cut anything — lay the bottom and top plate side by side, square across both at once, and you cannot get the two out of step.

Part Qty Length Stock Note
A Bottom plate 1 137" 2x4 sits flat on the deck — cut out at the doors AFTER standing
B Top plate 1 137" 2x4 first plate over the studs
C Cap plate (upper top plate) 1 134" 2x4 laps the corner — hold back 1-1/2in one end, run 1-1/2in long the other
D Common stud 5 76" 2x4 16in OC, crown out
E King stud (full height, beside the opening) 2 76" 2x4 full height, outside the jack
F Jack stud (carries the header) 2 27-1/2" 2x4 carries the header, sits ON the bottom plate
G Header 2 77-1/2" 2x8 two pieces + a 1/2in plywood spacer = 3-1/2in thick, flush both faces
H Rough sill 1 77-1/2" 2x4 rough sill under the window
I Cripple under the sill 6 13" 2x4 between bottom plate and rough sill
J Cripple over the header 6 41-1/4" 2x4 between header and top plate
5c

Left end wall (run end)

The run attaches to this wall, and the pop door passes through it. Plate length 89". Openings: pop door 12" x 14". 25 pieces in this wall. Every dimension on the drawing runs from the LEFT end of the plate to a stud CENTRE. Mark the whole plate out before you cut anything — lay the bottom and top plate side by side, square across both at once, and you cannot get the two out of step.

Part Qty Length Stock Note
A Bottom plate 1 89" 2x4 sits flat on the deck — cut out at the doors AFTER standing
B Top plate 1 89" 2x4 first plate over the studs
C Cap plate (upper top plate) 1 92" 2x4 laps the corner — hold back 1-1/2in one end, run 1-1/2in long the other
D Common stud 6 76" 2x4 16in OC, crown out
E King stud (full height, beside the opening) 2 76" 2x4 full height, outside the jack
F Jack stud (carries the header) 2 16-1/2" 2x4 carries the header, sits ON the bottom plate
G Header 2 15" 2x4 two pieces + a 1/2in plywood spacer = 3-1/2in thick, flush both faces
H Rough sill 1 15" 2x4 rough sill under the window
I Cripple over the header 2 56" 2x4 between header and top plate
J Rake plate (sloped) 1 91-3/4" 2x4 top bevel 14 deg (3:12)
K Rake stud (sloped top wall) 1 22-1/16" 2x4 top bevel 14 deg (3:12)
L Rake stud (sloped top wall) 1 20-3/16" 2x4 top bevel 14 deg (3:12)
M Rake stud (sloped top wall) 1 16-3/16" 2x4 top bevel 14 deg (3:12)
N Rake stud (sloped top wall) 1 12-3/16" 2x4 top bevel 14 deg (3:12)
O Rake stud (sloped top wall) 1 8-3/16" 2x4 top bevel 14 deg (3:12)
P Rake stud (sloped top wall) 1 4-3/16" 2x4 top bevel 14 deg (3:12)
5d

Right end wall (feed room)

The far end. Outside door into the feed room, plus a window. Plate length 89". Openings: feed-room door 30" x 74", window 18" x 23". 33 pieces in this wall. Every dimension on the drawing runs from the LEFT end of the plate to a stud CENTRE. Mark the whole plate out before you cut anything — lay the bottom and top plate side by side, square across both at once, and you cannot get the two out of step.

Part Qty Length Stock Note
A Bottom plate 1 89" 2x4 sits flat on the deck — cut out at the doors AFTER standing
B Top plate 1 89" 2x4 first plate over the studs
C Cap plate (upper top plate) 1 92" 2x4 laps the corner — hold back 1-1/2in one end, run 1-1/2in long the other
D Common stud 4 76" 2x4 16in OC, crown out
E King stud (full height, beside the opening) 4 76" 2x4 full height, outside the jack
F Jack stud (carries the header) 2 72-1/2" 2x4 carries the header, sits ON the bottom plate
G Jack stud (carries the header) 2 52-1/2" 2x4 carries the header, sits ON the bottom plate
H Header 2 33" 2x4 two pieces + a 1/2in plywood spacer = 3-1/2in thick, flush both faces
I Header 2 21" 2x4 two pieces + a 1/2in plywood spacer = 3-1/2in thick, flush both faces
J Rough sill 1 21" 2x4 rough sill under the window
K Cripple under the sill 3 28" 2x4 between bottom plate and rough sill
L Cripple over the header 3 20" 2x4 between header and top plate
M Rake plate (sloped) 1 91-3/4" 2x4 top bevel 14 deg (3:12)
N Rake stud (sloped top wall) 1 22-1/16" 2x4 top bevel 14 deg (3:12)
O Rake stud (sloped top wall) 1 20-3/16" 2x4 top bevel 14 deg (3:12)
P Rake stud (sloped top wall) 1 16-3/16" 2x4 top bevel 14 deg (3:12)
Q Rake stud (sloped top wall) 1 12-3/16" 2x4 top bevel 14 deg (3:12)
R Rake stud (sloped top wall) 1 8-3/16" 2x4 top bevel 14 deg (3:12)
S Rake stud (sloped top wall) 1 4-3/16" 2x4 top bevel 14 deg (3:12)
6

Shed rafters

A single-slope shed roof at 3:12 — 24" of fall across the 96" width, which is the minimum pitch exposed-fastener corrugated metal will shed reliably. There is no ridge and no opposing rafter pair, so there is no outward thrust and no rafter tie is required — the load lands straight down on the two side walls. That is the quiet advantage of a shed roof over a gable, and it is why this is the simplest roof in our line to frame. Rafters are 2x6 rather than 2x4: a shed rafter spans the full 96" in one piece, which puts a 2x4 right at its limit under a 30 psf snow load.

Part Qty Length Stock Note
Shed rafter 7 110-15/16" 2x6 birdsmouth both ends, 12" tail
Rafter blocking 6 14-1/2" 2x6 between rafters at each wall
7

Roof deck and metal

3/4" plywood over the rafters, then corrugated metal sheets. Metal over shingles because it sheds snow, lasts decades and never needs a tear-off. Lap the sheets one full corrugation.

Part Qty Length Stock Note
Roof deck panel 10 4' x 8' sheet 3/4" plywood cut to fit
Metal roof sheet 10 4' x 8' sheet corrugated steel
8

Siding

Lap siding in 9-foot courses, starting from a level chalk line at the bottom and working up. Each course laps the one below by 1 inch. Leave the window and door openings proud and trim after.

Part Qty Length Stock Note
Lap siding board 113 9 ft 9 ft lap siding 5in wide, ~1in lap
8b

Doors, hatches and lids

Every opening you framed in step 5 now gets something to close it. Cut each slab a quarter inch smaller than its rough opening on all four sides — 3/4in plywood swells in the wet and a door cut to the exact opening size will bind by November. Walk-in door on the front wall (low eave): slab 33-1/2" x 73-1/2" in a 34" x 74" opening — a 1/4in gap all round. 3 hinges, out, hinged on the left as you face it from outside. Pop door on the left end wall (run end): slab 11-1/2" x 13-1/2" in a 12" x 14" opening — a 1/4in gap all round. 2 hinges, out, hinged on the left as you face it from outside. Feed-room door on the right end wall (feed room): slab 29-1/2" x 73-1/2" in a 30" x 74" opening — a 1/4in gap all round. 3 hinges, out, hinged on the left as you face it from outside. Every plywood door over 30in tall gets a Z-brace on the back: a rail top and bottom and one diagonal running from the bottom hinge corner up to the top latch corner. That diagonal is in compression and it is the only thing stopping the door sagging into a parallelogram. Run it the wrong way and it does nothing. Hinge side and swing. All doors here swing OUT, hinged on the left as you face them from outside. Out, because a door that opens inward sweeps the bedding and gets blocked by it; left, so every latch on the coop is in the same place and you are not hunting for it in the dark with an armful of feed.

Part Qty Length Stock Note
Walk-in door slab 1 33-1/2" x 73-1/2" 3/4" plywood 3 hinges, opens out
Walk-in door batten (Z-brace) 3 32" 1x4 two rails + one diagonal, screwed from the back
Pop door slab 1 11-1/2" x 13-1/2" 3/4" plywood 2 hinges, opens out
Feed-room door slab 1 29-1/2" x 73-1/2" 3/4" plywood 3 hinges, opens out
Feed-room door batten (Z-brace) 3 28" 1x4 two rails + one diagonal, screwed from the back
9

Nest bank

An exterior nest bank 74-1/2" long and 17 inches deep, hung off the side wall with a hinged lid. 5 compartments — one per three to four hens. Collecting eggs from outside means you never disturb a sitting bird.

Part Qty Length Stock Note
Nest bank floor 1 74-1/2" x 17" 3/4" plywood
Nest divider 4 17" x 14" 3/4" plywood
Nest lid 1 74-1/2" x 18" 3/4" plywood hinged
Nest bank frame 4 74-1/2" 2x4
10

Pop door and ramp

The pop door is a 12 x 10 inch plywood panel on a hinge with a latch, opening onto a cleated ramp down into the run. At 18-1/4" of drop the ramp wants to be about 34-11/16" long with cleats every 4 inches.

Part Qty Length Stock Note
Pop door panel 1 11-15/16" x 9-15/16" 3/4" plywood
Ramp 1 34-11/16" x 10" 3/4" plywood
Ramp cleat 8 10" 1x2
11

Run frame

The 8 ft x 16 ft screened run frames off the coop wall, 96" tall. 5 posts a side on roughly 4-foot centres, with a top rail and a mid rail so the hardware cloth has something to fasten to at every course. Set the run posts the same way you set the coop posts in step 1 — on the same pier blocks, at the same height, checked with the same string line. A run on a different footing system than the coop it hangs off will move against it and open a gap at the joint, which is exactly where a predator starts. Fixing the run to the coop: the two run rails that meet the coop are lag-bolted into the corner posts of the run-end wall, not screwed into siding. Two 3/8in x 4in lag bolts per rail, drilled with a 1/4in pilot, one 3in above the rail's bottom edge and one 3in below its top. Siding is a skin; it holds nothing.

Part Qty Length Stock Note
Run post 10 96" 4x4
Run top rail 2 192" 2x4
Run mid rail 2 192" 2x4
Run end rail 3 89" 2x4
Run brace 4 33" 2x4 45° corner braces
Run door stile 2 74" 2x4
Run door rail 3 26" 2x4
12

Hardware cloth

The step that decides whether you still have a flock in two years. Quarter-inch hardware cloth over every opening, screwed through fender washers rather than only stapled. Quarter-inch, not half-inch: a least weasel squeezes through anything 1/4 inch or larger (Univ. of Kentucky Extension ID-245), and half-inch mesh — while genuinely raccoon-proof — does not stop weasels, mink or snakes. Chicken wire stops nothing: a raccoon reaches straight through the hexagonal gaps. Bury a 12-inch apron down and out around the whole run perimeter (12 inches is confirmed by three separate extension services). The windows get cloth too. An open 18 x 23 window is a hole a raccoon walks through, and it is the ventilation you rely on in summer, so it has to stay open at night. Staple a panel of cloth to the INSIDE of every window opening before the unit goes in — behind the glazing, not over it, so the window still shuts on a clean frame. Same for the continuous vent strip along the top of the back wall and the nest-bank opening.

Part Qty Length Stock Note
Run walls and roof 1 44 lin ft 1/4" hardware cloth
Buried apron, 12in down and out 1 40 lin ft 1/4" hardware cloth
Window screens (behind every opening light) 1 2 lin ft 1/4" hardware cloth
Continuous eave vent strip 1 12 lin ft 1/4" hardware cloth
Nest bank opening and pop-door surround 1 4 lin ft 1/4" hardware cloth
13

Feed room partition

A full-height stud wall 36" in from the end wall, closing off a 96" x 36" feed and storage room with its own door to the outside. Feed, bedding, tools, the egg basket and the medicine box all live in here instead of in the house — and because the wall is solid, rodents drawn to stored feed are kept out of the bird space. This room is not bird space and is excluded from the capacity figure.

Part Qty Length Stock Note
Partition plate 2 89" 2x4 top and bottom
Partition stud 7 76" 2x4 16" OC
Partition sheathing 2 4' x 8' sheet 1/2" plywood cut to fit
Feed room door 1 30" x 60" 3/4" plywood
14

Roosts and droppings board

18 birds NEED 180 inches of perch at 10 inches each, comfortably above the 6-inch minimum the extension services set. The cut list below BUILDS 219 inches — 3 bars at 73". Those are two different numbers and this plan states both, because a plan that prints the requirement and calls it the built total is contradicting its own cut table. Use a rounded or slightly flattened bearing surface 1 to 2 inches across rather than a thin dowel or a full 3-1/2 inch flat face: it spreads footpad pressure and lowers bumblefoot risk. Set the bars 18 to 24 inches off the floor, 10 to 12 inches apart, and at least 8 inches off the wall. Stagger them like stair treads rather than stacking them, so the birds underneath do not get rained on. No bar sits over a nest box. Directly beneath the bars goes a removable droppings board — birds put out most of a night's manure while roosting, and catching it on a board you slide out and scrape turns the daily clean into a two-minute job. Never use wire for this: droppings stick to mesh and it becomes impossible to clean.

Part Qty Length Stock Note
Roost bar 3 73" 2x4 top edges eased round
Roost support 6 14" 2x4 wall cleats
Droppings board 1 75" x 24" 3/4" plywood removable, sealed or lined
Droppings board rail 2 75" 2x2 slides out on these

Frequently Asked Questions

Are these 8x12 chicken coop plans free?

Yes — the full 22-page PDF is a free download with no email required. Every dimension, the complete material list and all 19 assembly steps are also published on this page, so you can price the build before downloading anything.

How many chickens fit in a 8x12 coop?

16-18 hens. At 72 square feet of coop floor this holds 18 birds at the standard 4 square feet each, and the attached run adds 128 square feet on top of the shaded bay under the raised floor.

What does this 8x12 coop cost to build?

Roughly $2,600–$3,900 at 2026 big-box lumber prices, depending on your region and what you pick for siding and roofing. The material list on this page is the full bill of materials — take it to the yard as-is.

How long does it take to build?

Eight to ten days (60-75 hrs) for someone with basic carpentry skills. Difficulty is rated advanced. Nothing in the plan needs a table saw or pocket-hole joinery — a circular saw, a drill, a level and a square cover the whole build.

Do I need a permit?

Quite possibly. At 72 square feet of coop plus 128 of run you are near or past the threshold where many jurisdictions require a permit, commonly 100 to 120 square feet of footprint. Check with your zoning office before buying lumber.

Why is the floor raised off the ground?

The floor sits 12" up on posts. That keeps the framing out of ground moisture so it does not rot, denies rats and snakes the cavity they would otherwise nest in under a grade-level floor, and gives the birds an extra 72 square feet of dry shaded space that costs nothing to build.

Download the 8x12 Walk-In Shed Coop with Feed Room + 8x16 Run plans

Different size? See all chicken coop plans, or check the size calculator first.