Chicken Coop Plans

Free 6-page preview · No email

6x8 Duck House Plans for 6-8 Ducks (Free PDF)

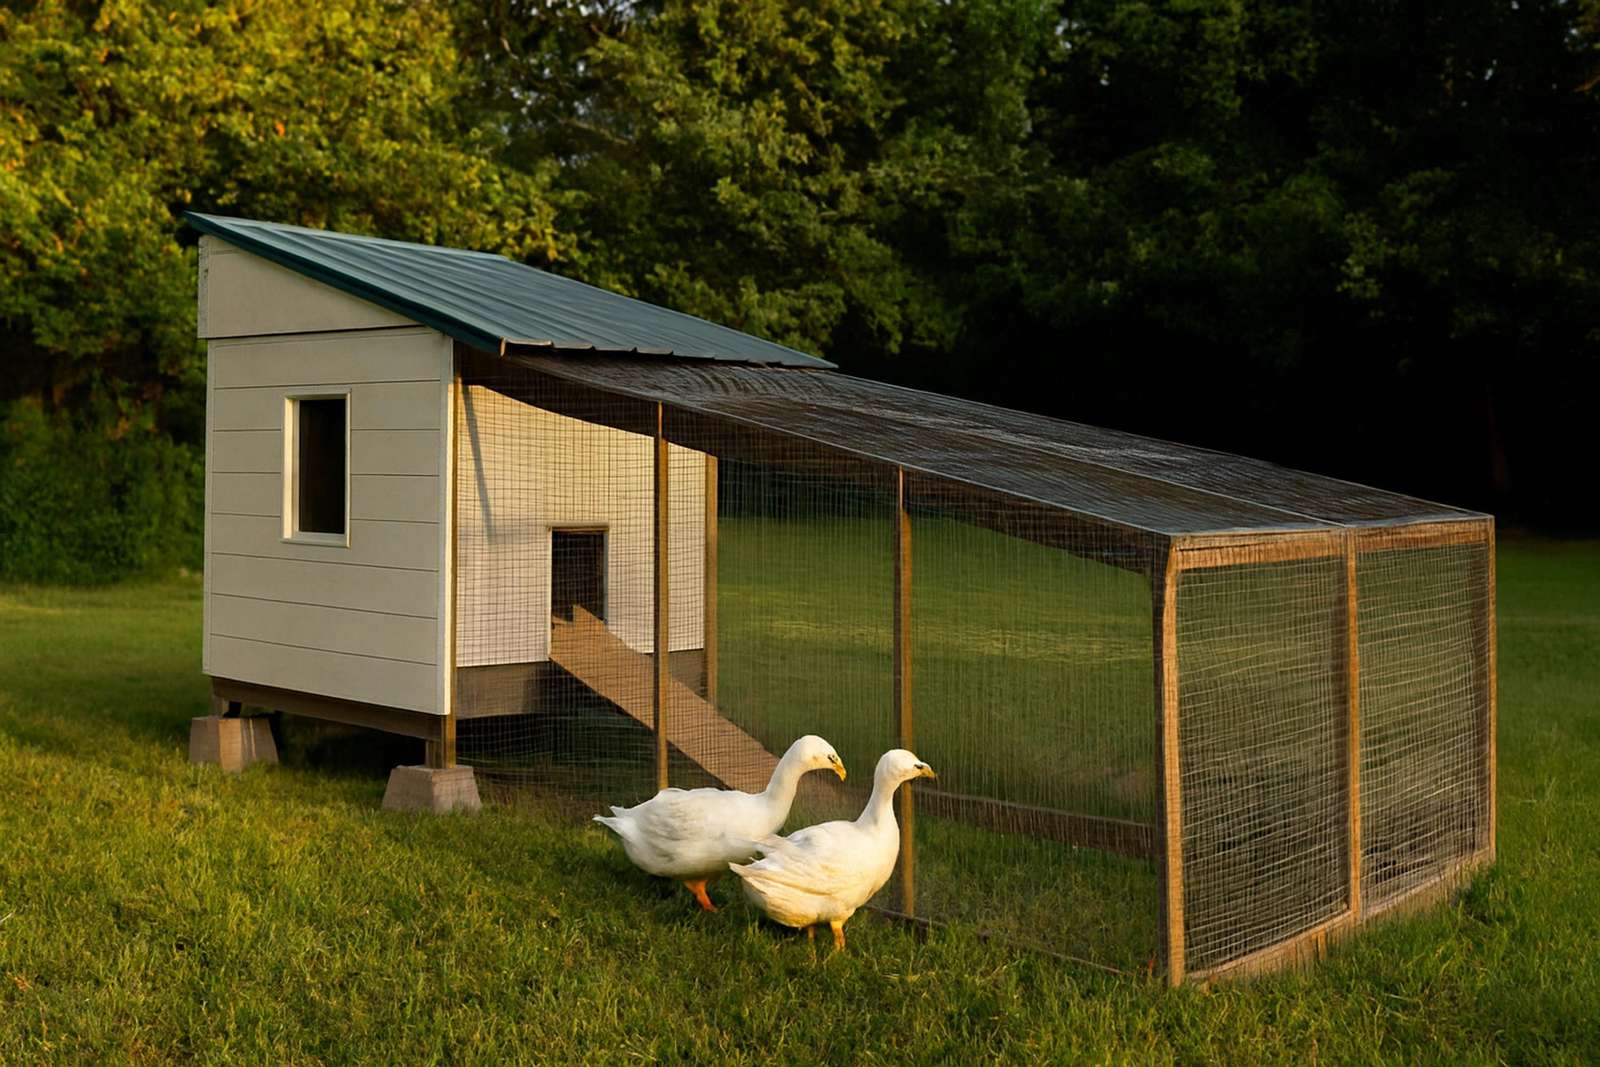
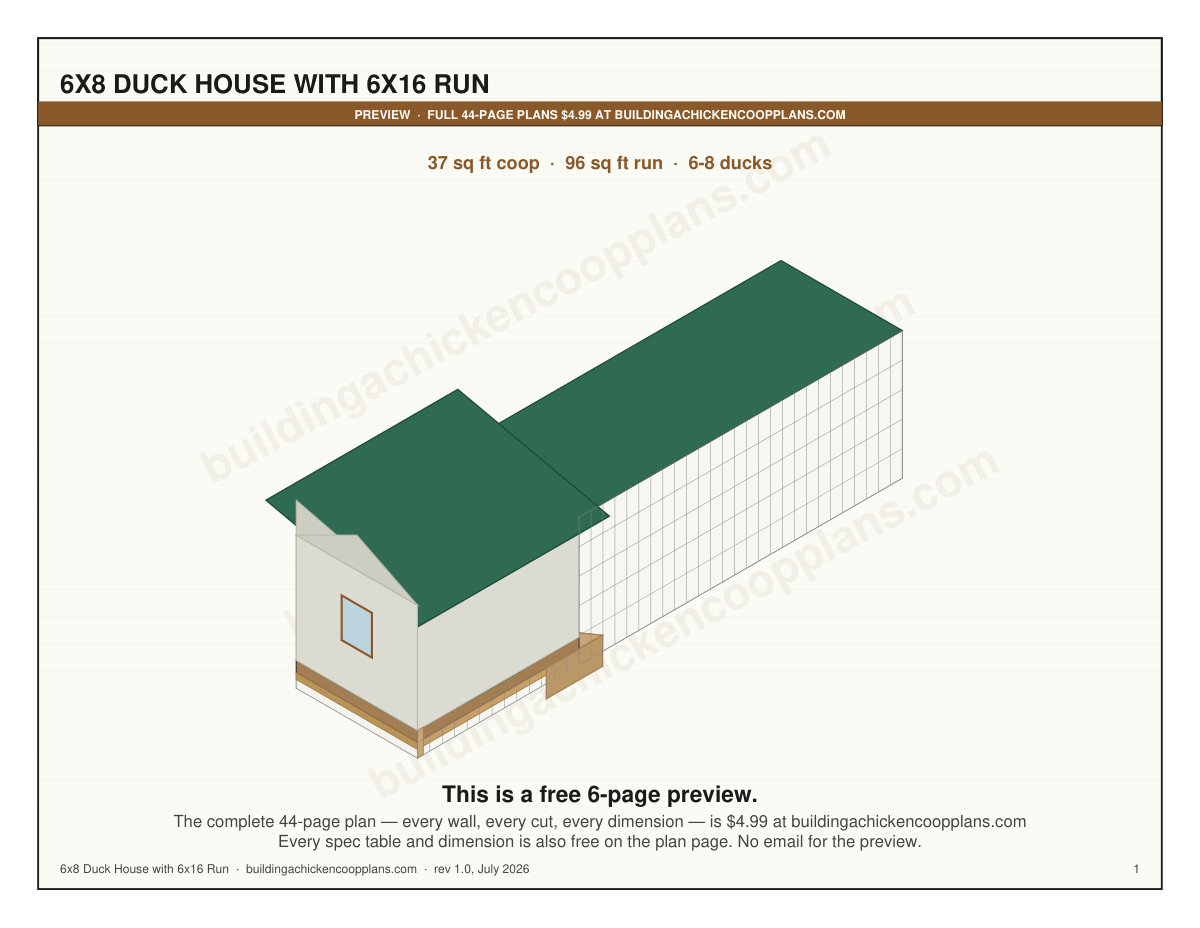
6x8 Duck House with 6x16 Run: 37 sq ft of coop and 96 sq ft of screened run for 6-8 ducks. Dimensioned drawings, a complete material list, and every cut length across 19 assembly steps. Intermediate build, four to five days (30-38 hrs).

Every dimension, spec table and cut list below is free on this page.

6x8 Duck House with 6x16 Run plans — cover sheet with isometric view

Specifications

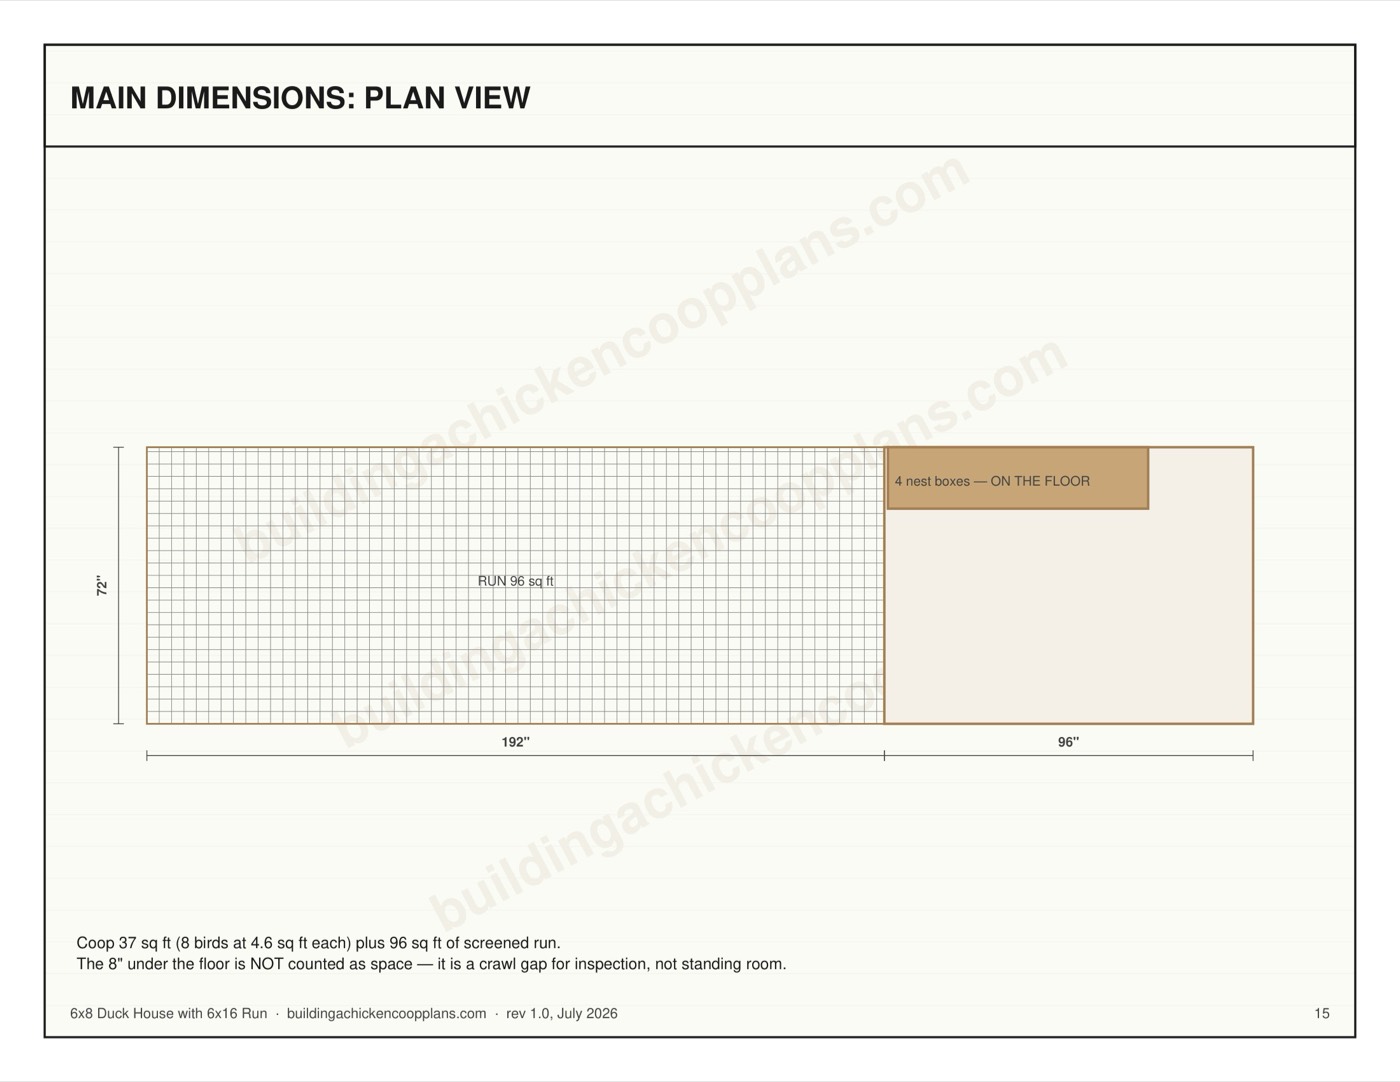
Coop footprint 6 ft × 8 ft — 37 sq ft of bird floor
Run 6 ft × 16 ft (96 sq ft), screened
Overall length 288" coop + run
Peak height 103-5/16" (18" roof rise)
Interior wall height 60"
Floor height 8" off grade — screened bay underneath
Capacity 6-8 ducks
Nest boxes 4 in a 67-3/4" bank
Ventilation 4.8 sq ft across 3 windows
Floor framing 7 joists at 16" OC, 66" clear span
Build time Four to five days (30-38 hrs)
Difficulty Intermediate
Materials cost $3,000–$3,850 at 2026 prices

Material List

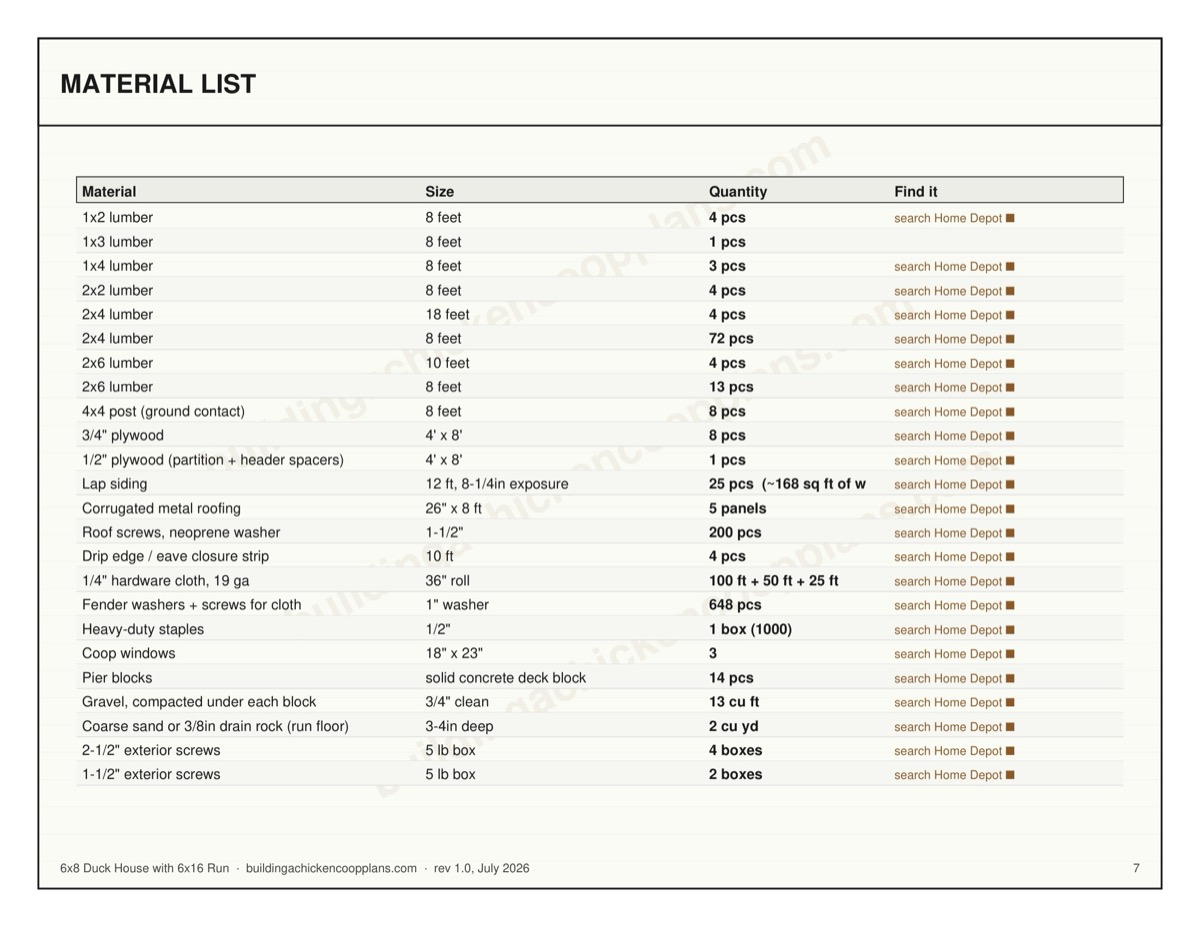
The complete bill of materials. Quantities carry no waste allowance — add two or three extra boards if you are new to framing.

Material Size Quantity
1x2 lumber 8 feet 4 pcs
1x3 lumber 8 feet 1 pcs
1x4 lumber 8 feet 3 pcs
2x2 lumber 8 feet 4 pcs
2x4 lumber 18 feet 4 pcs
2x4 lumber 8 feet 72 pcs
2x6 lumber 10 feet 4 pcs
2x6 lumber 8 feet 13 pcs
4x4 post (ground contact) 8 feet 8 pcs
3/4" plywood 4' x 8' 8 pcs
1/2" plywood (partition + header spacers) 4' x 8' 1 pcs
Lap siding 12 ft, 8-1/4in exposure 25 pcs (~168 sq ft of wall)
Corrugated metal roofing 26" x 8 ft 5 panels
Roof screws, neoprene washer 1-1/2" 200 pcs
Drip edge / eave closure strip 10 ft 4 pcs
1/4" hardware cloth, 19 ga 36" roll 100 ft + 50 ft + 25 ft (162 ft needed)
Fender washers + screws for cloth 1" washer 648 pcs
Heavy-duty staples 1/2" 1 box (1000)
Coop windows 18" x 23" 3
Pier blocks solid concrete deck block 14 pcs
Gravel, compacted under each block 3/4" clean 13 cu ft
Coarse sand or 3/8in drain rock (run floor) 3-4in deep 2 cu yd
2-1/2" exterior screws 5 lb box 4 boxes
1-1/2" exterior screws 5 lb box 2 boxes
4" structural screws 24 pcs
3/8" x 4" lag bolts (run to coop) 8 pcs
Siding nails or screws 5 lb box 2 boxes
Exterior caulk 10 oz tube 3 tubes
Exterior primer + paint 1 gal each 1 + 1
Hinges 11 (5 openable parts, buy in pairs)
Two-action latches 5
Sheet vinyl or EPDM pond liner 88" x 112" 1 pc (one piece — turned 8" up every wall)
Mineral-surface roll roofing (ramp surfacing) 36in x 36 ft roll 1 roll (9 sq ft of ramp; rubber stair tread or sanded porch paint also work)
Rubber or heavy canvas (nest entry curtains) 10" x 14" 4 pcs (darkness is what the box is for)
Large-flake pine shavings or chopped straw compressed bale 1 to fill + ~2/month (3.4 kg/week for 8 ducks) — NEVER cedar
3/8" drain rock (drip-zone pit) 6in deep 2 cu ft (under the 24" slat platform)

Nominal vs actual: the list uses nominal sizes (2×4), the drawings use finished sizes (1-1/2" × 3-1/2"). Check your own stock before cutting.

Floor Framing

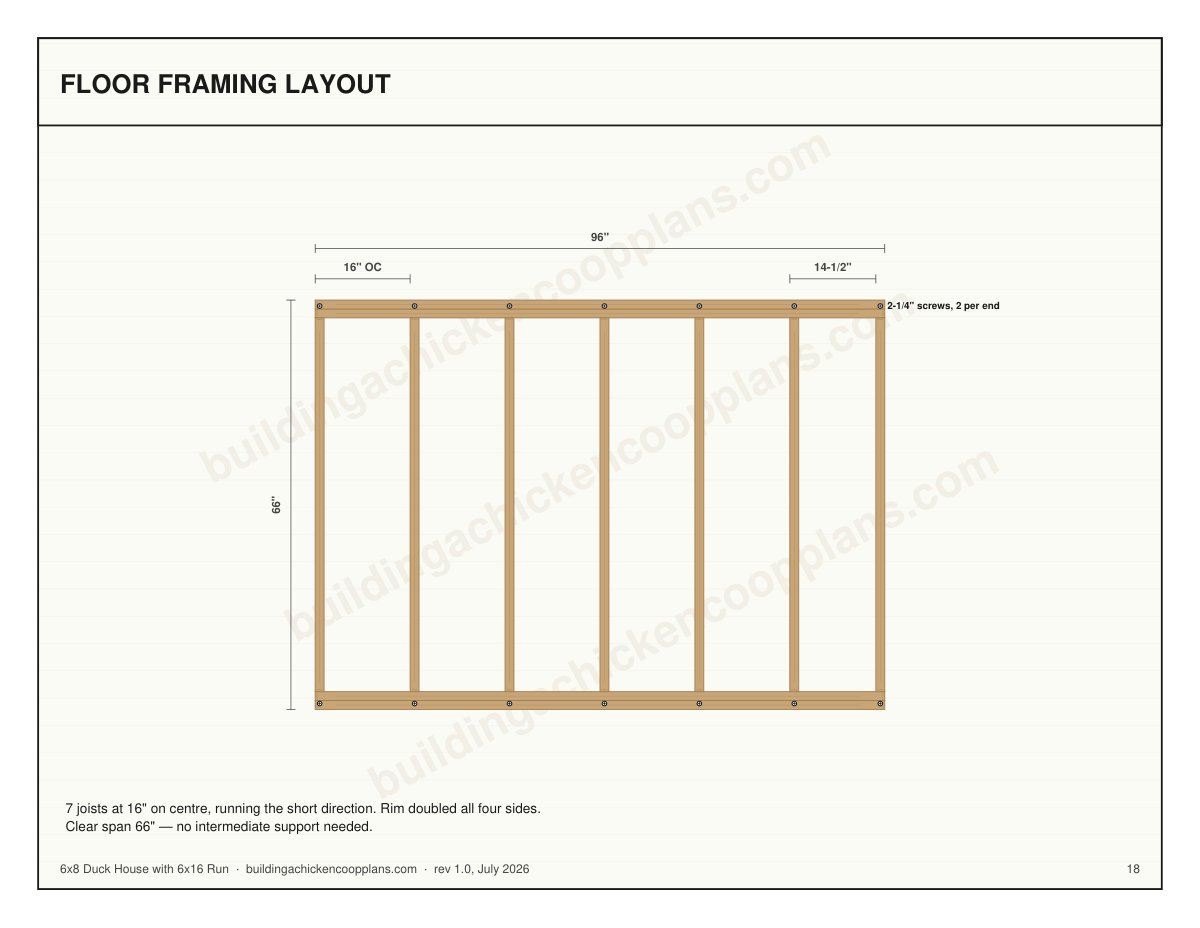
7 joists at 16" on centre running the short direction, rim doubled on all four sides, 66" clear span — comfortably inside the published span tables, so no intermediate support is needed. True 16" spacing means plywood seams land on framing.

6x8 Duck House with 6x16 Run floor framing layout

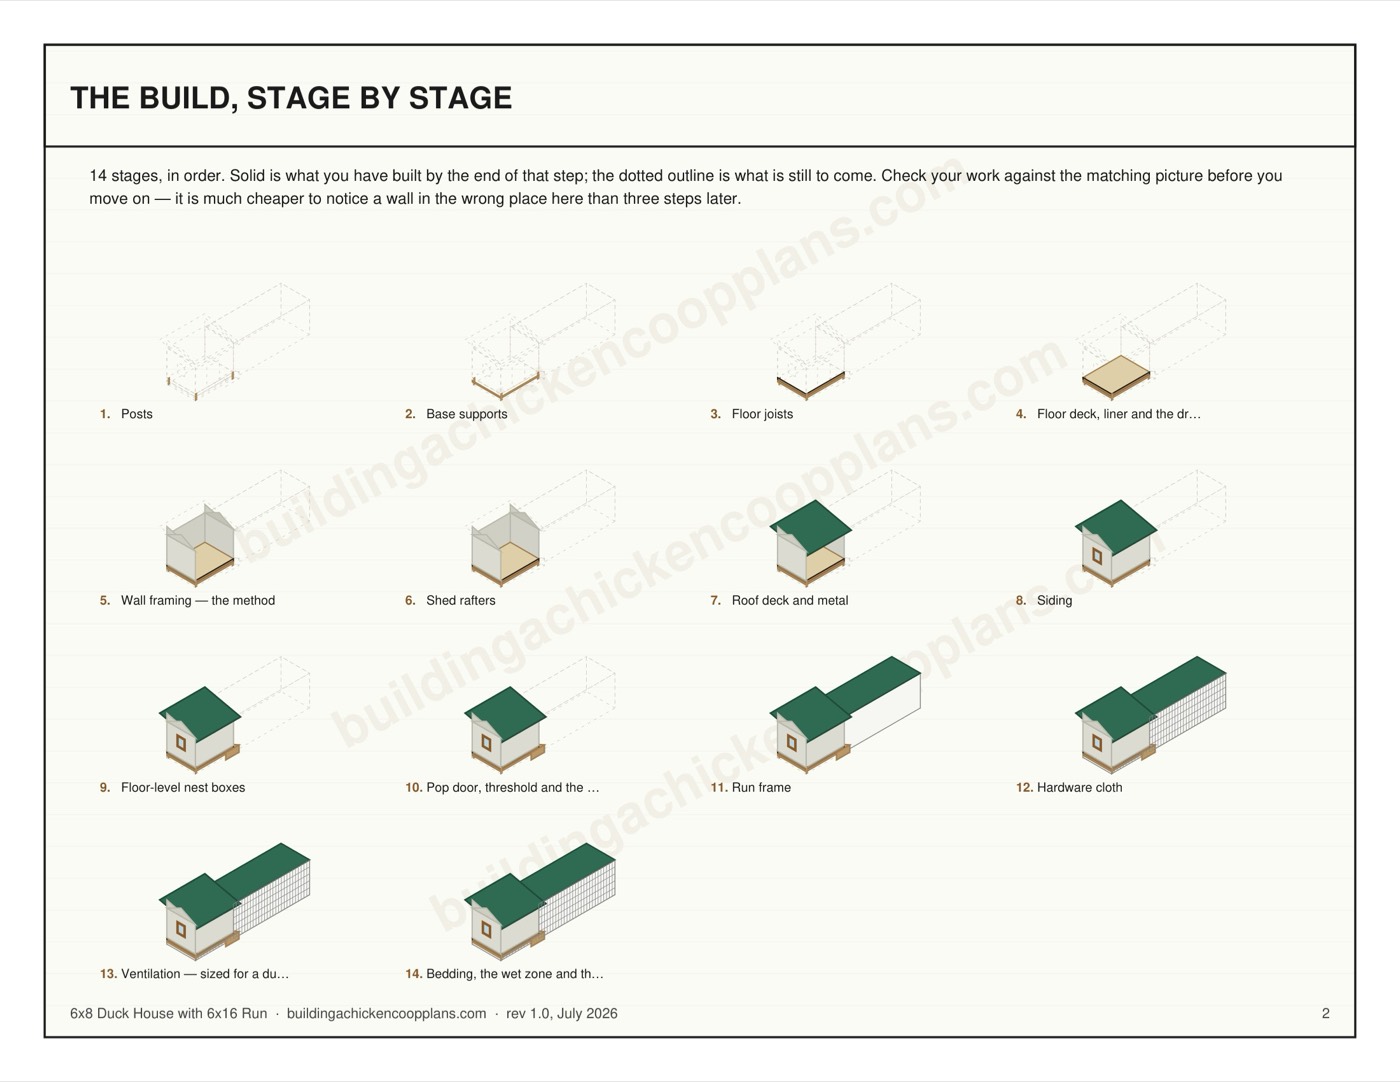
The 19 Assembly Steps

Every cut length below is computed from the same geometry that draws the PDF, so the numbers on this page and the numbers in the plan set cannot disagree.

1

Posts

Four 4x4 posts cut to 78-3/4" carry the structure from grade to the top plate. Setting the floor 8" up keeps the frame out of ground moisture and hands the flock the shaded space underneath.

Part Qty Length Stock Note
Post A 4 78-3/4" 4x4
2

Base supports

The base ring ties the four posts into a rigid square at grade. Use the 4-inch screws here — this joint carries the racking load for the life of the coop.

Part Qty Length Stock Note
Base support A (front/back) 2 65" 4x4
Base support B (sides) 2 89" 4x4
Base blocking 8 20-1/2" 2x4
3

Floor joists

Joists sit 8" above grade on 16" centres, running the short direction across 66" in 2x6, with the rim doubled on all four sides. At 66" the 2x6 joists span well inside the 8 ft 4 in that AWC DCA6 Table 2 allows at 16-inch centres, so no intermediate girder is needed. Crown every joist up before you fasten it. Where the datum is. Every height in this set is measured from the TOP OF THE PIER BLOCK — the surface the posts actually stand on, not the soil. Set the blocks first, level them to each other with a string line, and treat that plane as zero. If the blocks sit 4in proud of the dirt the finished coop is 4in taller than the numbers here, which is fine; measuring one post from the block and the next from the ground is not. Fixing the floor frame to the posts. This is the joint everything above stands on and it is the one most plans leave to guesswork. Build the rim rectangle first, square it to the diagonals, then drop it over the four posts so the rim sits ON the base ring and CLOSES the outside face of each post. Fasten each corner with two 4in structural screws driven through the rim into the post, one 1-1/2in down from the top of the rim and one 1-1/2in up from the bottom, offset from each other so they are not in the same grain line. Eight screws in total, four corners. Predrill — a 4in screw close to the end of a 2x6 will split it otherwise.

Part Qty Length Stock Note
Rim joist (long sides) 4 96" 2x6 doubled
Floor joist 7 66" 2x6 16" OC, last bay short
4

Floor deck, liner and the drip zone

Deck the floor in 3/4" plywood, notched 3-1/2" square at each corner so it drops cleanly around the posts. Fasten with 1-1/2 inch screws every 8 inches on the joists. Now the part that makes this a duck house. A duck drinks by dabbling and carries water out of the drinker on its bill and off its feathers all day. Measured against nipple drinkers, an open trough puts roughly 400 ml per duck per day into the bedding on top of what the bird actually swallows — for 8 ducks that is about 22 litres of water landing on this floor every week. Bare plywood under wet litter delaminates from the top down and you will be cutting it out inside three years. Do NOT slope this floor. It is the intuitive fix and it is the wrong one. The Swiss federal guidance is explicit that a walkable floor area has no slope, and the reason is that a duck LIES on this floor: tilt it and the litter migrates downhill into a wet heap at one end, and you have taken away the level, dry lying surface that is the whole point of the bedding. Lay this deck flat and check it flat. Seal it instead. Sheet vinyl or pond liner, in ONE piece if you can buy it that wide, taken 8" up the wall and fastened above the litter line rather than cut off at the floor. A seam at the wall-floor corner is the one place standing water always finds, so the liner turning up the wall is not a nicety — it is the whole point. Bed it in construction adhesive and roll it flat; a bubble is somewhere water gets under. And then drain LOCALLY. Water does not arrive evenly across this floor — almost all of it arrives under the drinker. So that is the only place that gets drainage: a slatted platform 24" square standing over a gravel pit, which step 14 builds. Five separate authorities — Cornell, the Swiss BLV, NCSU, the Michigan/Wisconsin extension bulletin and Chen's 2021 review — say a duck drinker must stand on slats or wire over drainage and not on litter. It is the most consistently attested feature in the whole duck-housing literature and almost no published plan draws it. Cap the slats at a quarter of the floor. This design keeps litter over 89% of the deck. Do not be tempted to slat the whole thing: on fully slatted floors ducks show skin irritation and slipping, and feather pecking rises — and falls again as litter replaces the slats. A duck's footpad skin is measurably softer and thinner than a chicken's.

Part Qty Length Stock Note
Floor panel 1 72" x 96" 3/4" plywood notch corners
Floor liner 1 88" x 112" sheet vinyl or EPDM one piece, turned 8" up every wall
Liner batten 4 cut to fit 1x2 traps the liner ABOVE the litter line, all four walls
5

Wall framing — the method

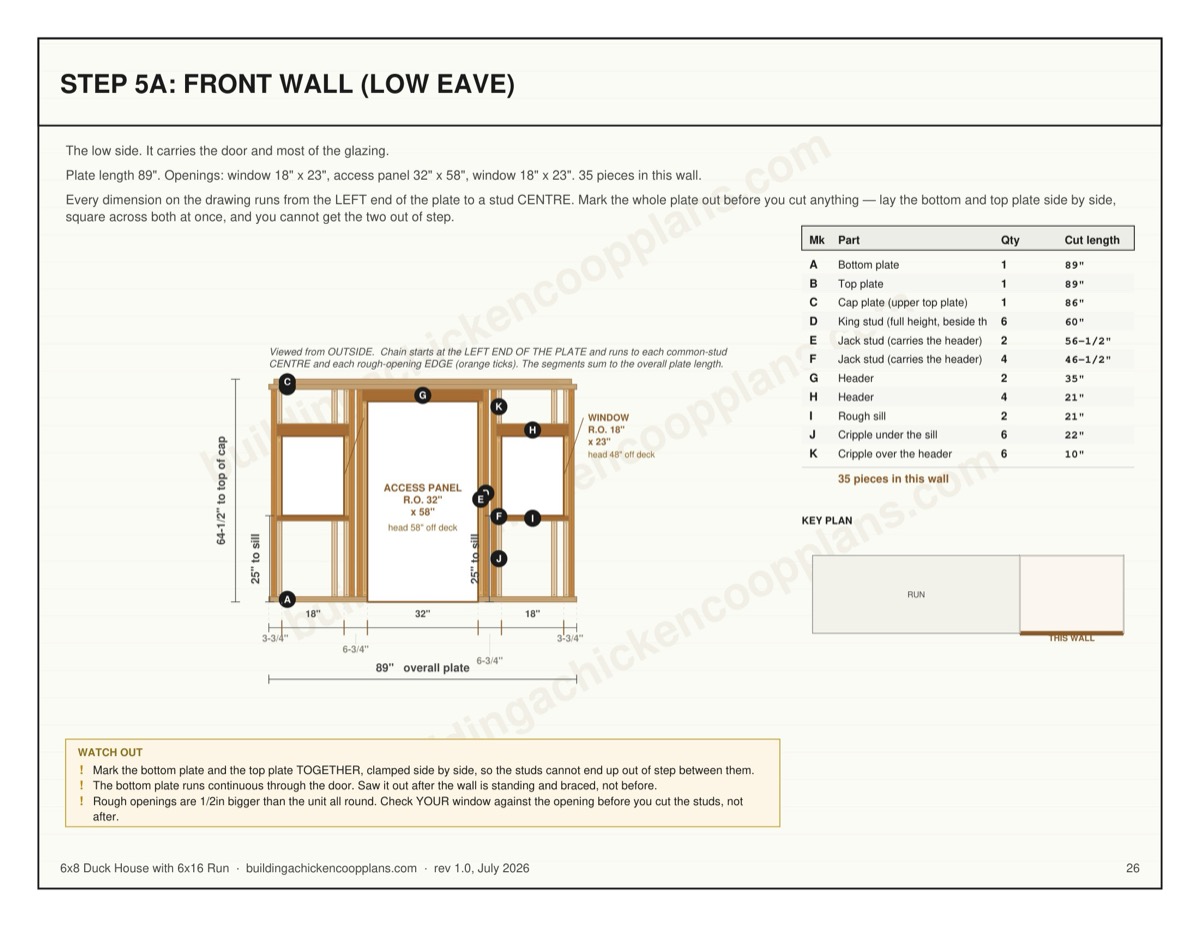
Every wall is framed FLAT ON THE DECK and then stood up. That is the whole trick: you are working on a level surface, gravity holds the parts where you put them, and you can push the frame square before a single screw goes in. Studs run 16" on centre so 4-foot sheet goods break on a stud. Build order matters. Front wall, back wall, then the two end walls. The long walls go up first and get braced to the deck; the end walls then drop between them and lock the box square. If you stand a short wall first it has nothing to brace against. Every wall gets three plates: a bottom plate, a top plate, and a cap plate over the top. The cap plate is not a second top plate for strength — it is there to LAP the corner. Hold the long walls' cap plate back 1-1/2" at BOTH ends, and run the end walls' cap 1-1/2" long at BOTH ends. On this coop that is a 86" cap on a 89" long wall and a 68" cap on an 65" end wall. The end-wall caps then run over the long-wall caps at all four corners and tie the walls into one ring. A butt joint at every corner is a box that racks. Cut the bottom plate CONTINUOUS through every door opening. Frame it, stand it, brace it, and only then saw the plate out of the doorway with a handsaw. It is what keeps the wall square while you move it.

5a

Front wall (low eave)

The low side. It carries the door and most of the glazing. Plate length 89". Openings: window 18" x 23", access panel 32" x 58", window 18" x 23". 35 pieces in this wall. Every dimension on the drawing runs from the LEFT end of the plate to a stud CENTRE. Mark the whole plate out before you cut anything — lay the bottom and top plate side by side, square across both at once, and you cannot get the two out of step.

Part Qty Length Stock Note
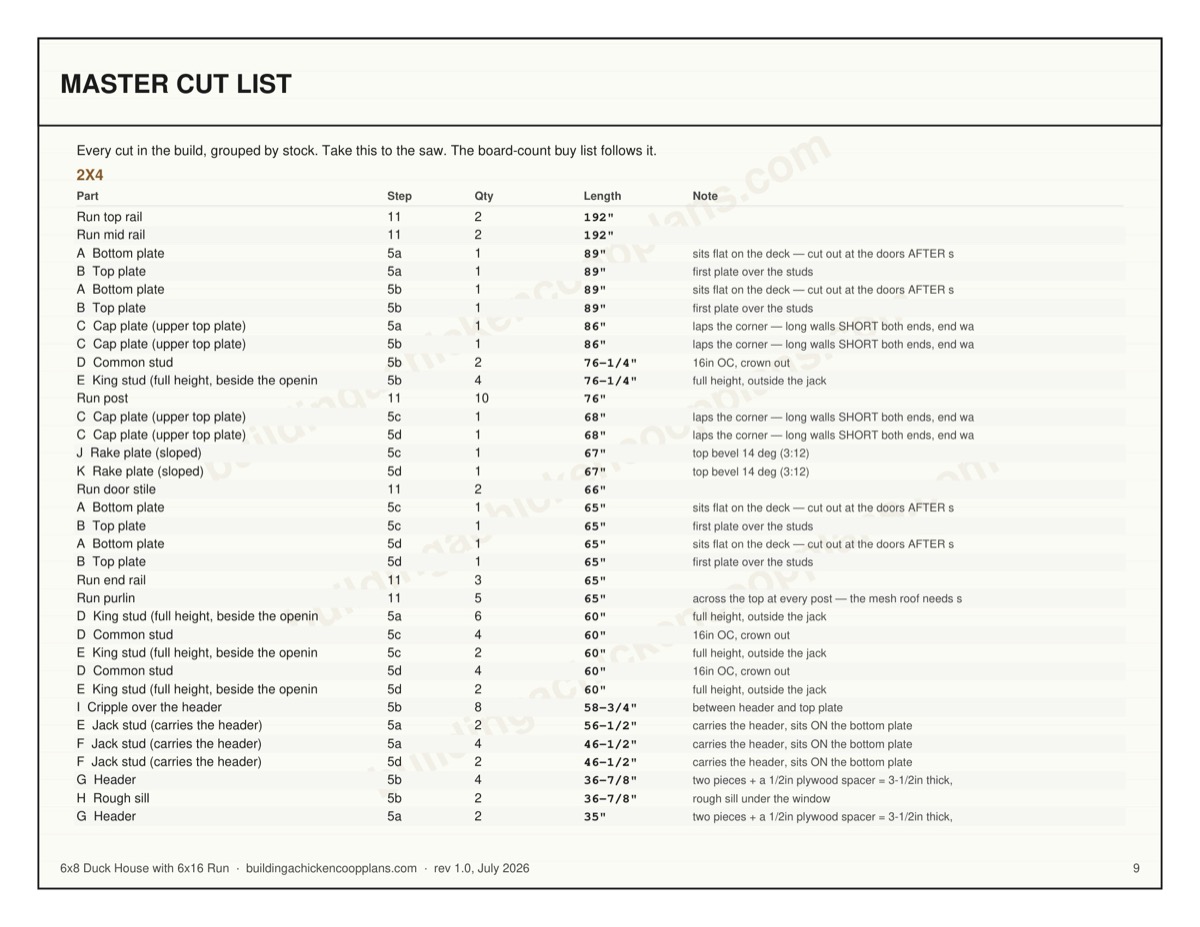
A Bottom plate 1 89" 2x4 sits flat on the deck — cut out at the doors AFTER standing
B Top plate 1 89" 2x4 first plate over the studs
C Cap plate (upper top plate) 1 86" 2x4 laps the corner — long walls SHORT both ends, end walls LONG both ends
D King stud (full height, beside the opening) 6 60" 2x4 full height, outside the jack
E Jack stud (carries the header) 2 56-1/2" 2x4 carries the header, sits ON the bottom plate
F Jack stud (carries the header) 4 46-1/2" 2x4 carries the header, sits ON the bottom plate
G Header 2 35" 2x4 two pieces + a 1/2in plywood spacer = 3-1/2in thick, flush both faces
H Header 4 21" 2x4 two pieces + a 1/2in plywood spacer = 3-1/2in thick, flush both faces
I Rough sill 2 21" 2x4 rough sill under the window
J Cripple under the sill 6 22" 2x4 between bottom plate and rough sill
K Cripple over the header 6 10" 2x4 between header and top plate
5b

Back wall (high eave)

The HIGH side — its studs are longer than the front wall's by the full rise of the roof. The nest bank hangs outside it and the vent strip runs along the top, so keep the top bay clear. Plate length 89". Openings: egg hatch 1 33-7/8" x 14", egg hatch 2 33-7/8" x 14". 27 pieces in this wall. Every dimension on the drawing runs from the LEFT end of the plate to a stud CENTRE. Mark the whole plate out before you cut anything — lay the bottom and top plate side by side, square across both at once, and you cannot get the two out of step.

Part Qty Length Stock Note
A Bottom plate 1 89" 2x4 sits flat on the deck — cut out at the doors AFTER standing
B Top plate 1 89" 2x4 first plate over the studs
C Cap plate (upper top plate) 1 86" 2x4 laps the corner — long walls SHORT both ends, end walls LONG both ends
D Common stud 2 76-1/4" 2x4 16in OC, crown out
E King stud (full height, beside the opening) 4 76-1/4" 2x4 full height, outside the jack
F Jack stud (carries the header) 4 14" 2x4 carries the header, sits ON the bottom plate
G Header 4 36-7/8" 2x4 two pieces + a 1/2in plywood spacer = 3-1/2in thick, flush both faces
H Rough sill 2 36-7/8" 2x4 rough sill under the window
I Cripple over the header 8 58-3/4" 2x4 between header and top plate
5c

Left end wall (run end)

The run attaches to this wall and the pop door passes through it. Seen from outside, the roof runs DOWNHILL left to right. Plate length 65". Openings: pop door 20" x 20". 22 pieces in this wall. Every dimension on the drawing runs from the LEFT end of the plate to a stud CENTRE. Mark the whole plate out before you cut anything — lay the bottom and top plate side by side, square across both at once, and you cannot get the two out of step.

Part Qty Length Stock Note
A Bottom plate 1 65" 2x4 sits flat on the deck — cut out at the doors AFTER standing
B Top plate 1 65" 2x4 first plate over the studs
C Cap plate (upper top plate) 1 68" 2x4 laps the corner — long walls SHORT both ends, end walls LONG both ends
D Common stud 4 60" 2x4 16in OC, crown out
E King stud (full height, beside the opening) 2 60" 2x4 full height, outside the jack
F Jack stud (carries the header) 2 22-1/2" 2x4 carries the header, sits ON the bottom plate
G Header 2 23" 2x4 two pieces + a 1/2in plywood spacer = 3-1/2in thick, flush both faces
H Rough sill 1 23" 2x4 rough sill under the window
I Cripple over the header 3 34" 2x4 between header and top plate
J Rake plate (sloped) 1 67" 2x4 top bevel 14 deg (3:12)
K Rake stud (sloped top wall) 1 16-1/16" 2x4 top bevel 14 deg (3:12)
L Rake stud (sloped top wall) 1 12-1/16" 2x4 top bevel 14 deg (3:12)
M Rake stud (sloped top wall) 1 8-1/16" 2x4 top bevel 14 deg (3:12)
N Rake stud (sloped top wall) 1 4-1/16" 2x4 top bevel 14 deg (3:12)
5d

Right end wall

Fixed wall with a window. This wall MIRRORS the left end: seen from outside, the roof runs UPHILL left to right. Plate length 65". Openings: window 18" x 23". 25 pieces in this wall. Every dimension on the drawing runs from the LEFT end of the plate to a stud CENTRE. Mark the whole plate out before you cut anything — lay the bottom and top plate side by side, square across both at once, and you cannot get the two out of step.

Part Qty Length Stock Note
A Bottom plate 1 65" 2x4 sits flat on the deck — cut out at the doors AFTER standing
B Top plate 1 65" 2x4 first plate over the studs
C Cap plate (upper top plate) 1 68" 2x4 laps the corner — long walls SHORT both ends, end walls LONG both ends
D Common stud 4 60" 2x4 16in OC, crown out
E King stud (full height, beside the opening) 2 60" 2x4 full height, outside the jack
F Jack stud (carries the header) 2 46-1/2" 2x4 carries the header, sits ON the bottom plate
G Header 2 21" 2x4 two pieces + a 1/2in plywood spacer = 3-1/2in thick, flush both faces
H Rough sill 1 21" 2x4 rough sill under the window
I Cripple under the sill 3 22" 2x4 between bottom plate and rough sill
J Cripple over the header 3 10" 2x4 between header and top plate
K Rake plate (sloped) 1 67" 2x4 top bevel 14 deg (3:12)
L Rake stud (sloped top wall) 1 16-1/16" 2x4 top bevel 14 deg (3:12)
M Rake stud (sloped top wall) 1 12-3/16" 2x4 top bevel 14 deg (3:12)
N Rake stud (sloped top wall) 1 8-3/16" 2x4 top bevel 14 deg (3:12)
O Rake stud (sloped top wall) 1 4-3/16" 2x4 top bevel 14 deg (3:12)
6

Shed rafters

A single-slope shed roof at 3:12 — 18" of fall across the 72" width, which is the minimum pitch exposed-fastener corrugated metal will shed reliably. There is no ridge and no opposing rafter pair, so there is no outward thrust and no rafter tie is required — the load lands straight down on the two side walls. That is the quiet advantage of a shed roof over a gable, and it is why this is the simplest roof in our line to frame. Rafters are 2x6 rather than 2x4: a shed rafter spans the full 72" in one piece, which puts a 2x4 right at its limit under a 30 psf snow load.

Part Qty Length Stock Note
Shed rafter 5 83-3/16" 2x6 birdsmouth both ends, 9" tail
Rafter blocking 8 22-1/2" 2x6 between rafters — a row at the LOW wall and a row at the HIGH wall
7

Roof deck and metal

3/4" plywood over the rafters, then corrugated metal sheets. Metal over shingles because it sheds snow, lasts decades and never needs a tear-off. Lap the sheets one full corrugation.

Part Qty Length Stock Note
Roof deck panel 3 4' x 8' sheet 3/4" plywood lay the 8-ft dimension UP the slope; seams land on a rafter
Metal roof panel 5 8 ft x 26" corrugated steel 26in wide, 24in coverage; one piece eave to ridge, no lap partway up
8a

Siding

Lap siding in 9-foot courses, starting from a level chalk line at the bottom and working up. Each course laps the one below by 1 inch. Leave the window and door openings proud and trim after.

Part Qty Length Stock Note
Lap siding board 65 9 ft 9 ft lap siding 5in wide, ~1in lap
8b

Doors, hatches and lids

Every opening you framed in step 5 now gets something to close it. Cut each slab a quarter inch smaller than its rough opening on all four sides — 3/4in plywood swells in the wet and a door cut to the exact opening size will bind by November. Then close that gap with a stop. A quarter inch is the clearance the door needs and it is also, exactly, the gap this plan tells you a least weasel fits through. Run a 1x2 stop around the inside of every door opening so the slab closes against it and the gap is blocked, not open. On the pop door, staple a strip of hardware cloth behind the stop as well. Access panel on the front wall (low eave): slab 31-1/2" x 57-1/2" in a 32" x 58" opening — a 1/4in gap all round. 3 hinges, out, hinged on the left as you face it from outside. Pop door on the left end wall (run end): slab 19-1/2" x 19-1/2" in a 20" x 20" opening — a 1/4in gap all round. 2 hinges, out, hinged on the left as you face it from outside. Every plywood door over 30in tall gets a Z-brace on the back: a rail top and bottom and one diagonal running from the bottom hinge corner up to the top latch corner. That diagonal is in compression and it is the only thing stopping the door sagging into a parallelogram. Run it the wrong way and it does nothing. Hinge side and swing. All doors here swing OUT, hinged on the left as you face them from outside. Out, because a door that opens inward sweeps the bedding and gets blocked by it; left, so every latch on the coop is in the same place and you are not hunting for it in the dark with an armful of feed.

Part Qty Length Stock Note
Access panel slab 1 31-1/2" x 57-1/2" 3/4" plywood 3 hinges, opens out
Access panel batten rail 2 30" 1x4 top and bottom, 1in in from each edge
Access panel batten diagonal 1 55-3/4" 1x4 BOTTOM HINGE corner up to TOP LATCH corner; mitre both ends to suit
Pop door slab 1 19-1/2" x 19-1/2" 3/4" plywood 2 hinges, opens out
9

Floor-level nest boxes

4 box(es), 16" x 16" x 16" internal, standing ON THE DECK against the back wall. Not on the wall — on the floor. This is the biggest single difference between this plan and a chicken coop, and most duck plans get it wrong even when their own text says ducks bed down on the ground. Swiss animal-welfare law requires duck laying nests to be on the floor, and EFSA's 2023 panel says the same. A box 16 inches up a wall is furniture: the ducks ignore it and lay in the litter, and you collect dirty eggs off the floor for the life of the building. The box is a 16" cube, not the 12 x 14 inches every duck plan repeats. That 12 x 14 traces to a single Ontario agriculture pamphlet from 1964, restated in 1975 and again in 2007. The size ducks actually chose in a controlled trial is 40 centimetres square, which is what this is. IT MUST HAVE AN OPAQUE TOP. Three closed sides, a solid lid, and a curtain over the entry. This is not styling. In the published work, ducks laid twice as many eggs as chance in a box built this way — and used a box with no top only HALF as often as chance. An open-topped nest is worse than no nest at all, because it takes up floor the birds would otherwise lie on. A 10" entry, and no perch in front of it. The perch a chicken nest gets is for a bird that flies up to the entrance. Here it is something to trip over. Bed the box in loose SAWDUST, 6" of it, topped up late in the day. Substrate was tested directly: ducks preferred sawdust over hemp fibre, and both over artificial turf — and six of twelve pushed a door loaded to 120% of their own bodyweight to reach the substrate they wanted. In the birds that completed the full workload, 96% of eggs went to the preferred substrate. Note what that rules out: a rubber mat or an artificial nest pad is the LEAST preferred option tested, even though some standards permit one. Use loose litter a duck can shape. Leave one egg in the box overnight, or use a dummy. Ducks lay where ducks have laid: in the trial, leaving the previous day's egg in place put 97.6% of eggs in that box. It is the largest single effect anywhere in the duck nesting literature and it costs nothing. One box per 2 ducks, which is more generous than the standards ask, and the reason is a real experiment. Run at four ducks per box, floor-laying hit 84%. Run at one duck per box it fell to 44%. Box DESIGN made no measurable difference in the same trial — the RATIO did. Certified Humane permits one box per five ducks; at that ratio you would be collecting most of your eggs off the litter. Expect about 20% of eggs on the floor anyway, more in the first weeks of lay. That is what the field data show with good boxes and enough of them, and a plan that promises you 100% box-laying is lying to you. If it stays high, add a box before you change anything else. Shut them in from dusk until about 9 a.m. This is the best-evidenced operating rule in the whole of duck keeping. Ducks lay very early: in the one published timing study, oviposition happened 7 to 9 hours after the previous evening's darkness fell, and 97% of eggs were down by 7 a.m. Two independent extension services say the same thing in plainer words — most duck eggs are laid before 7, and 95-98% by 9. The anchor is DARKNESS, not the clock. The study tied laying to hours after dark onset, so under natural light the window moves through the year with your actual sunset. If you let them out at first light in June you will be hunting eggs in the run; keep them in until mid-morning and they are in the box. The eggs come out through the back wall. The 2 hatch(es) framed in step 5b, 33-7/8" each, sit at 1-1/2" — the top of the bottom plate, the lowest an opening can start without cutting the plate the wall stands on. Reaching in from outside at floor level means you never walk across a wet floor to collect.

Part Qty Length Stock Note
Nest box side 5 16" x 16" 3/4" plywood
Nest box back 1 67-3/4" x 16" 3/4" plywood screws to the wall studs — the only fixing, so it pulls out to clean
Nest box TOP 1 67-3/4" x 16" 3/4" plywood OPAQUE, and not optional — a topless box is used half as often as chance
Nest box front 1 67-3/4" x 16" 3/4" plywood 10" entry cut per box, sill on the deck
Nest entry curtain 4 10" x 14" rubber or heavy canvas hung over each entry — darkness is what the box is for
Egg hatch slab 2 33-3/8" x 13-1/2" 3/4" plywood hinged at the top, two-action latch
10

Pop door, threshold and the duck ramp

The pop-door slab was already cut to fit the opening you framed in step 5c — do not cut another one. This step hangs it, sets the threshold and builds the ramp. The doorway is 20" wide, not 12. Ducks move as a flock and crowd an opening; a narrow door is where that becomes birds treading on each other. Width buys more than height here — this is a bird that lowers its head, not one that hops. The threshold is 4" and no more. It is there to stop bedding walking out of the doorway, and that is all it is there for. Any higher and you have built a step, which is the thing this plan is trying not to make them climb. NOW READ THIS BEFORE YOU CUT THE RAMP. The best advice on duck housing says a duck coop should not have a ramp entry at all, and that this matters most in climates that ice. A wet ramp in freezing weather is the most dangerous surface on the whole building for a bird that cannot grip. If your site lets you set this house on a level, well-drained pad so the doorway is a step-over rather than a climb, do that instead and skip the ramp entirely. The floor is deliberately set low to make that possible. If you do build it, 14 degrees is the pitch and it is not negotiable by eye. Two welfare standards give a duck ramp angle and they disagree: Certified Humane's auditable manual says a maximum of 15 degrees, the RSPCA's advisory note says 20. Neither is measured — no duck has ever been put on a variable-angle ramp in a published study, and the RSPCA's own justification document gives no basis for its figure at all. This plan builds to the tighter of the two, because when two unmeasured numbers disagree the cheap one to be wrong about is the shallow one. A ramp is MANDATORY, not optional, once the step is over 2 inches — that trigger is auditable even though the angle is not. If you are raising it — and on wet ground you should — the ramp is what that costs. Measure the drop on site: it runs from the threshold, 18-1/4" above grade, down to the FINISHED run surface, which is the sand you placed in step 11 and not bare ground. On a level site that is 15-1/4" of drop and about 62-7/8" of ramp, but cut it to what you measure. It is 20" wide — the full width of the doorway, because that is what the standard requires and because they will go up two abreast whether it is wide enough or not. The traction is the SURFACE, not cleats — and there is evidence for that, not just an opinion about webbed feet. The one experiment that put rungs up against a continuous grip surface did it with birds that CAN grip, and the rungs still lost badly: 37% success going up versus 58%, more than half the birds refusing to attempt the ladder at all against 13%, and 71% of them jumping off rather than walk back down — against none on the continuous surface. The authors recommended against rung ramps for a gripping bird. Applying rung geometry to a foot that cannot grip has nothing behind it at all. So cover the whole ramp: mineral-surface roll roofing bedded in adhesive, or outdoor rubber stair tread, or porch paint with sand broadcast into it while wet and a second coat over the top. Whatever you use must be continuous. The 5 battens below are NOT treads — they sit at 12" centres, far enough apart that a duck's stride lands between them, and they exist only to stop a wet bird sliding the last few inches. Leave a level landing at the top, about 39-3/8" of flat before the doorway, so a bird is not stepping from a slope straight over a threshold. Side rails both edges. 4" high, full length. Ducks walk off the side of a ramp; this is not optional and it is why the plan does not tell you to make the ramp narrower to save plywood.

Part Qty Length Stock Note
Ramp deck 1 62-7/8" x 20" 3/4" plywood trim to your measured drop
Ramp side rail 2 62-7/8" 1x4 4" above the deck, full length, both edges
Ramp batten 5 20" 1x2 12" OC — a stride apart, NOT a tread
Ramp surfacing 1 62-7/8" x 20" mineral-surface roll roofing or rubber stair tread, or sanded porch paint — continuous, no bare plywood
11

Run frame

The 6 ft x 16 ft screened run frames off the coop wall, 76" tall. 5 posts a side on roughly 4-foot centres, with a top rail and a mid rail so the hardware cloth has something to fasten to at every course. The mid rail goes at 32 inches, not higher — the cloth comes off a 36-inch roll, so a course run up from the ground reaches 36 inches and has to land ON a rail with a lap to spare. Set the run posts the same way you set the coop posts in step 1 — on the same pier blocks, at the same height, checked with the same string line. A run on a different footing system than the coop it hangs off will move against it and open a gap at the joint, which is exactly where a predator starts. Fixing the run to the coop: the two run rails that meet the coop are lag-bolted into the corner posts of the run-end wall, not screwed into siding. Two 3/8in x 4in lag bolts per rail, drilled with a 1/4in pilot, one 3in above the rail's bottom edge and one 3in below its top. Siding is a skin; it holds nothing. The run door is 33" wide — two 2x4 stiles plus 26" rails between them. Hang it in the end bay furthest from the coop so you are not squeezing past the ramp with a bucket. Purlins across the top at every post. A quarter-inch mesh roof spanning eight feet unsupported sags into a hammock and a raccoon can bear it down far enough to get a leg through. The purlins are what the roof mesh fastens to. Get the water out before you put the birds in. A run that ponds turns into mud, mud turns into the coccidiosis and bumblefoot problems that cost people their flock, and no amount of hardware cloth fixes it. Three things, in order of how much they matter: grade the run to fall away from the coop — an inch of drop for every eight feet is enough and it costs you nothing but a rake; keep the run surface above the surrounding grade, not level with it, so it sheds instead of collects; and top it with 3 to 4 inches of coarse sand or 3/8in drain rock, not topsoil and not straw. Coarse sand drains, dries fast and can be raked clean like a litter box. Do this before the apron goes in — you cannot regrade under a buried mesh skirt.

Part Qty Length Stock Note
Run post 10 76" 2x4
Run top rail 2 192" 2x4
Run mid rail 2 192" 2x4
Run end rail 3 65" 2x4
Run purlin 5 65" 2x4 across the top at every post — the mesh roof needs something to span to
Run brace 4 33" 2x4 45 deg corner braces, 33in on the long points
Run door stile 2 66" 2x4
Run door rail 3 26" 2x4 finished door 33" wide
12

Hardware cloth

The step that decides whether you still have a flock in two years. Quarter-inch hardware cloth over every opening, screwed through fender washers rather than only stapled. Quarter-inch, not half-inch. A least weasel squeezes through a half-inch opening; quarter-inch mesh stops it. That is the whole reason for the spec (Univ. of Kentucky Extension ID-245), and half-inch mesh — while genuinely raccoon-proof — does not stop weasels, mink or snakes. Chicken wire stops nothing: a raccoon reaches straight through the hexagonal gaps. Bury a 12-inch apron down and out around the whole run perimeter, turned outward at the bottom into an L. Sources for both numbers: Univ. of Kentucky Cooperative Extension ID-245 and Virginia Cooperative Extension 2902-1092. The windows get cloth too. An open 18 x 23 window is a hole a raccoon walks through, and it is the ventilation you rely on in summer, so it has to stay open at night. Staple a panel of cloth to the INSIDE of every window opening before the unit goes in — behind the glazing, not over it, so the window still shuts on a clean frame. Same for the continuous vent strip along the top of the back wall and the nest-bank opening.

Part Qty Length Stock Note
Run walls 1 81 lin ft 1/4" hardware cloth
Run roof 1 32 lin ft 1/4" hardware cloth
Buried apron, 12in down and 12in out 1 30 lin ft 1/4" hardware cloth
Window screens 1 5 lin ft 1/4" hardware cloth
Continuous eave vent strip 1 3 lin ft 1/4" hardware cloth
Nest opening and pop-door surround 1 4 lin ft 1/4" hardware cloth
Under-floor skirt 1 7 lin ft 1/4" hardware cloth
13

Ventilation — sized for a duck, not a hen

A continuous vent strip 8" deep and 86" long under the high eave, hardware cloth over every inch of it, permanently open. Deeper than a chicken coop's, on purpose. A duck drinks by dabbling and carries water in on its feathers, so it puts far more moisture into the air of its house than a hen does. Moisture that does not leave condenses on the underside of the roof deck overnight and rains back down onto the litter, which is how a house with 'dry bedding' on Sunday is soaked by Wednesday with nobody having spilled anything. After the mesh takes its share this delivers about 64 square inches of free area per duck at the advertised flock. That is the number to hold onto if you change the size of this building — the strip is not generous in itself, it is generous relative to the birds behind it. High, and on one side only. The strip is under the high eave, above the birds' heads. Air leaves there and comes in around the pop door. A vent at bird height in a winter wind is a draught, and a draught on a wet bird is worse than no vent at all — which is why this is a strip under the eave and not a window you are told to leave open. Never close it. Not in winter. The instinct to shut a duck house up tight when it gets cold is the wrong one here, and for a reason that is better evidenced than the usual advice. Ducks drink and excrete far more water than chickens do — their droppings are over 90% moisture — so a duck puts MORE load on ventilation in winter than a hen does, not less. A sealed house in January is a wet house by morning. A note on what this plan will not claim. You will read everywhere that ducks are far hardier in cold than chickens. No source we could find actually compares them, and the only sourced comparison that exists — the moisture load above — points the other way for HOUSING. What is sourced is that ducks are near-insensitive to heat and cold from about three weeks old, and comfortable down around 10-15 C once fully feathered. No lower critical temperature has ever been measured for any domestic duck breed, so nobody, including us, can honestly tell you the number at which a duck gets cold. Keep them dry and out of the wind and the question rarely arises.

Part Qty Length Stock Note
Vent strip blocking 2 86" 2x2 holds the cloth top and bottom
Vent cloth 1 86" x 12" 1/4" hardware cloth screwed through fender washers, not stapled
Vent trim 1 86" 1x3 closes the cloth edge
14

Bedding, the wet zone and the clean-out routine

This step is a running cost, not a build step, and it is the one that decides whether this house lasts. Every other page here is carpentry you do once. Fill the floor to 4" — large-flake pine shavings, or chopped straw, never cedar. For this size that is about 7 kg, roughly 1 compressed bale(s), at the sourced set-up rate of 2 kg per square metre. Then budget about 3.4 kg a week for 8 ducks — call it 2 bale(s) a month. That figure comes from the only quantified litter-usage number published anywhere for ducks, and it is the honest difference between keeping ducks and keeping chickens in the same building. No duck plan on the market prints it. If it looks high, it is not. Here is why. Measured against nipple drinkers, an open trough puts roughly 400 ml per duck per day into the bedding beyond what the bird swallows. For your flock that is about 22 litres of water a week arriving on this floor, on top of droppings that are themselves over 90% moisture. Litter that stays wet is not bedding — it is a compost heap with birds standing in it, and for a duck the litter is the BED. Swiss welfare law treats it as the lying surface and requires every bird to be able to rest on it at once. Build the drip zone. A slatted platform 24" square over a gravel pit, and the drinker stands on it. Nothing else in this house gets slats. Five independent authorities say a duck drinker must not stand on litter, and this is the cheapest part of the whole build. Put the drinker OUTSIDE where you can. Not superstition — the sourced rule is that feeder and drinker sit at least 3 metres apart, because ducks carry feed to water to soak it and wreck both. Neither of these houses is 3 metres long. That single fact settles it: the feed goes inside, the water goes in the run. On whether water belongs inside overnight, the evidence genuinely conflicts and this plan will not pretend otherwise. Four instruments including binding EU law require drinking water at all times; experienced keepers take it out at night precisely to keep the floor dry. The resolution that satisfies both: a small drinker stays inside overnight, standing on the slats over the drip pit — and the BATHING water, which no standard requires overnight, comes out at dusk. A duck must be able to dip its whole head to clear its eyes and nostrils, so whatever you leave in must be deep enough for that: about 4" of water, not a chick fount. The clean-out. Take the caked litter out DAILY — by the door and around the drinker — stir the rest, and strip the whole floor every 7 days. That is a weekly job, not a monthly one, and it is the single biggest lifestyle difference between ducks and hens. What tells you it is wrong: ammonia you can smell at duck height, litter that packs instead of scattering when you kick it, or condensation on the roof deck in the morning. The first two mean more bedding or more often; the third means the vent is blocked.

Part Qty Length Stock Note
Bedding — initial fill 1 1 bale(s) large-flake pine shavings or chopped straw 7 kg to 4" — NEVER cedar
Drip-zone slat 8 24" 1x2 spaced 3/4in apart over the gravel pit — spill drains through
Drip-zone frame 4 24" 2x2 24" square, under the drinker and nowhere else
Drainage gravel 1 2 cu ft 3/8" drain rock pit under the slats, 6in deep

Frequently Asked Questions

Are these 6x8 duck house plans really free?

The 6-page preview PDF is a free download with no email required, and everything published on this page stays free — every dimension, the spec table, the complete material list and all 19 assembly steps with their cut tables. The complete 44-page plan book — every wall on its own sheet with its own cut table, a board-by-board cut plan and a material buy list — is $4.99 on Etsy.

How many ducks fit in the 6x8 duck house?

6-8 ducks. At 37 sq ft of floor, 6 birds get about 6 sq ft each, with 96 sq ft of screened run on top of that. The top of the range (8) assumes the birds spend their days outside rather than shut in.

What's in the full 44-page plan book?

Everything on this page — dimensioned plan and elevation drawings, the complete bill of materials (36 line items) and all 19 assembly steps with per-step cut tables — plus what a web page can't carry: every wall framed on its own sheet, a board-by-board cut plan, a buy list you can hand to the lumber yard, and stop-and-measure checkpoints at each stage. The free 6-page preview PDF shows the design overview and main dimensions. On-page specs are computed from the same geometry that draws the PDFs, so the numbers can never disagree.

Related Plans

Get the full 44-page plans — $4.99 on Etsy

Want a look first? Download the free 6-page preview PDF — no email required.

Different size? See all chicken coop plans, or check the size calculator first.