Chicken Coop Plans

Free 6-page preview · No email

4x6 Duck House Plans for 3-4 Ducks (Free PDF)

4x6 Duck House with 4x12 Run: 16 sq ft of coop and 48 sq ft of screened run for 3-4 ducks. Dimensioned drawings, a complete material list, and every cut length across 19 assembly steps. Beginner build, two weekends (16-24 hrs).

Every dimension, spec table and cut list below is free on this page.

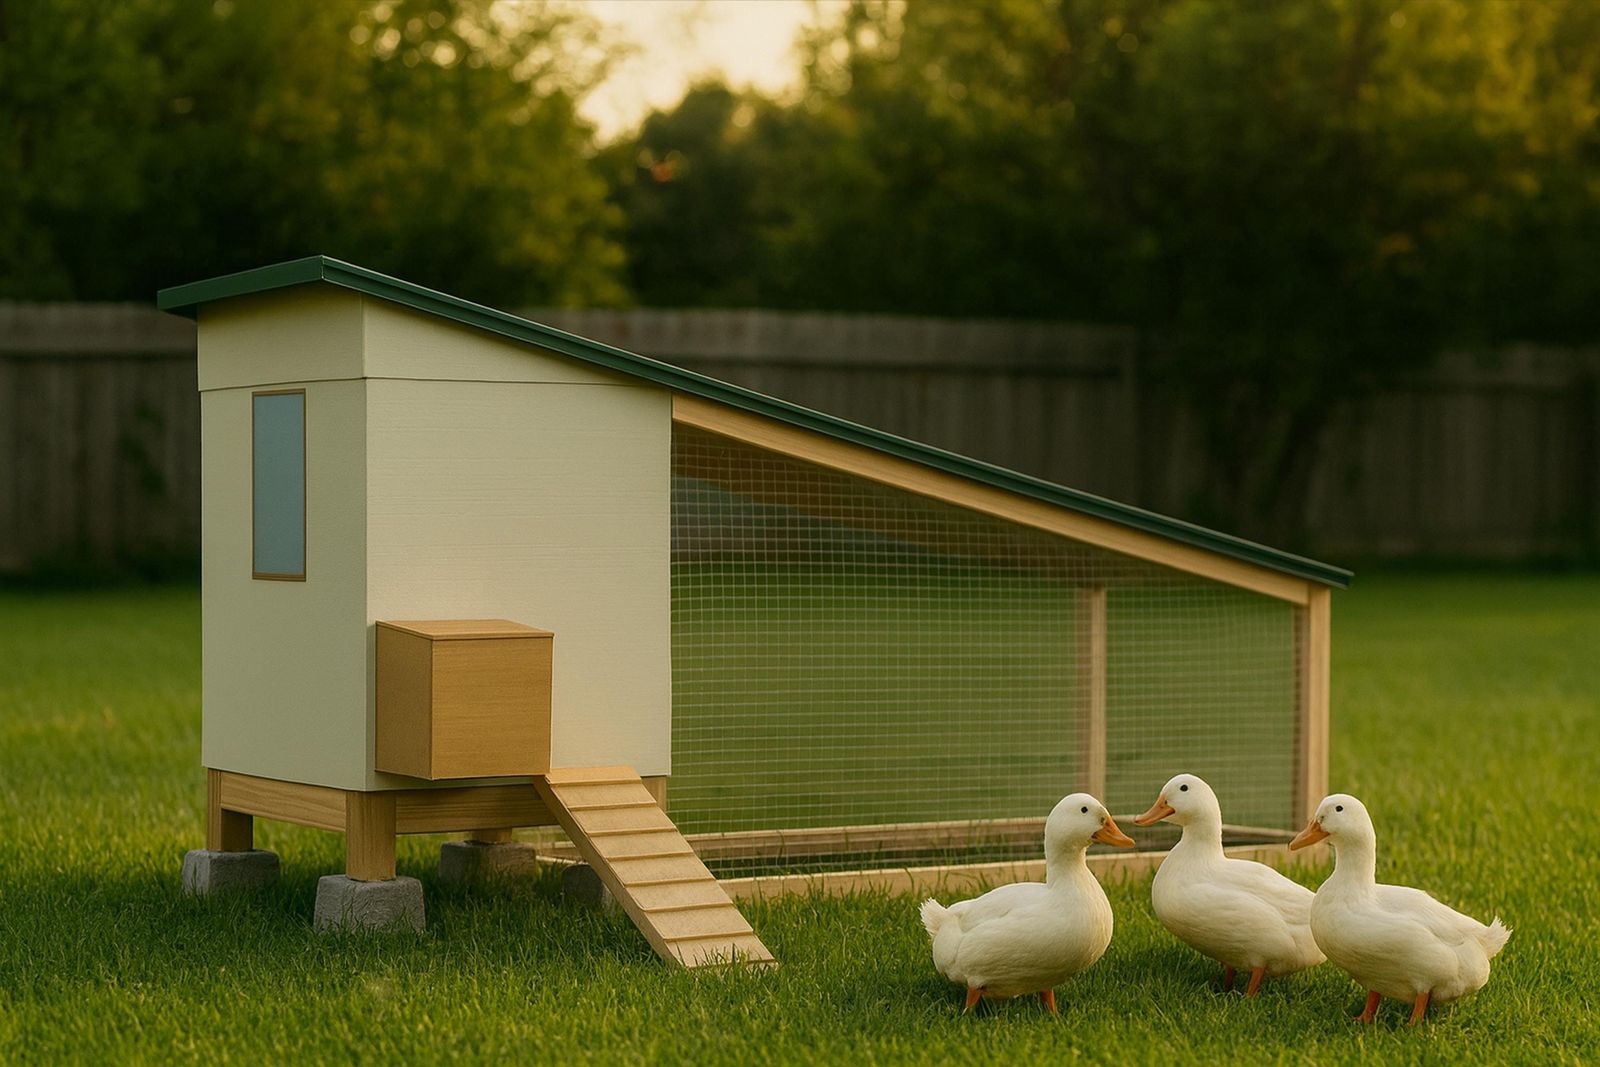
4x6 duck house — finished build in a backyard, sized for 3-4 ducks

Isometric Overview

The cover sheet from the plan book — the accurate geometry behind the image above. Every dimension, spec and cut length on this page is computed from this same model, so the drawing and the tables cannot disagree.

4x6 Duck House with 4x12 Run plans — cover sheet with isometric view

Specifications

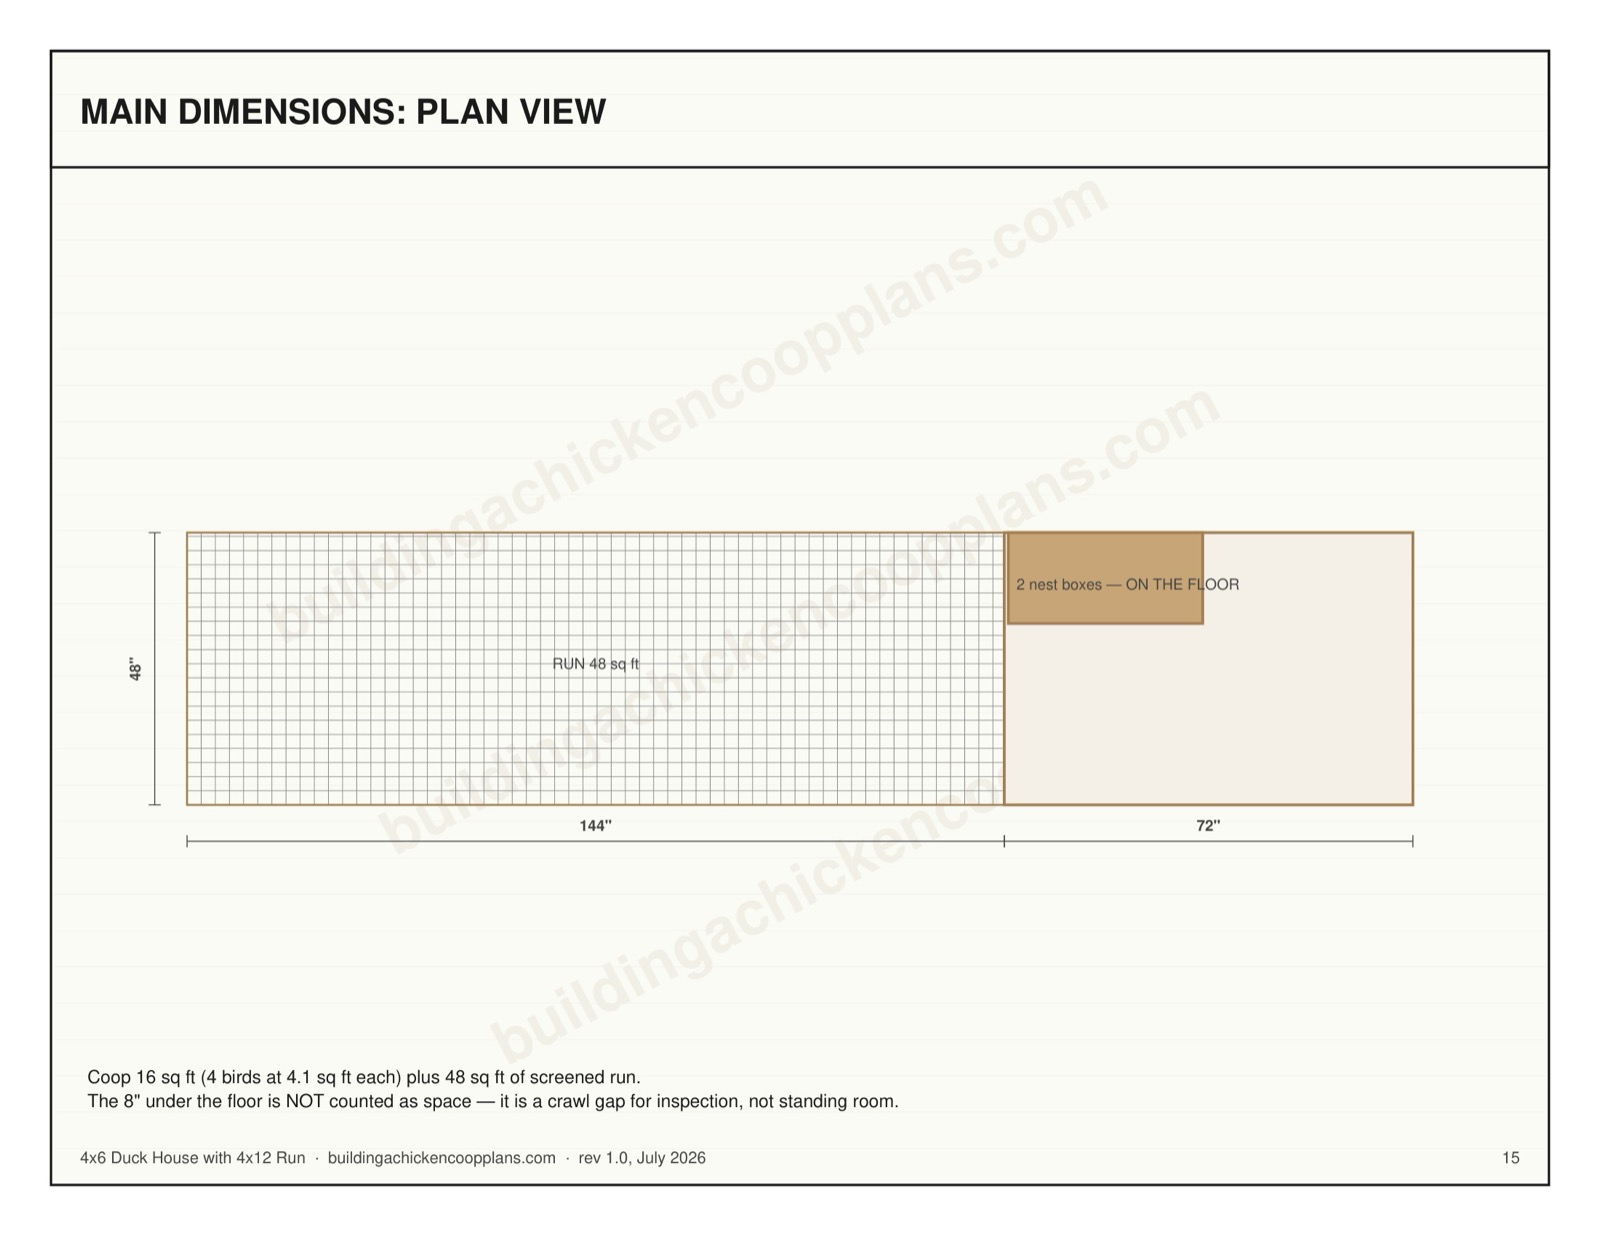
Coop footprint 4 ft × 6 ft — 16 sq ft of bird floor
Run 4 ft × 12 ft (48 sq ft), screened
Overall length 216" coop + run
Peak height 85-5/16" (12" roof rise)
Access Reach-in — 30" × 30" hinged panel
Interior wall height 48"
Floor height 8" off grade — screened bay underneath
Capacity 3-4 ducks
Nest boxes 2 in a 34-1/4" bank
Ventilation 3.4 sq ft across 2 windows
Floor framing 6 joists at 16" OC, 42" clear span
Build time Two weekends (16-24 hrs)
Difficulty Beginner
Materials cost $2,150–$2,800 at 2026 prices

What's Inside the Plans

Sample sheets from the complete 44-page plan book — dimensioned drawings, cut tables and build references drawn at print quality. The previews below are watermarked; the book is not. Everything published on this page stays free.

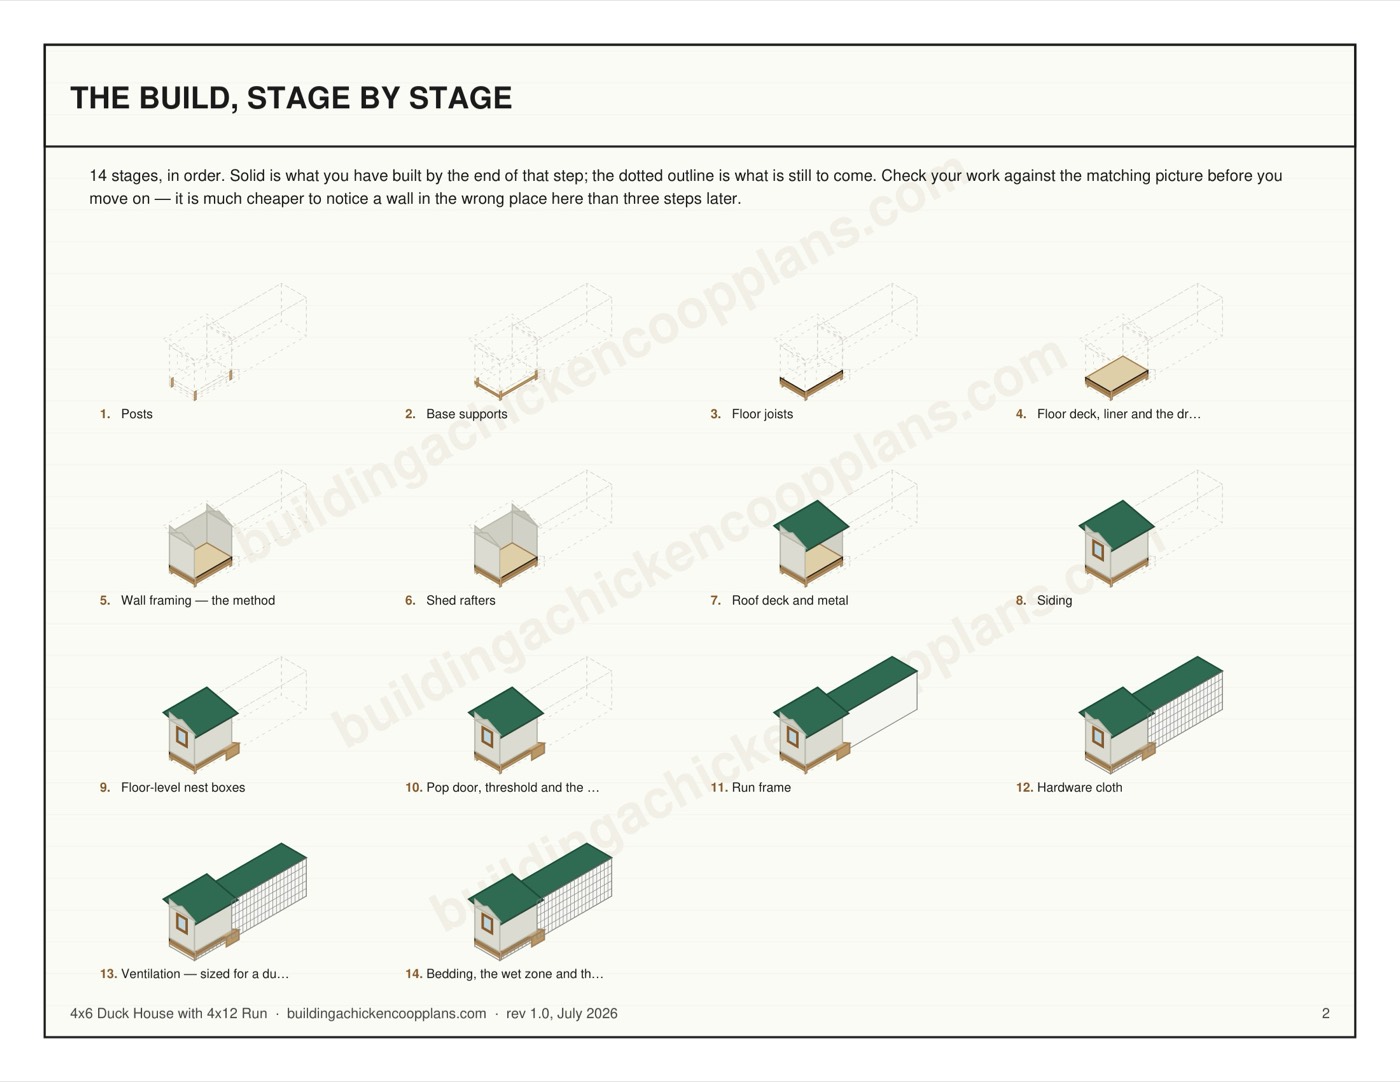
4x6 Duck House with 4x12 Run plans — build stages overview page
Build stages overview
4x6 Duck House with 4x12 Run plans — dimensioned plan view page
Dimensioned plan view
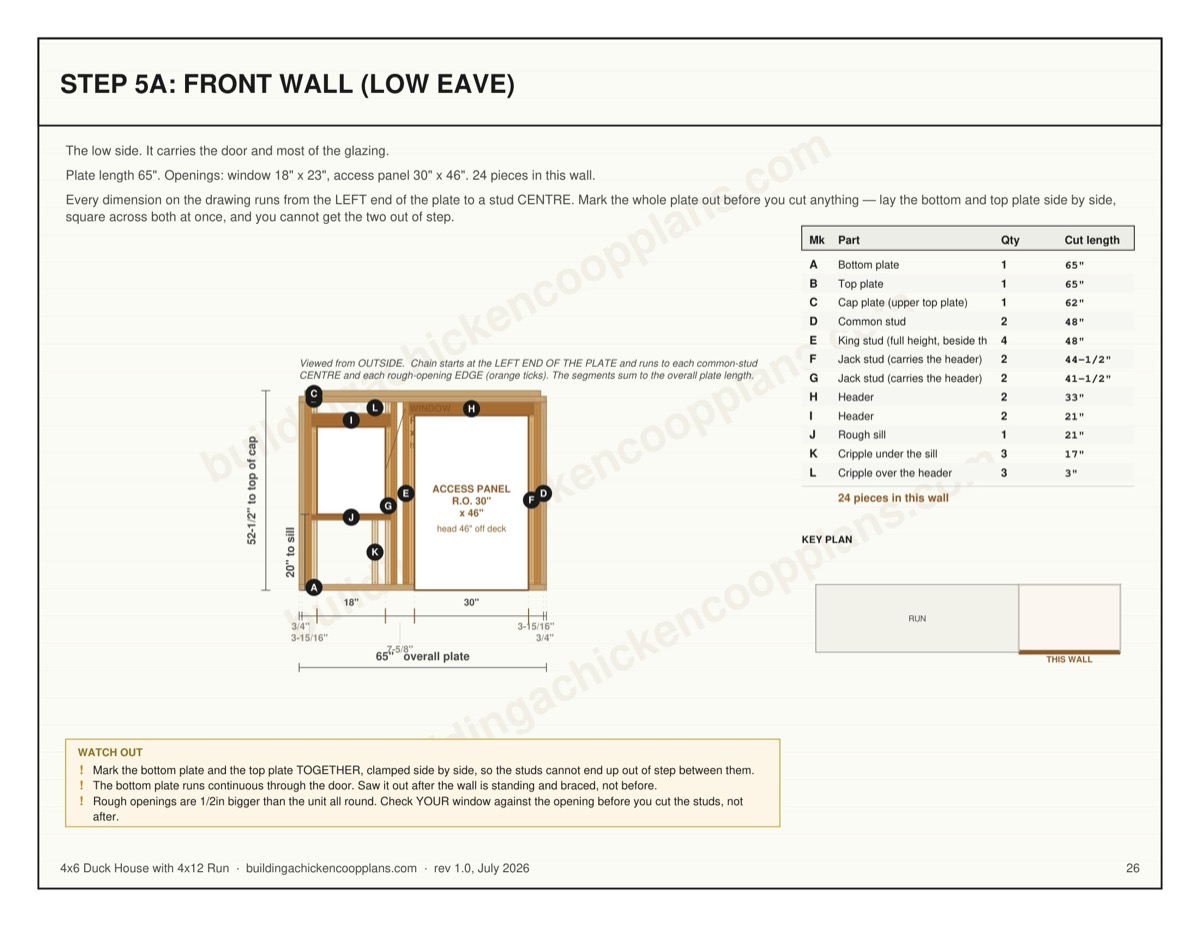
4x6 Duck House with 4x12 Run plans — wall framing sheet page
Wall framing sheet
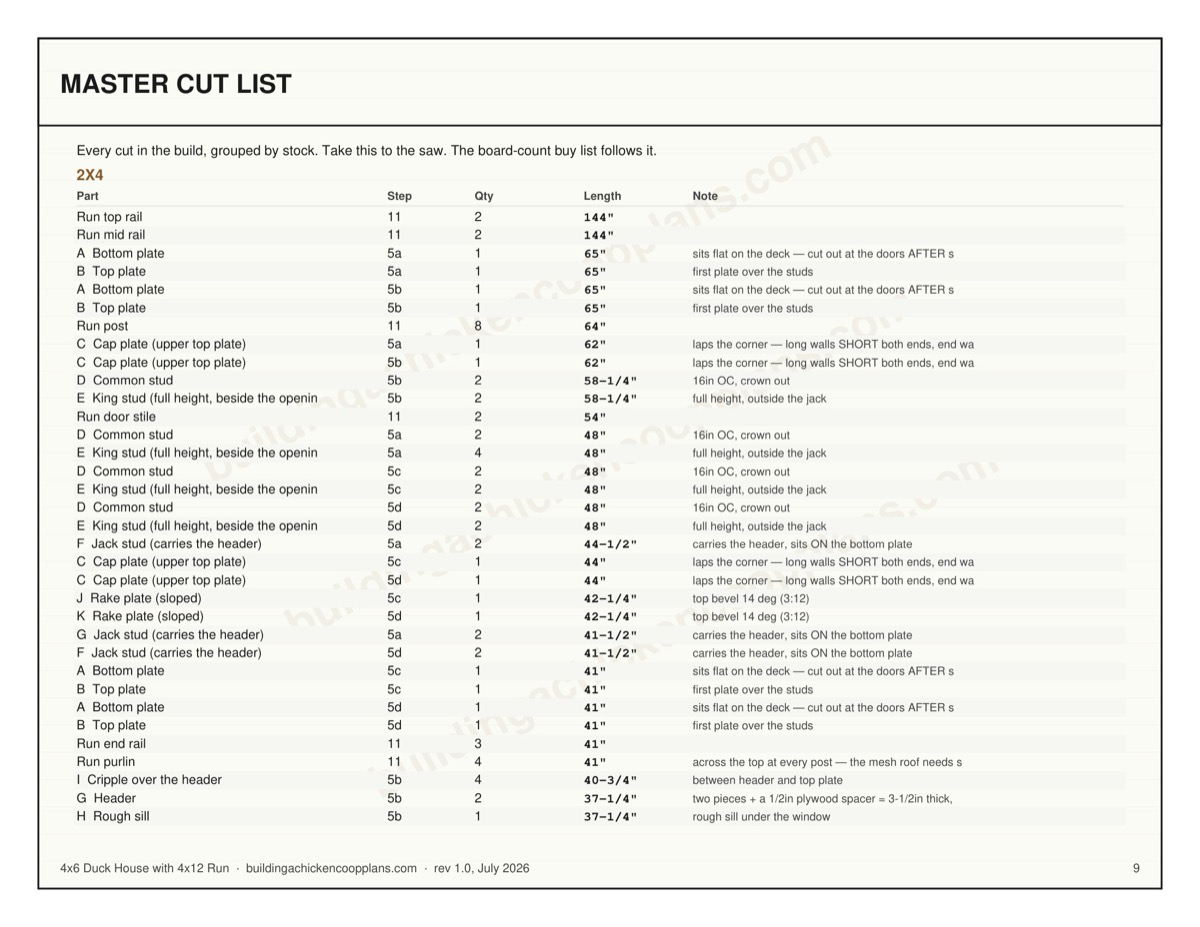
4x6 Duck House with 4x12 Run plans — board-by-board cut plan page
Board-by-board cut plan
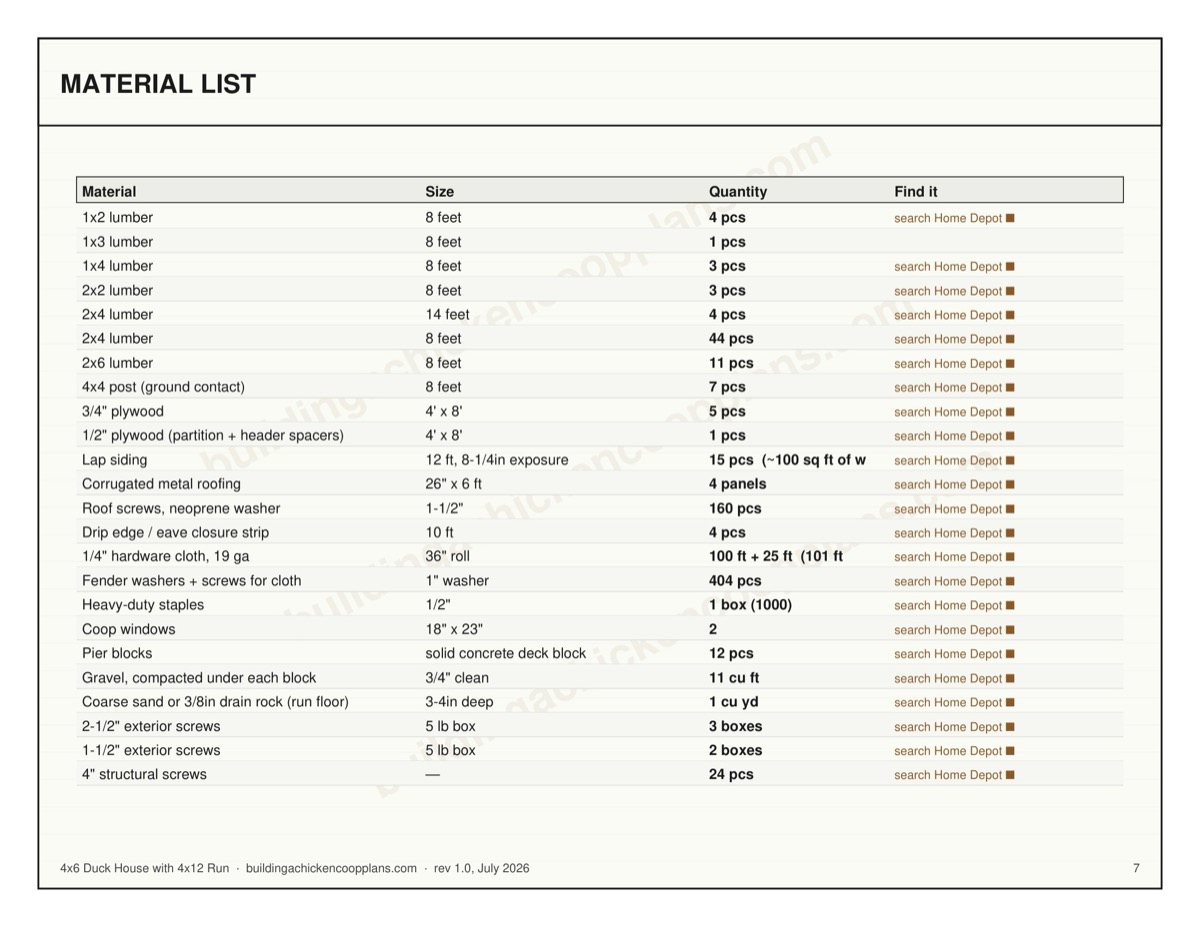
4x6 Duck House with 4x12 Run plans — material list page
Material list
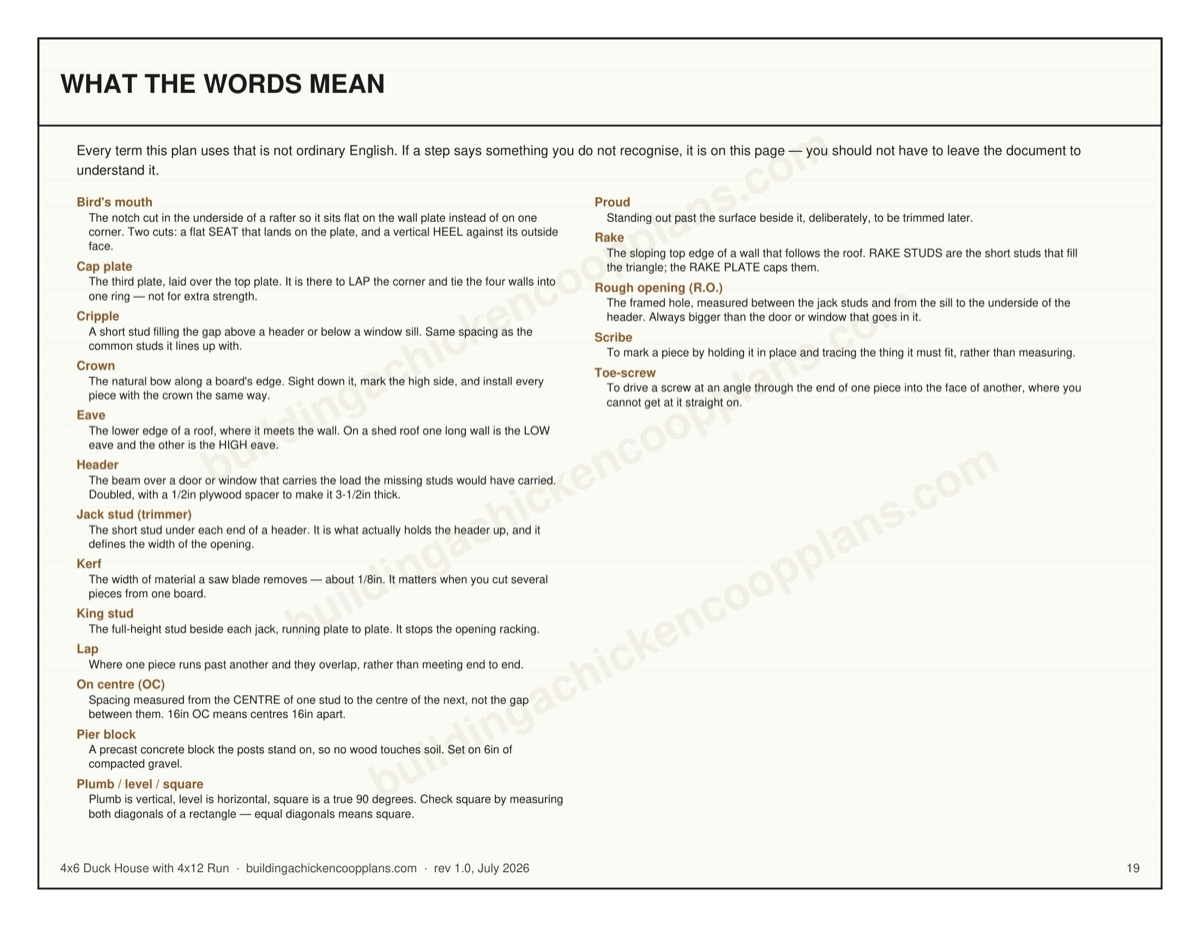
4x6 Duck House with 4x12 Run plans — builder's glossary page
Builder's glossary

Material List

The complete bill of materials. Quantities carry no waste allowance — add two or three extra boards if you are new to framing.

Material Size Quantity
1x2 lumber 8 feet 4 pcs
1x3 lumber 8 feet 1 pcs
1x4 lumber 8 feet 3 pcs
2x2 lumber 8 feet 3 pcs
2x4 lumber 14 feet 4 pcs
2x4 lumber 8 feet 44 pcs
2x6 lumber 8 feet 11 pcs
4x4 post (ground contact) 8 feet 7 pcs
3/4" plywood 4' x 8' 5 pcs
1/2" plywood (partition + header spacers) 4' x 8' 1 pcs
Lap siding 12 ft, 8-1/4in exposure 15 pcs (~100 sq ft of wall)
Corrugated metal roofing 26" x 6 ft 4 panels
Roof screws, neoprene washer 1-1/2" 160 pcs
Drip edge / eave closure strip 10 ft 4 pcs
1/4" hardware cloth, 19 ga 36" roll 100 ft + 25 ft (101 ft needed)
Fender washers + screws for cloth 1" washer 404 pcs
Heavy-duty staples 1/2" 1 box (1000)
Coop windows 18" x 23" 2
Pier blocks solid concrete deck block 12 pcs
Gravel, compacted under each block 3/4" clean 11 cu ft
Coarse sand or 3/8in drain rock (run floor) 3-4in deep 1 cu yd
2-1/2" exterior screws 5 lb box 3 boxes
1-1/2" exterior screws 5 lb box 2 boxes
4" structural screws 24 pcs
3/8" x 4" lag bolts (run to coop) 8 pcs
Siding nails or screws 5 lb box 2 boxes
Exterior caulk 10 oz tube 3 tubes
Exterior primer + paint 1 gal each 1 + 1
Hinges 9 (4 openable parts, buy in pairs)
Two-action latches 4
Sheet vinyl or EPDM pond liner 64" x 88" 1 pc (one piece — turned 8" up every wall)
Mineral-surface roll roofing (ramp surfacing) 36in x 36 ft roll 1 roll (9 sq ft of ramp; rubber stair tread or sanded porch paint also work)
Rubber or heavy canvas (nest entry curtains) 10" x 14" 2 pcs (darkness is what the box is for)
Large-flake pine shavings or chopped straw compressed bale 1 to fill + ~1/month (1.7 kg/week for 4 ducks) — NEVER cedar
3/8" drain rock (drip-zone pit) 6in deep 2 cu ft (under the 24" slat platform)

Nominal vs actual: the list uses nominal sizes (2×4), the drawings use finished sizes (1-1/2" × 3-1/2"). Check your own stock before cutting.

Floor Framing

6 joists at 16" on centre running the short direction, rim doubled on all four sides, 42" clear span — comfortably inside the published span tables, so no intermediate support is needed. True 16" spacing means plywood seams land on framing.

4x6 Duck House with 4x12 Run floor framing layout

The 19 Assembly Steps

Every step, with the cut list it needs. The summaries here are the short version — the complete 44-page book carries the full written instruction for each one, plus the stop-and-measure checkpoints.

Every cut length below is computed from the same geometry that draws the PDF, so the numbers on this page and the numbers in the plan set cannot disagree.

1

Posts

Four 4x4 posts cut to 66-3/4" carry the structure from grade to the top plate.

Part Qty Length Stock Note
Post A 4 66-3/4" 4x4
2

Base supports

The base ring ties the four posts into a rigid square at grade. Use the 4-inch screws here — this joint carries the racking load for the life of the coop.

Part Qty Length Stock Note
Base support A (front/back) 2 41" 4x4
Base support B (sides) 2 65" 4x4
Base blocking 8 20-1/2" 2x4
3

Floor joists

Joists sit 8" above grade on 16" centres, running the short direction across 42" in 2x6, with the rim doubled on all four sides.

Part Qty Length Stock Note
Rim joist (long sides) 4 72" 2x6 doubled
Floor joist 6 42" 2x6 16" OC, last bay short
4

Floor deck, liner and the drip zone

Deck the floor in 3/4" plywood, notched 3-1/2" square at each corner so it drops cleanly around the posts.

Part Qty Length Stock Note
Floor panel 1 48" x 72" 3/4" plywood notch corners
Floor liner 1 64" x 88" sheet vinyl or EPDM one piece, turned 8" up every wall
Liner batten 4 cut to fit 1x2 traps the liner ABOVE the litter line, all four walls
5

Wall framing — the method

Every wall is framed FLAT ON THE DECK and then stood up. That is the whole trick: you are working on a level surface, gravity holds the parts where you put them, and you can push the frame square before a single screw goes in.

5a

Front wall (low eave)

The low side. It carries the door and most of the glazing.

Part Qty Length Stock Note
A Bottom plate 1 65" 2x4 sits flat on the deck — cut out at the doors AFTER standing
B Top plate 1 65" 2x4 first plate over the studs
C Cap plate (upper top plate) 1 62" 2x4 laps the corner — long walls SHORT both ends, end walls LONG both ends
D Common stud 2 48" 2x4 16in OC, crown out
E King stud (full height, beside the opening) 4 48" 2x4 full height, outside the jack
F Jack stud (carries the header) 2 44-1/2" 2x4 carries the header, sits ON the bottom plate
G Jack stud (carries the header) 2 41-1/2" 2x4 carries the header, sits ON the bottom plate
H Header 2 33" 2x4 two pieces + a 1/2in plywood spacer = 3-1/2in thick, flush both faces
I Header 2 21" 2x4 two pieces + a 1/2in plywood spacer = 3-1/2in thick, flush both faces
J Rough sill 1 21" 2x4 rough sill under the window
K Cripple under the sill 3 17" 2x4 between bottom plate and rough sill
L Cripple over the header 3 3" 2x4 between header and top plate
5b

Back wall (high eave)

The HIGH side — its studs are longer than the front wall's by the full rise of the roof.

Part Qty Length Stock Note
A Bottom plate 1 65" 2x4 sits flat on the deck — cut out at the doors AFTER standing
B Top plate 1 65" 2x4 first plate over the studs
C Cap plate (upper top plate) 1 62" 2x4 laps the corner — long walls SHORT both ends, end walls LONG both ends
D Common stud 2 58-1/4" 2x4 16in OC, crown out
E King stud (full height, beside the opening) 2 58-1/4" 2x4 full height, outside the jack
F Jack stud (carries the header) 2 14" 2x4 carries the header, sits ON the bottom plate
G Header 2 37-1/4" 2x4 two pieces + a 1/2in plywood spacer = 3-1/2in thick, flush both faces
H Rough sill 1 37-1/4" 2x4 rough sill under the window
I Cripple over the header 4 40-3/4" 2x4 between header and top plate
5c

Left end wall (run end)

The run attaches to this wall and the pop door passes through it. Seen from outside, the roof runs DOWNHILL left to right.

Part Qty Length Stock Note
A Bottom plate 1 41" 2x4 sits flat on the deck — cut out at the doors AFTER standing
B Top plate 1 41" 2x4 first plate over the studs
C Cap plate (upper top plate) 1 44" 2x4 laps the corner — long walls SHORT both ends, end walls LONG both ends
D Common stud 2 48" 2x4 16in OC, crown out
E King stud (full height, beside the opening) 2 48" 2x4 full height, outside the jack
F Jack stud (carries the header) 2 22-1/2" 2x4 carries the header, sits ON the bottom plate
G Header 2 23" 2x4 two pieces + a 1/2in plywood spacer = 3-1/2in thick, flush both faces
H Rough sill 1 23" 2x4 rough sill under the window
I Cripple over the header 3 22" 2x4 between header and top plate
J Rake plate (sloped) 1 42-1/4" 2x4 top bevel 14 deg (3:12)
K Rake stud (sloped top wall) 1 10-1/16" 2x4 top bevel 14 deg (3:12)
L Rake stud (sloped top wall) 1 6-1/16" 2x4 top bevel 14 deg (3:12)
5d

Right end wall

Fixed wall with a window. This wall MIRRORS the left end: seen from outside, the roof runs UPHILL left to right.

Part Qty Length Stock Note
A Bottom plate 1 41" 2x4 sits flat on the deck — cut out at the doors AFTER standing
B Top plate 1 41" 2x4 first plate over the studs
C Cap plate (upper top plate) 1 44" 2x4 laps the corner — long walls SHORT both ends, end walls LONG both ends
D Common stud 2 48" 2x4 16in OC, crown out
E King stud (full height, beside the opening) 2 48" 2x4 full height, outside the jack
F Jack stud (carries the header) 2 41-1/2" 2x4 carries the header, sits ON the bottom plate
G Header 2 21" 2x4 two pieces + a 1/2in plywood spacer = 3-1/2in thick, flush both faces
H Rough sill 1 21" 2x4 rough sill under the window
I Cripple under the sill 3 17" 2x4 between bottom plate and rough sill
J Cripple over the header 3 3" 2x4 between header and top plate
K Rake plate (sloped) 1 42-1/4" 2x4 top bevel 14 deg (3:12)
L Rake stud (sloped top wall) 1 10-1/16" 2x4 top bevel 14 deg (3:12)
M Rake stud (sloped top wall) 1 8-3/16" 2x4 top bevel 14 deg (3:12)
N Rake stud (sloped top wall) 1 4-3/16" 2x4 top bevel 14 deg (3:12)
6

Shed rafters

A single-slope shed roof at 3:12 — 12" of fall across the 48" width, which is the minimum pitch exposed-fastener corrugated metal will shed reliably.

Part Qty Length Stock Note
Shed rafter 4 55-1/2" 2x6 birdsmouth both ends, 6" tail
Rafter blocking 6 22-1/2" 2x6 between rafters — a row at the LOW wall and a row at the HIGH wall
7

Roof deck and metal

3/4" plywood over the rafters, then corrugated metal sheets. Metal over shingles because it sheds snow, lasts decades and never needs a tear-off.

Part Qty Length Stock Note
Roof deck panel 2 4' x 8' sheet 3/4" plywood lay the 8-ft dimension UP the slope; seams land on a rafter
Metal roof panel 4 6 ft x 26" corrugated steel 26in wide, 24in coverage; one piece eave to ridge, no lap partway up
8a

Siding

Lap siding in 9-foot courses, starting from a level chalk line at the bottom and working up.

Part Qty Length Stock Note
Lap siding board 39 9 ft 9 ft lap siding 5in wide, ~1in lap
8b

Doors, hatches and lids

Every opening you framed in step 5 now gets something to close it. Cut each slab a quarter inch smaller than its rough opening on all four sides — 3/4in plywood swells in the wet and a door cut to the exact opening size will bind by November.

Part Qty Length Stock Note
Access panel slab 1 29-1/2" x 45-1/2" 3/4" plywood 3 hinges, opens out
Access panel batten rail 2 28" 1x4 top and bottom, 1in in from each edge
Access panel batten diagonal 1 44-1/2" 1x4 BOTTOM HINGE corner up to TOP LATCH corner; mitre both ends to suit
Pop door slab 1 19-1/2" x 19-1/2" 3/4" plywood 2 hinges, opens out
9

Floor-level nest boxes

2 box(es), 16" x 16" x 16" internal, standing ON THE DECK against the back wall.

Part Qty Length Stock Note
Nest box side 3 16" x 16" 3/4" plywood
Nest box back 1 34-1/4" x 16" 3/4" plywood screws to the wall studs — the only fixing, so it pulls out to clean
Nest box TOP 1 34-1/4" x 16" 3/4" plywood OPAQUE, and not optional — a topless box is used half as often as chance
Nest box front 1 34-1/4" x 16" 3/4" plywood 10" entry cut per box, sill on the deck
Nest entry curtain 2 10" x 14" rubber or heavy canvas hung over each entry — darkness is what the box is for
Egg hatch slab 1 33-3/4" x 13-1/2" 3/4" plywood hinged at the top, two-action latch
10

Pop door, threshold and the duck ramp

The pop-door slab was already cut to fit the opening you framed in step 5c — do not cut another one.

Part Qty Length Stock Note
Ramp deck 1 62-7/8" x 20" 3/4" plywood trim to your measured drop
Ramp side rail 2 62-7/8" 1x4 4" above the deck, full length, both edges
Ramp batten 5 20" 1x2 12" OC — a stride apart, NOT a tread
Ramp surfacing 1 62-7/8" x 20" mineral-surface roll roofing or rubber stair tread, or sanded porch paint — continuous, no bare plywood
11

Run frame

The 4 ft x 12 ft screened run frames off the coop wall, 64" tall.

Part Qty Length Stock Note
Run post 8 64" 2x4
Run top rail 2 144" 2x4
Run mid rail 2 144" 2x4
Run end rail 3 41" 2x4
Run purlin 4 41" 2x4 across the top at every post — the mesh roof needs something to span to
Run brace 4 33" 2x4 45 deg corner braces, 33in on the long points
Run door stile 2 54" 2x4
Run door rail 3 26" 2x4 finished door 33" wide
12

Hardware cloth

The step that decides whether you still have a flock in two years. Quarter-inch hardware cloth over every opening, screwed through fender washers rather than only stapled.

Part Qty Length Stock Note
Run walls 1 50 lin ft 1/4" hardware cloth
Run roof 1 16 lin ft 1/4" hardware cloth
Buried apron, 12in down and 12in out 1 22 lin ft 1/4" hardware cloth
Window screens 1 3 lin ft 1/4" hardware cloth
Continuous eave vent strip 1 2 lin ft 1/4" hardware cloth
Nest opening and pop-door surround 1 3 lin ft 1/4" hardware cloth
Under-floor skirt 1 5 lin ft 1/4" hardware cloth
13

Ventilation — sized for a duck, not a hen

A continuous vent strip 8" deep and 62" long under the high eave, hardware cloth over every inch of it, permanently open.

Part Qty Length Stock Note
Vent strip blocking 2 62" 2x2 holds the cloth top and bottom
Vent cloth 1 62" x 12" 1/4" hardware cloth screwed through fender washers, not stapled
Vent trim 1 62" 1x3 closes the cloth edge
14

Bedding, the wet zone and the clean-out routine

This step is a running cost, not a build step, and it is the one that decides whether this house lasts.

Part Qty Length Stock Note
Bedding — initial fill 1 1 bale(s) large-flake pine shavings or chopped straw 3 kg to 4" — NEVER cedar
Drip-zone slat 8 24" 1x2 spaced 3/4in apart over the gravel pit — spill drains through
Drip-zone frame 4 24" 2x2 24" square, under the drinker and nowhere else
Drainage gravel 1 2 cu ft 3/8" drain rock pit under the slats, 6in deep

Frequently Asked Questions

Are these 4x6 duck house plans really free?

The 6-page preview PDF is a free download with no email required, and everything published on this page stays free — every dimension, the spec table, the complete material list and all 19 assembly steps with their cut tables. The complete 44-page plan book — every wall on its own sheet with its own cut table, a board-by-board cut plan and a material buy list — is $4.99 on Etsy.

How many ducks fit in the 4x6 duck house?

3-4 ducks. At 16 sq ft of floor, 3 birds get about 5 sq ft each, with 48 sq ft of screened run on top of that. The top of the range (4) assumes the birds spend their days outside rather than shut in.

What's in the full 44-page plan book?

Everything on this page — dimensioned plan and elevation drawings, the complete bill of materials (35 line items) and all 19 assembly steps with per-step cut tables — plus what a web page can't carry: the full written instruction for every step rather than the summary shown here, every wall framed on its own sheet, a board-by-board cut plan, a buy list you can hand to the lumber yard, and stop-and-measure checkpoints at each stage. The free 6-page preview PDF shows the design overview and main dimensions. On-page specs are computed from the same geometry that draws the PDFs, so the numbers can never disagree.

Related Plans

Get the full 44-page plans — $4.99 on Etsy

Want a look first? Download the free 6-page preview PDF — no email required.

Different size? See all chicken coop plans, or check the size calculator first.