CoopCraft

Our own plan set · Free PDF

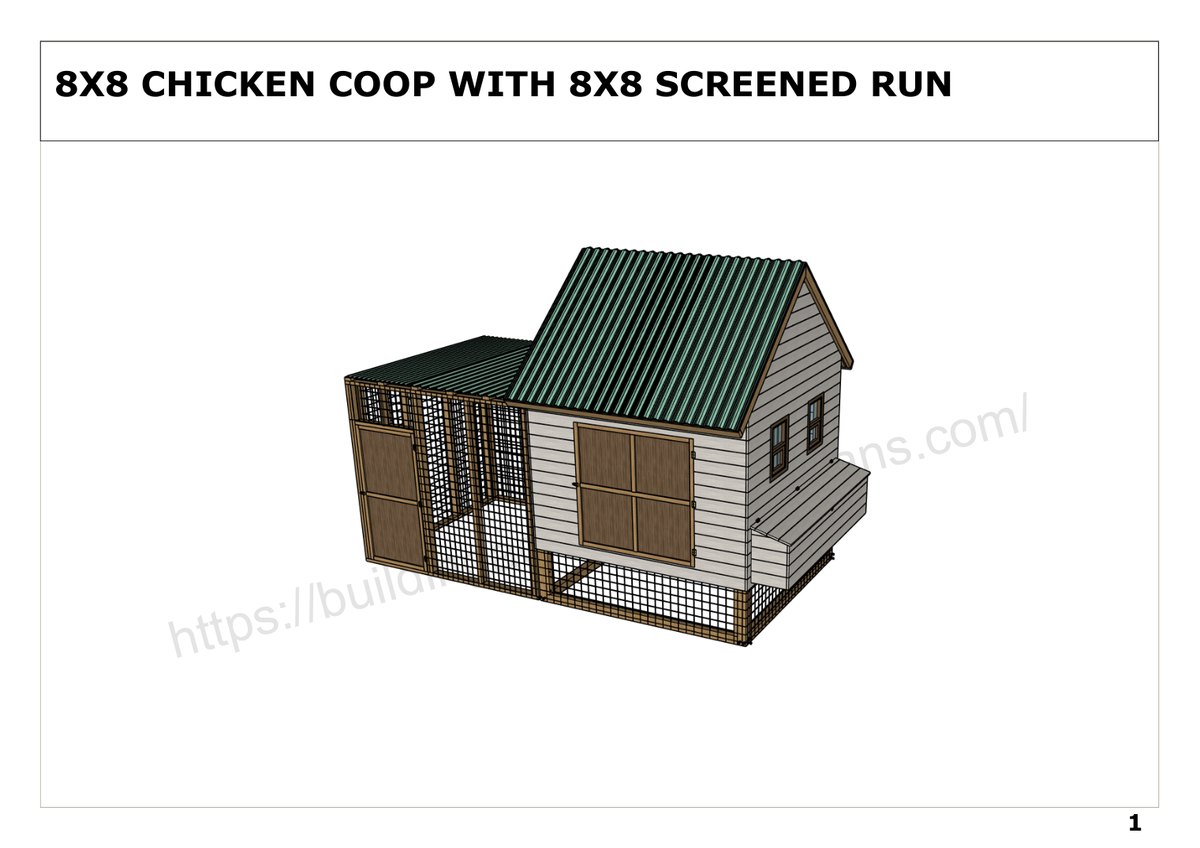
8×8 Chicken Coop Plans with an 8×8 Screened Run

Eighty CAD-drawn pages, a complete material list, every cut length called out, and sixteen assembly steps from the four base posts to the last staple of hardware cloth. Houses 12–16 hens. We drew it ourselves — it is not a roundup of somebody else's links.

PDF · 80 pages · ~7 MB · No email required

8x8 chicken coop plans with attached screened run — finished 3D view

8×8 Coop Specifications

Coop footprint 8 ft × 8 ft (96" × 96")
Run footprint 8 ft × 8 ft, fully screened
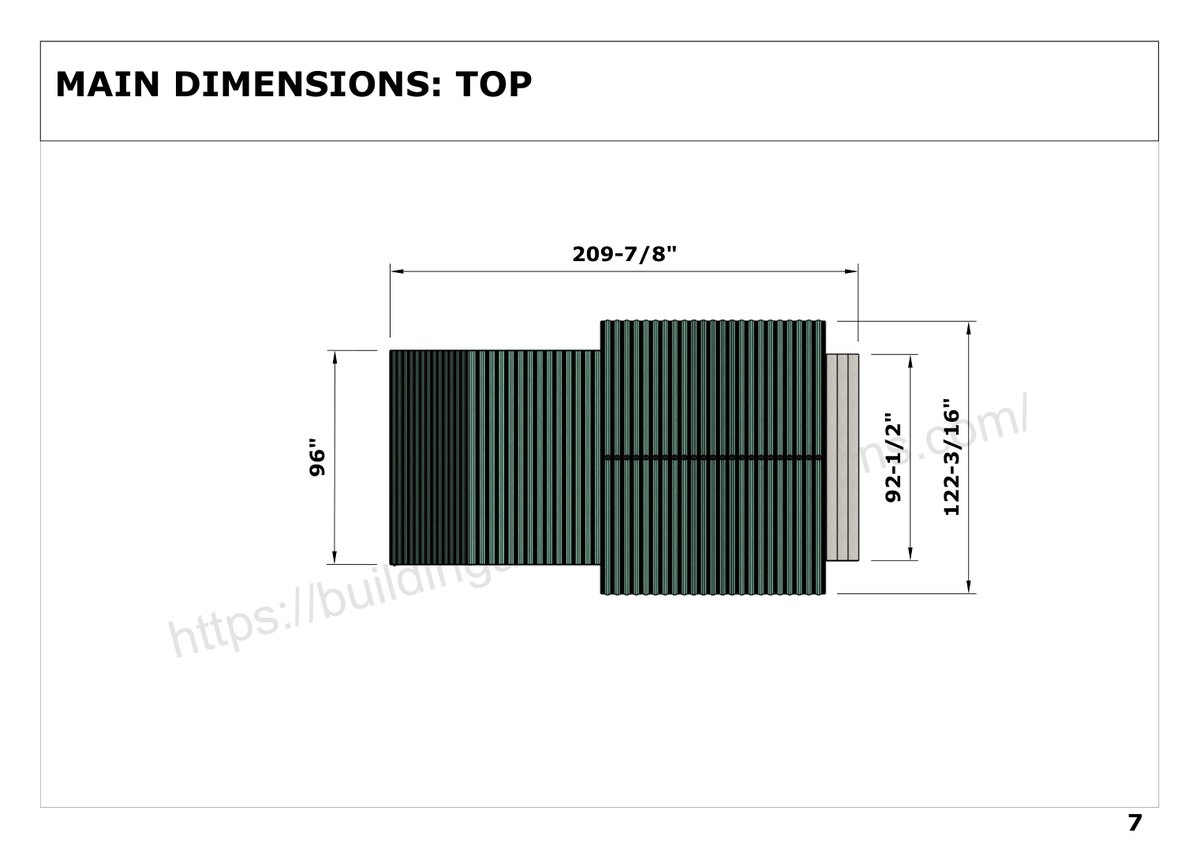
Overall length 209-7/8" (17 ft 6 in) coop + run
Overall width 96" (8 ft)
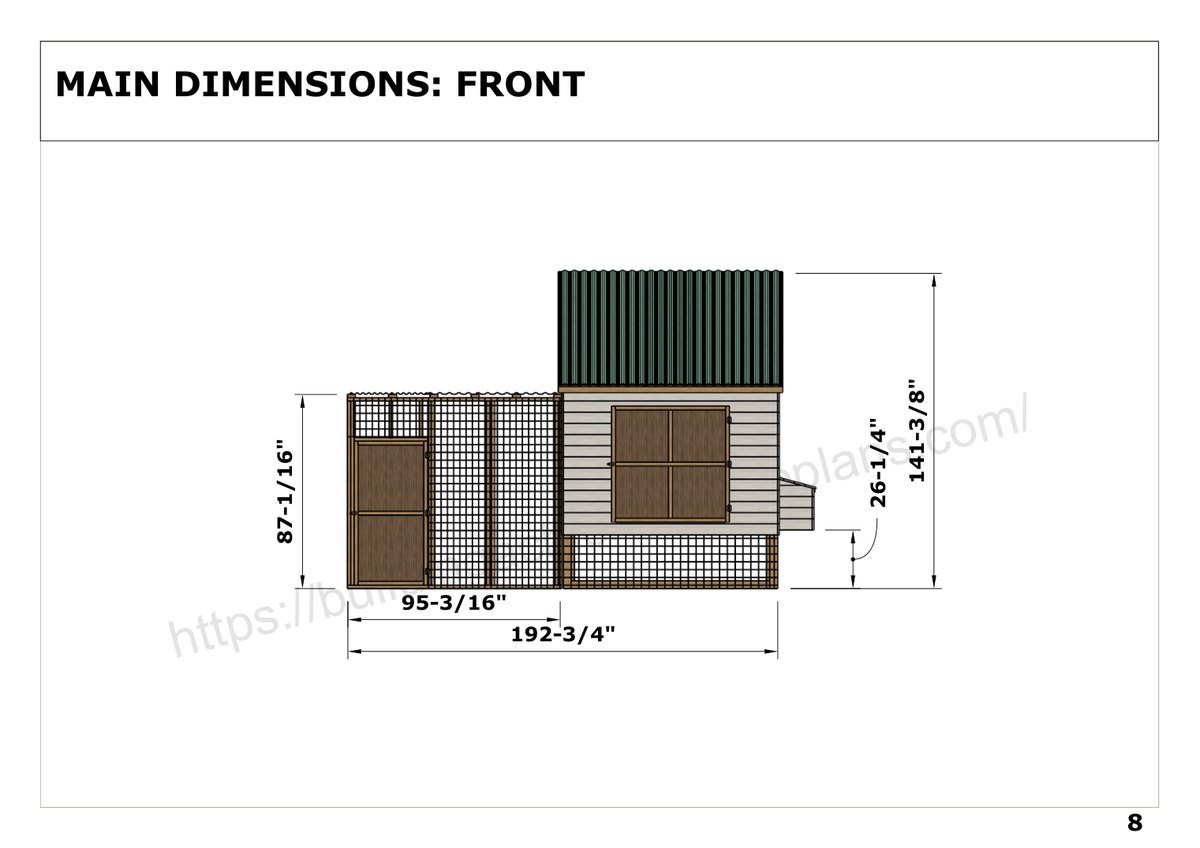
Overall height 141-3/8" (11 ft 9 in) at the ridge
Run height 87" at the eave
Floor height 24" off grade — the birds get the space underneath
Capacity 12–16 standard hens
Nest bank 92-1/2" long × 17-1/16" deep, exterior access
Windows 4 × (18" × 23")
Roof Gable, corrugated metal over 3/4" plywood deck
Build time 5–6 days for two people

Not sure this is the right size? Run your flock through the chicken coop size calculator first — it is cheaper to change your mind now than after you have bought 104 studs.

Dimensioned Drawings

Every elevation is dimensioned in the plan set. These are the actual drawing pages, not renderings made for the website.

8x8 chicken coop plans front elevation with overall dimensions
Front elevation — 192-3/4" overall, 141-3/8" to the ridge
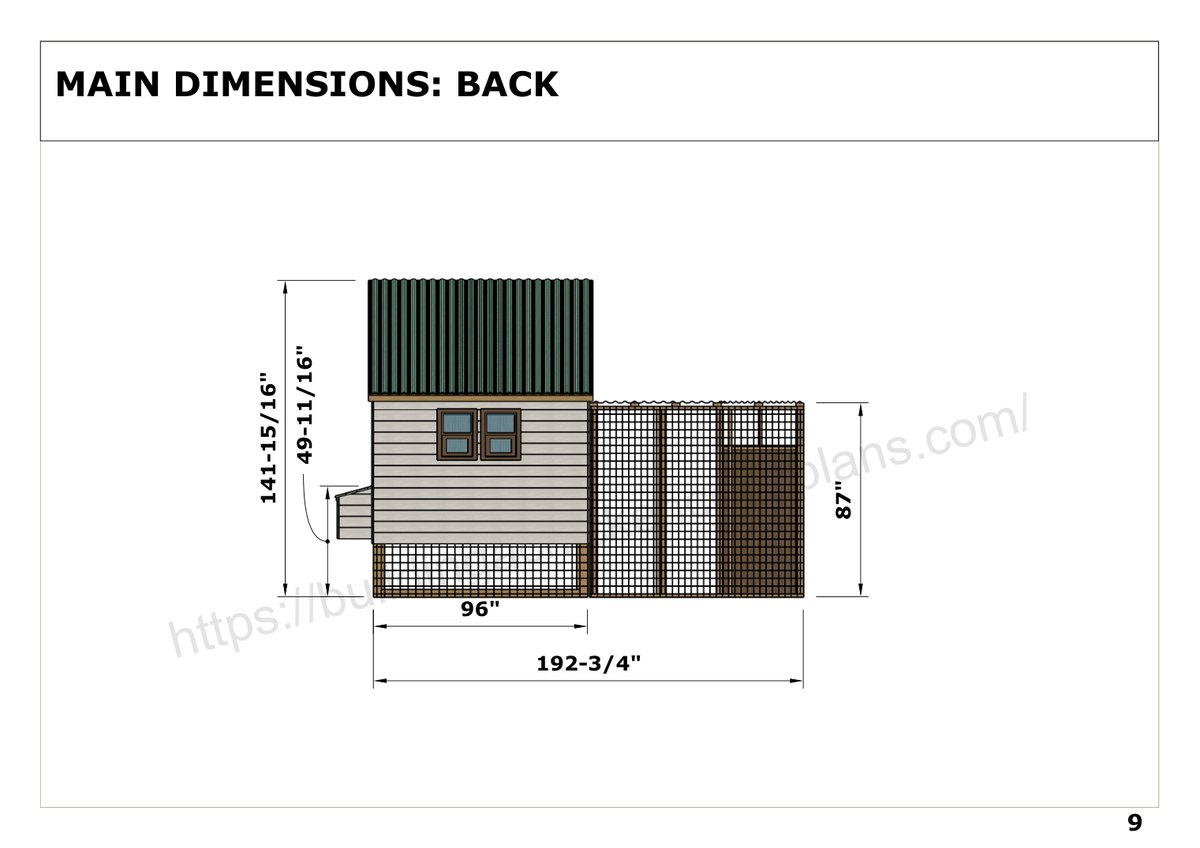
8x8 chicken coop plans rear elevation with dimensions
Rear elevation — 96" coop wall, run to the right
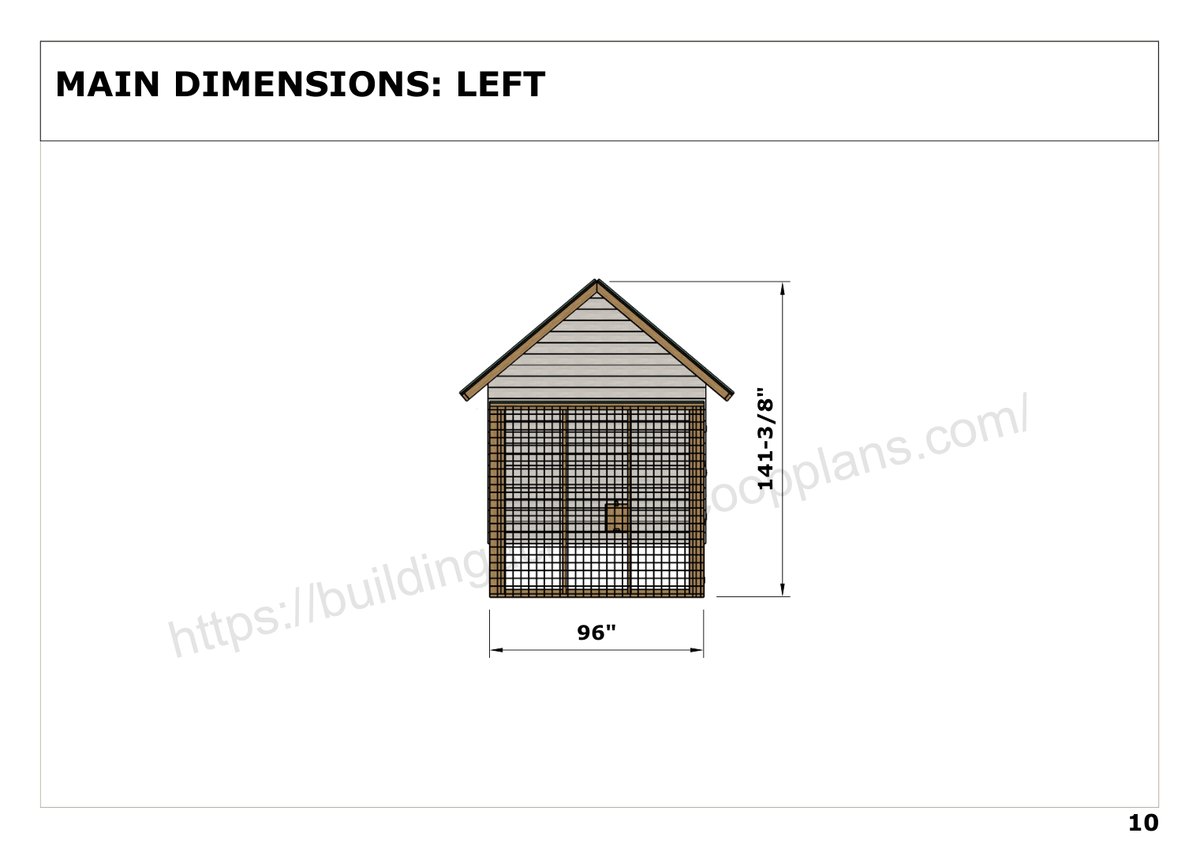
8x8 chicken coop plans left side elevation showing screened run end
Left elevation — the screened run end, 96" wide
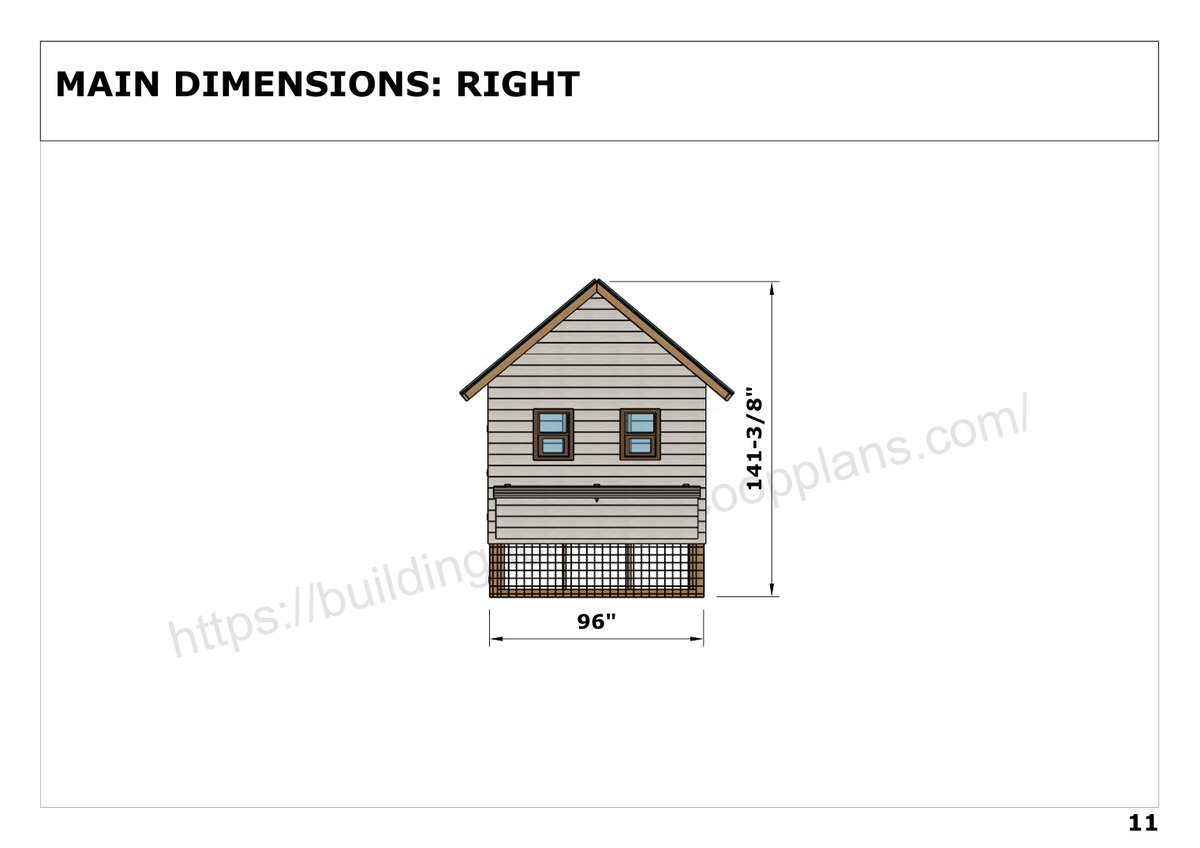
8x8 chicken coop plans right side elevation showing windows and nest box
Right elevation — windows and the exterior nest bank
8x8 chicken coop plans top view plan with overall length
Plan view — 209-7/8" total length, coop plus run
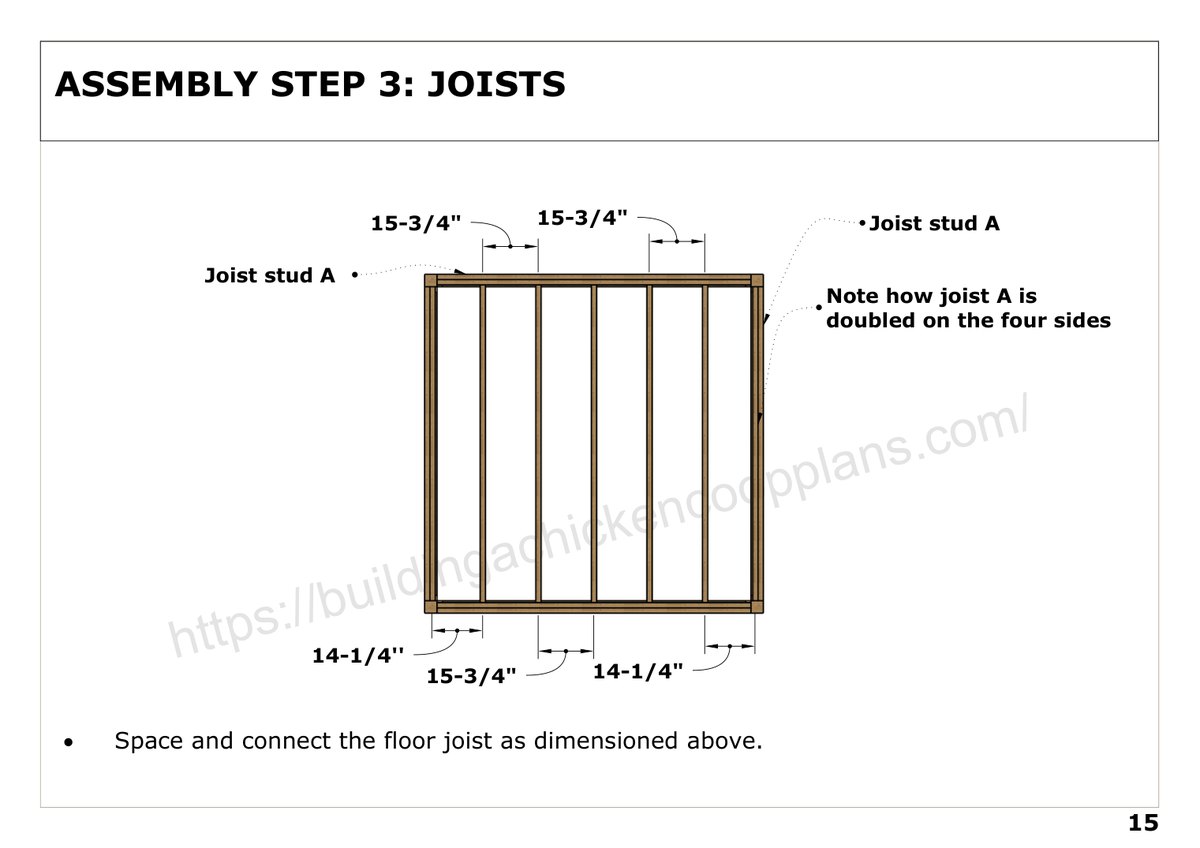
8x8 chicken coop floor joist spacing diagram
Joist layout — 15-3/4" centres, doubled perimeter

Complete Material List

This is the full bill of materials from page 6 of the plan set. Take it to the lumber yard as-is. Quantities assume no waste allowance — buy one or two extra 2×4s if you are new to framing.

Material Size Quantity
2×4 lumber 8 feet 104 pcs
4×4 post 8 feet 8 pcs
3/4" plywood 4' × 8' 10 pcs
Wall siding 9 feet 104 pcs
2-1/4" wood screw 180 pcs (2 lbs) 3 packs
1-1/2" wood screw 100 pcs 3 packs
4" wood screw 16 pcs
Chicken coop windows 18" × 23" 4
Hinges 10
Latches 4
Wireframe (hardware cloth) As required
Metal roofing sheets 4' × 8' 10 pcs

A note on lumber dimensions

The material list uses nominal sizes (2×4, 4×4). The drawings use actual finished sizes — a 2×4 really measures 1-1/2" × 3-1/2". Check your stock against the drawings before you cut; mills vary slightly and a sixteenth compounds fast across an 8-foot wall.

For current pricing on each line item, see the 2026 chicken coop cost breakdown and the coop materials guide.

The 16 Assembly Steps

The plan set walks the build in order, and each step has its own cut table and drawing. The cut lists reproduced below are transcribed straight from the plan — the PDF has the rest.

1

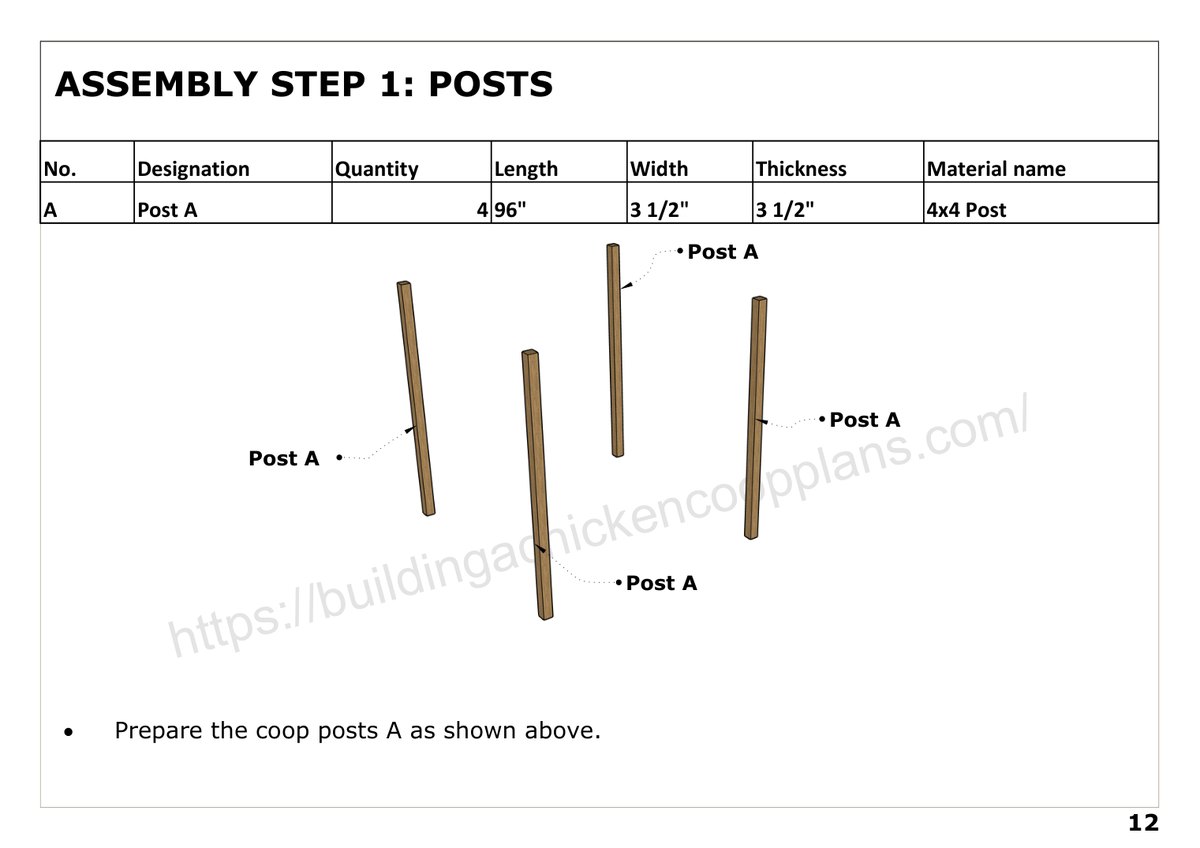
Posts

PDF pages 12

Four 4×4 posts cut to 96 inches carry the whole structure. They run from grade to the top plate, which is what lets the floor sit 24 inches up and turns the space underneath into shaded run.

Part Qty Length Stock
Post A 4 96" 4×4
8x8 chicken coop plans step 1: Posts
2

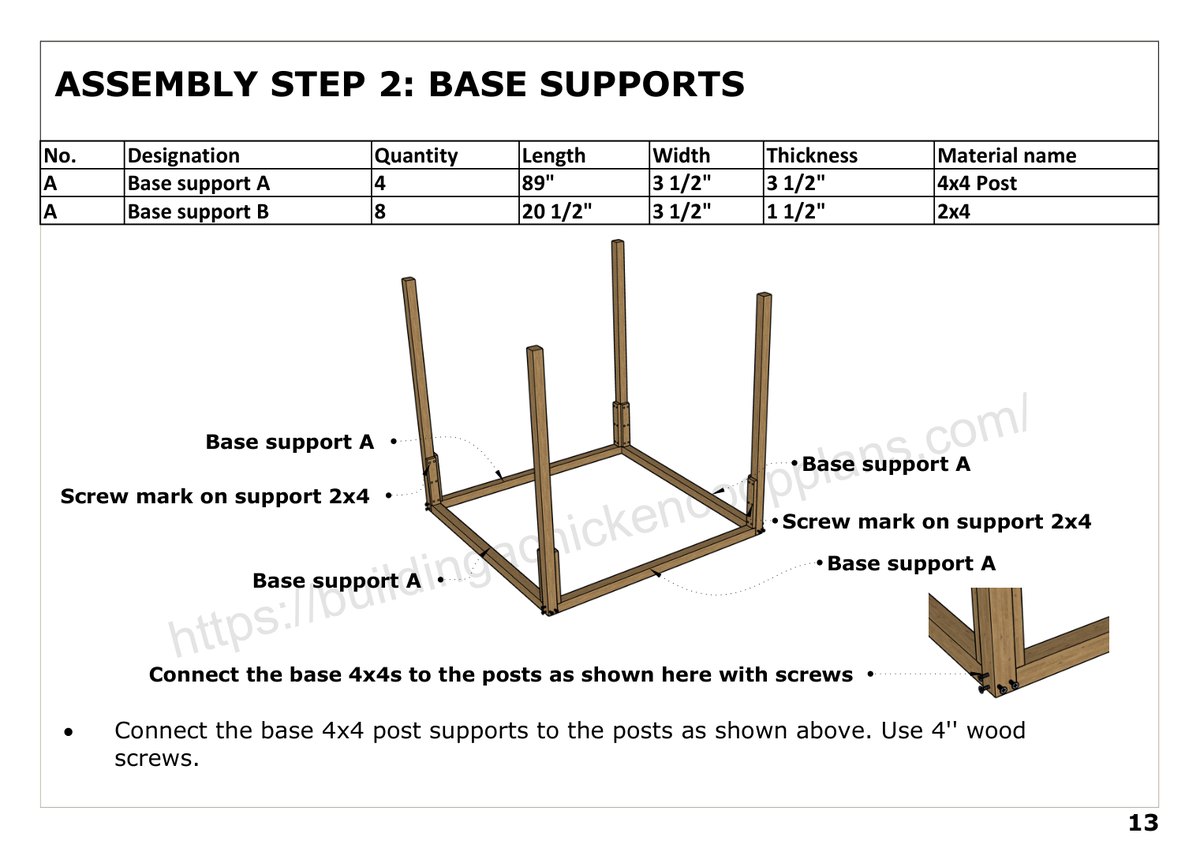
Base supports

PDF pages 13

The base 4×4s tie the four posts into a rigid square at grade. Use the 4-inch screws here — this joint takes the racking load for the life of the coop.

Part Qty Length Stock
Base support A 4 89" 4×4
Base support B 8 20-1/2" 2×4
8x8 chicken coop plans step 2: Base supports
3

Joists

PDF pages 14–16

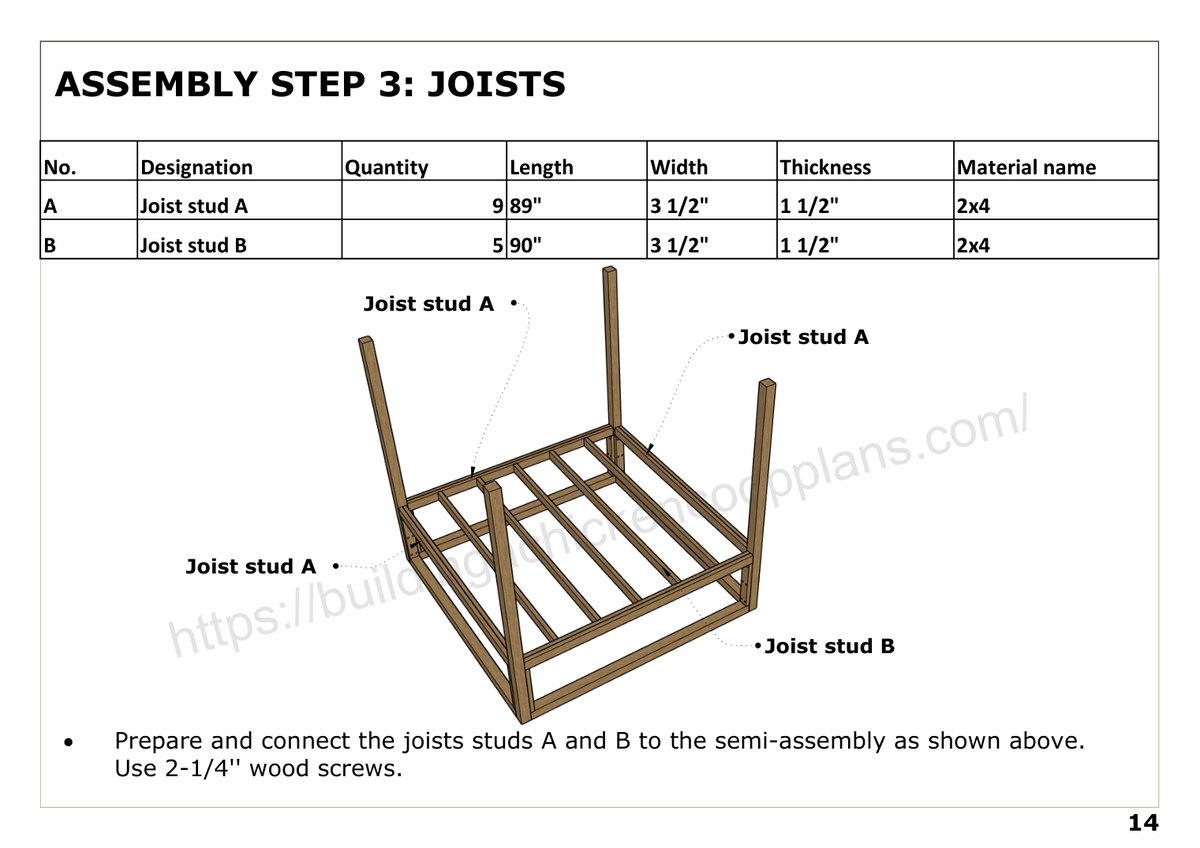
Floor joists sit 24 inches above the base frame. Joist A is doubled on all four sides to make a stiff perimeter, and the interior joists land on 15-3/4 inch centres with 14-1/4 inches at each end.

Part Qty Length Stock
Joist stud A 9 89" 2×4
Joist stud B 5 90" 2×4
8x8 chicken coop plans step 3: Joists
4

Floor panel

PDF pages 17–18

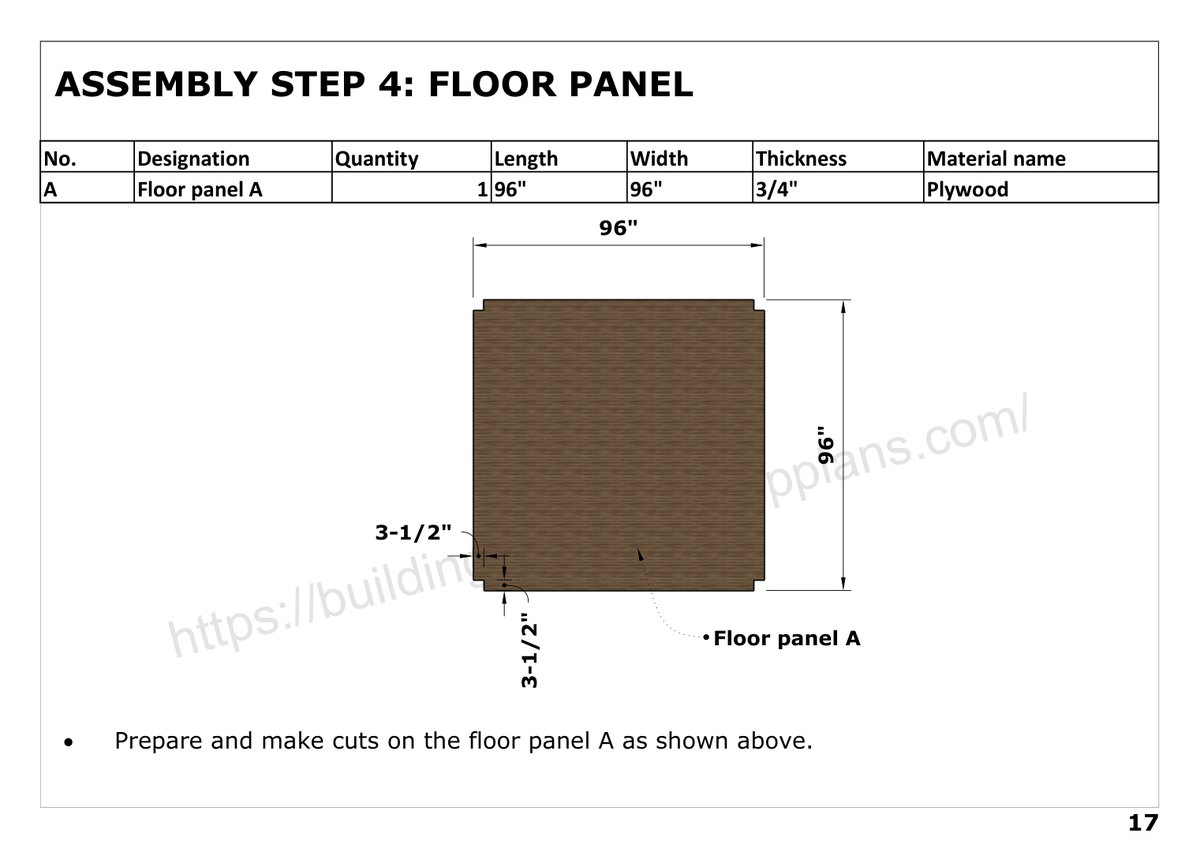
A single 96 × 96 inch sheet of 3/4-inch plywood, notched 3-1/2 inches square at each corner so it drops cleanly around the posts. Fasten with 1-1/2 inch screws.

Part Qty Length Stock
Floor panel A 1 96" × 96" 3/4" plywood
8x8 chicken coop plans step 4: Floor panel
5

Frame (all four walls)

PDF pages 19–43

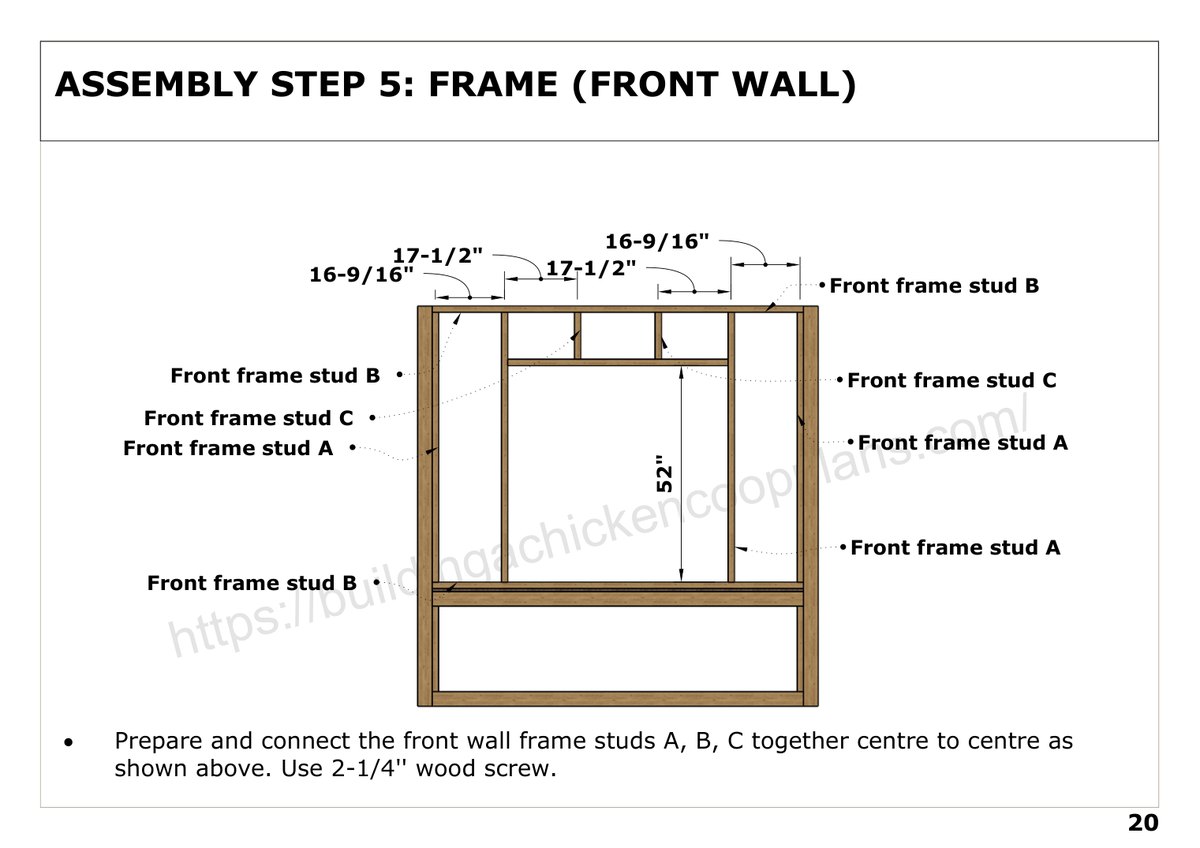
The longest section of the plan — 25 pages covering front, back, left, right and the gable ends. The front wall carries the 52-inch door opening. Every stud is called out centre-to-centre on its own drawing.

Part Qty Length Stock
Front frame stud A 4 64-3/4" 2×4
Front frame stud B 2 89" 2×4
Front frame stud C 2 11-1/4" 2×4
Front frame stud D 1 52-13/16" 2×4
8x8 chicken coop plans step 5: Frame (all four walls)
6

Siding

PDF pages 44–51

Lap siding goes on in 9-foot courses — 104 pieces across the whole structure. Eight pages of elevation drawings show the coursing and where each wall starts.

7

Faceboard

PDF pages 52–53

Trim boards close out the gable ends and the eaves, covering the siding end-grain and giving the roof its finished edge.

8

Nest box

PDF pages 54–56

An exterior nest bank 92-1/2 inches long and 17-1/16 inches deep, standing 18-3/4 inches tall, hung off the right wall. The lid is hinged with a latch so you collect eggs from outside without opening the coop or disturbing the flock.

9

Chicken door

PDF pages 57

The pop door — a 11-15/16 × 9-15/16 inch panel of 3/4-inch plywood on a hinge with a latch, opening onto the ramp down into the run.

Part Qty Length Stock
Chicken door panel A 1 11-15/16" × 9-15/16" 3/4" plywood
10

Run frame

PDF pages 58–66

Nine pages framing the 8×8 screened run off the coop. The front wall alone is seven studs at 82-1/2 inches plus two 96-inch posts, with the run door opening framed by the 16-1/2 and 33 inch pieces.

Part Qty Length Stock
Run front frame stud A 7 82-1/2" 2×4
Run front frame stud B 2 96" 2×4
Run front frame stud C 1 16-1/2" 2×4
Run front frame stud D 1 33" 2×4
11

Coop door

PDF pages 67–70

The full-height human door into the coop, built as a framed and braced panel to keep it from sagging on its hinges.

12

Run door

PDF pages 71–74

A separate door into the screened run, so you can get to the birds without going through the coop.

13

Window (right)

PDF pages 75–76

Framing and trim for the 18 × 23 inch windows. Four go into the build — two per gable-end wall — which is where most of the daylight and cross-ventilation comes from.

14

Roof plywood

PDF pages 77

3/4-inch plywood decking over the rafters, forming the substrate the metal roofing screws down to.

15

Roof metal sheets

PDF pages 78

Ten 4 × 8 foot corrugated metal sheets over the deck. Metal was specified over shingles because it sheds snow, lasts decades, and never needs a tear-off.

16

Wireframe

PDF pages 79

Hardware cloth over every opening in the run and the under-coop space. This is the step that decides whether you still have a flock in two years — use hardware cloth, never chicken wire.
Notes Before You Start Cutting

Use hardware cloth, not chicken wire

Step 16 is the one that decides whether you still have a flock in two years. Chicken wire keeps chickens in; it does not keep anything out. A raccoon tears it, and a weasel simply walks through the mesh — a raccoon does not need to get inside to kill a bird roosting against the wire, which is the failure mode University of Kentucky Extension documents directly (ID-245).

Use quarter-inch hardware cloth, screwed through fender washers rather than only stapled. Half-inch is the commonly quoted figure and it genuinely stops raccoons — but a least weasel squeezes through anything a quarter-inch or larger, so half-inch mesh does not deliver the weasel, mink and snake exclusion most plans imply it does. Extend it as a 12-inch apron buried down and out around the run perimeter so nothing digs under; that 12-inch figure is confirmed independently by Kentucky, Maryland and Florida extension services. Full detail in the predator-proofing guide.

The raised floor is doing real work

Setting the floor 24 inches up on 4×4 posts is not a styling decision. It keeps the floor structure out of ground moisture, removes the dead cavity that rats and snakes colonise under a grade-level floor, and gives the birds another 64 square feet of dry, shaded space that costs nothing extra to build. In hot climates that shade is the coolest ground on the property by mid-afternoon.

Ventilation is the number-two killer after predators

The four 18 × 23 inch windows plus the gable ends carry the ventilation load for 64 square feet of floor. The rule is roughly 1 square foot of permanent vent per 10 square feet of floor, and the openings need to sit above roosting height so moisture leaves without blowing a draft across the birds. If you are building in a cold climate, do not reduce the vent area for winter — see the ventilation guide and the insulation guide.

Check your setbacks before the first post goes in

At 17 feet 6 inches of overall length this is a substantial accessory structure. Most jurisdictions require a setback from property lines, and many require a permit past roughly 100–120 square feet of footprint. Both are far cheaper to satisfy before the build than after a neighbour complains. The coop permit guide covers how the rules generally work.

Cut one, test-fit, then batch the rest

The framing section runs 25 pages and there are 104 studs in the material list, which tempts everyone into batch-cutting on day one. Don't. Cut one of each part, dry-fit it in place, confirm it against the drawing, and only then cut the remaining eight. A sixteenth of an inch of drift is invisible on one stud and impossible to hide across a wall.

Frequently Asked Questions

Are these 8x8 chicken coop plans really free?

Yes. The full 80-page PDF is a free download — no payment, no trial. We drew these plans ourselves rather than linking you to someone else's, and the complete material list, dimensions and cut lengths are also published on this page so you can price the build before you download anything.

How many chickens fit in an 8x8 coop?

Twelve to sixteen standard hens. At 64 square feet of coop floor the 4-sq-ft-per-bird rule allows sixteen, and the attached 8x8 run adds another 64 square feet of covered outdoor space plus the shaded area under the raised floor. If your birds free-range during the day you can run the higher number comfortably.

What does it cost to build this 8x8 chicken coop?

At 2026 big-box lumber prices, expect roughly $1,400–$2,200 depending on your region and what you choose for siding and roofing. The heavy line items are 104 pieces of 2x4, 10 sheets of 3/4-inch plywood, 104 pieces of lap siding and 10 sheets of metal roofing. See our cost breakdown guide for a line-by-line build budget.

How long does this coop take to build?

Five to six full days for two people with basic carpentry experience — realistically three weekends. The framing section is the longest stretch of the plan at 25 pages. A single builder working alone should plan on eight to ten days.

Do I need a permit to build an 8x8 chicken coop?

Often yes. At 64 square feet of coop plus a 64-square-foot run you are past the "no permit needed" threshold in many jurisdictions, which commonly sits between 100 and 120 square feet of total footprint. Check with your local zoning office before you buy lumber — our coop permit guide covers how the rules typically work.

What tools do I need?

A circular saw, a drill/driver, a tape measure, a level, a square and a ladder cover the whole build. Nothing in the plan requires a table saw, a compound miter saw or pocket-hole joinery, though a miter saw makes the repetitive stud cuts far faster.

Why is the coop floor raised 24 inches off the ground?

Three reasons. It keeps the floor structure off wet ground so it does not rot, it denies rats and snakes a nesting cavity under a slab-level floor, and it hands the birds an extra 64 square feet of shaded, dry space beneath the coop that costs you nothing to build.

Can I build this coop without the run?

Yes. The coop and the run are framed as separate assemblies — steps 1 through 9 build the coop, step 10 onward adds the run. If you free-range your flock or already have a fenced yard, stop after the chicken door and you have a complete standalone 8x8 coop.

Get the full plan set

All 80 pages — every elevation, every cut table, all sixteen assembly steps.

Download the free PDF

Building something smaller? Browse all our chicken coop plans or start with the beginner plans.