Posts
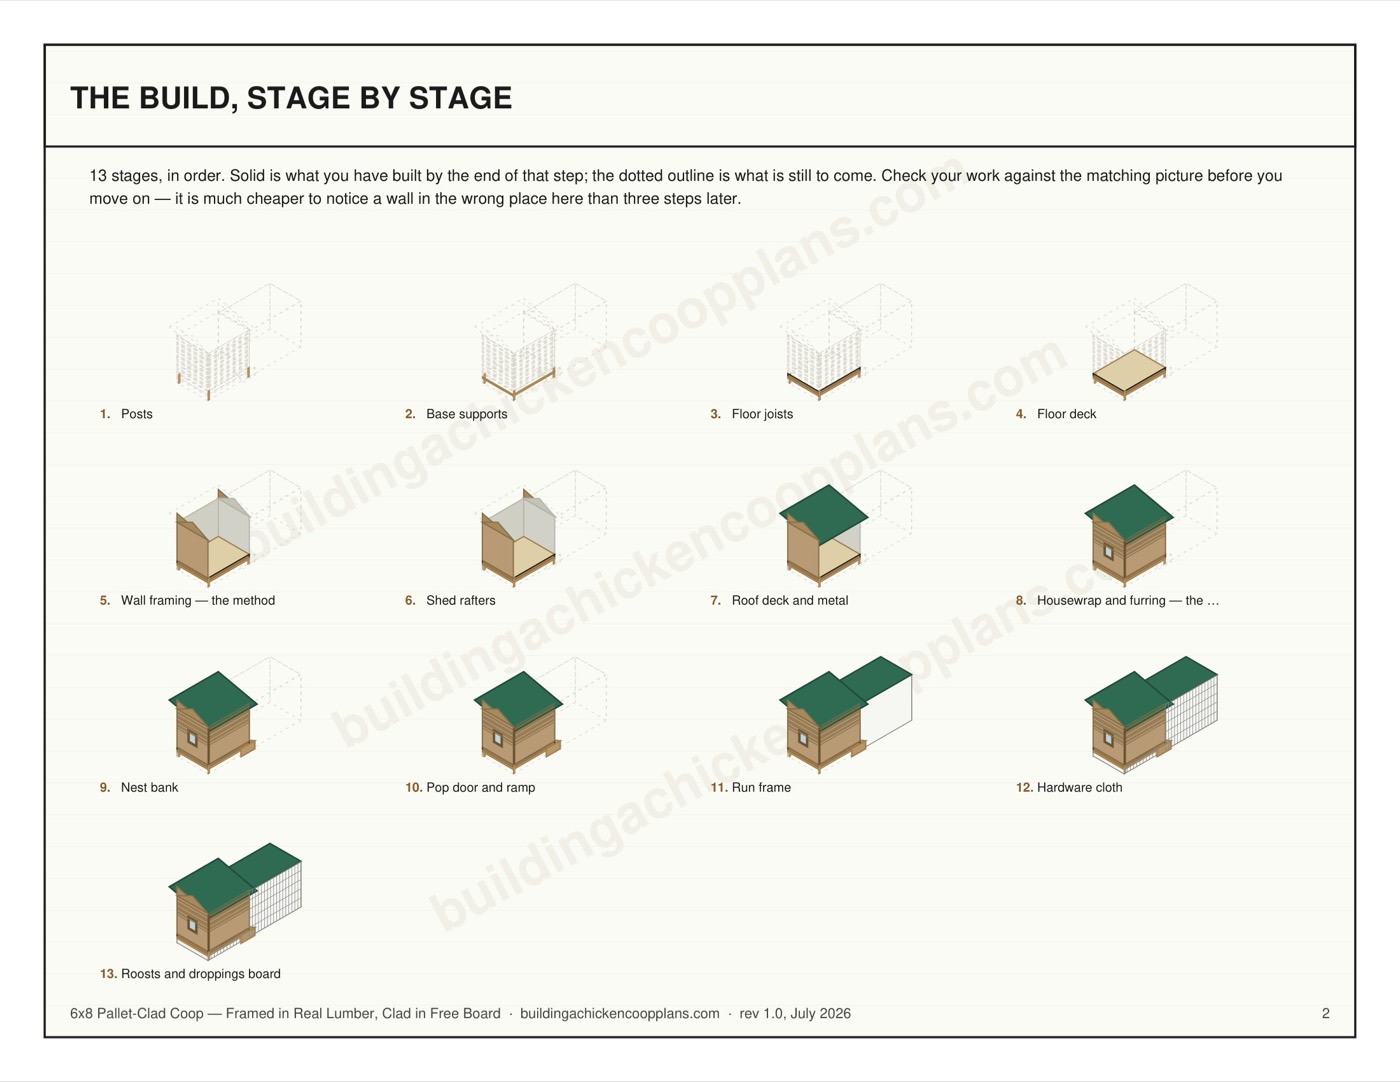
Four 4x4 posts cut to 94-3/4" carry the structure from grade to the top plate. Setting the floor 12" up keeps the frame out of ground moisture and hands the flock the shaded space underneath.
| Part | Qty | Length | Stock | Note |
|---|---|---|---|---|
| Post A | 4 | 94-3/4" | 4x4 |
Free 6-page preview · No email
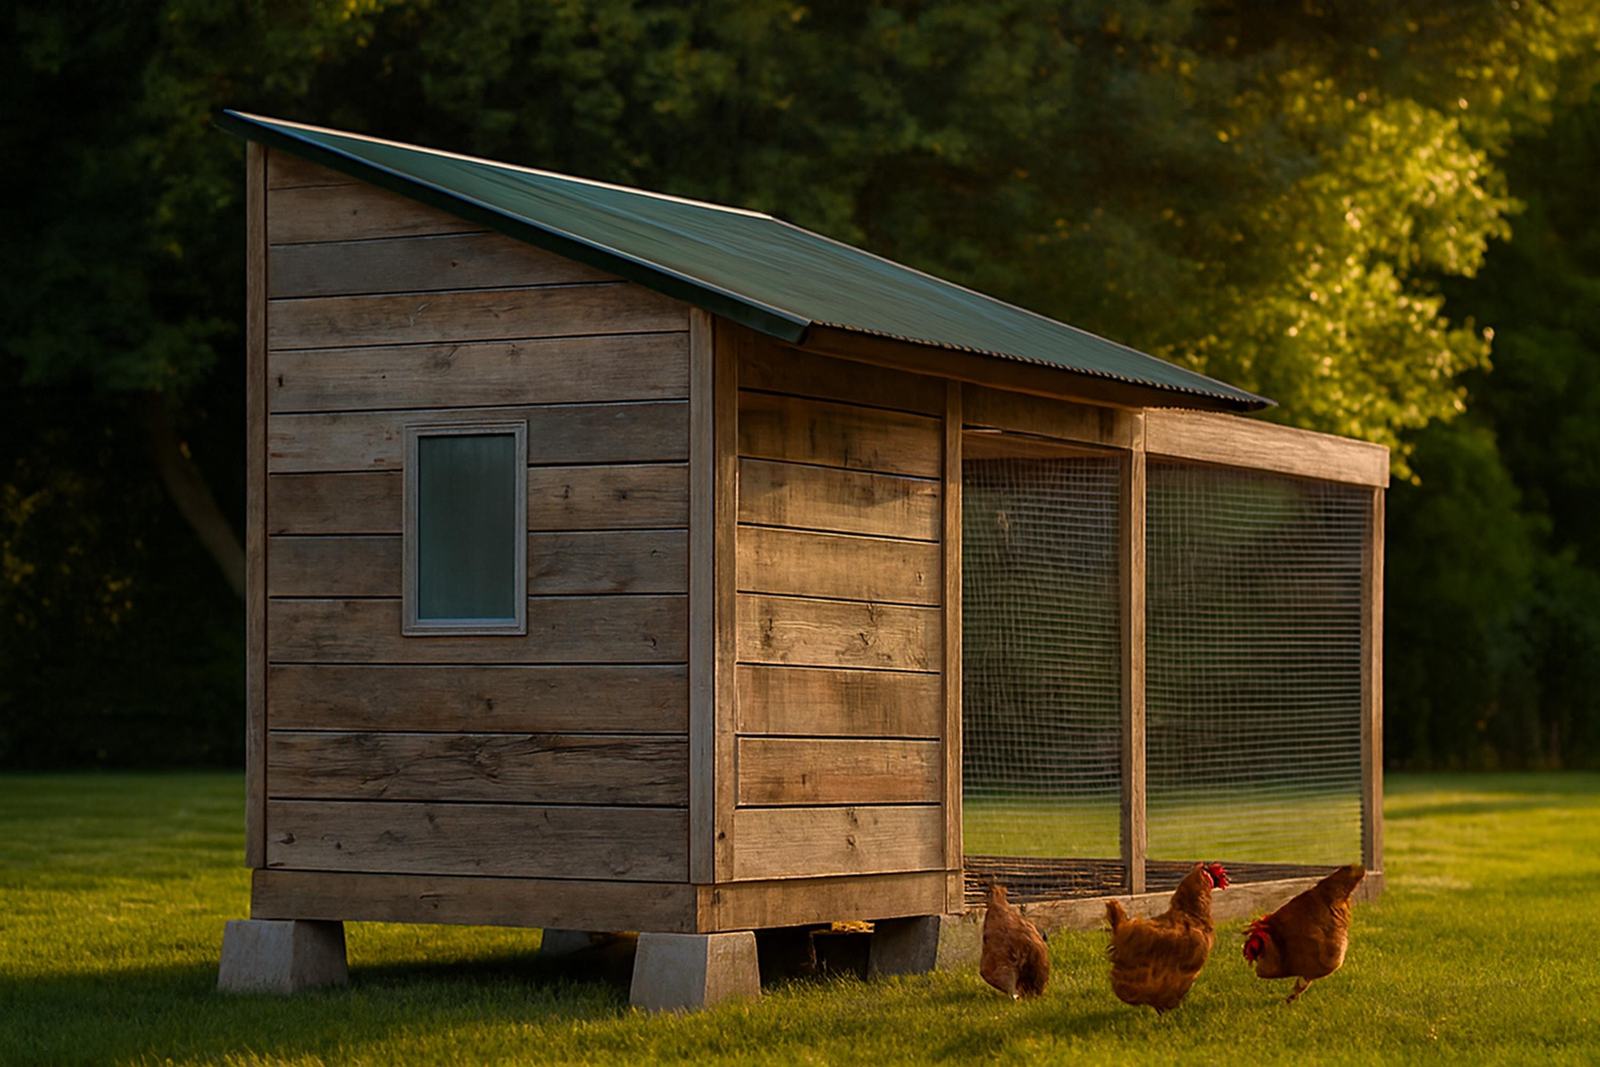
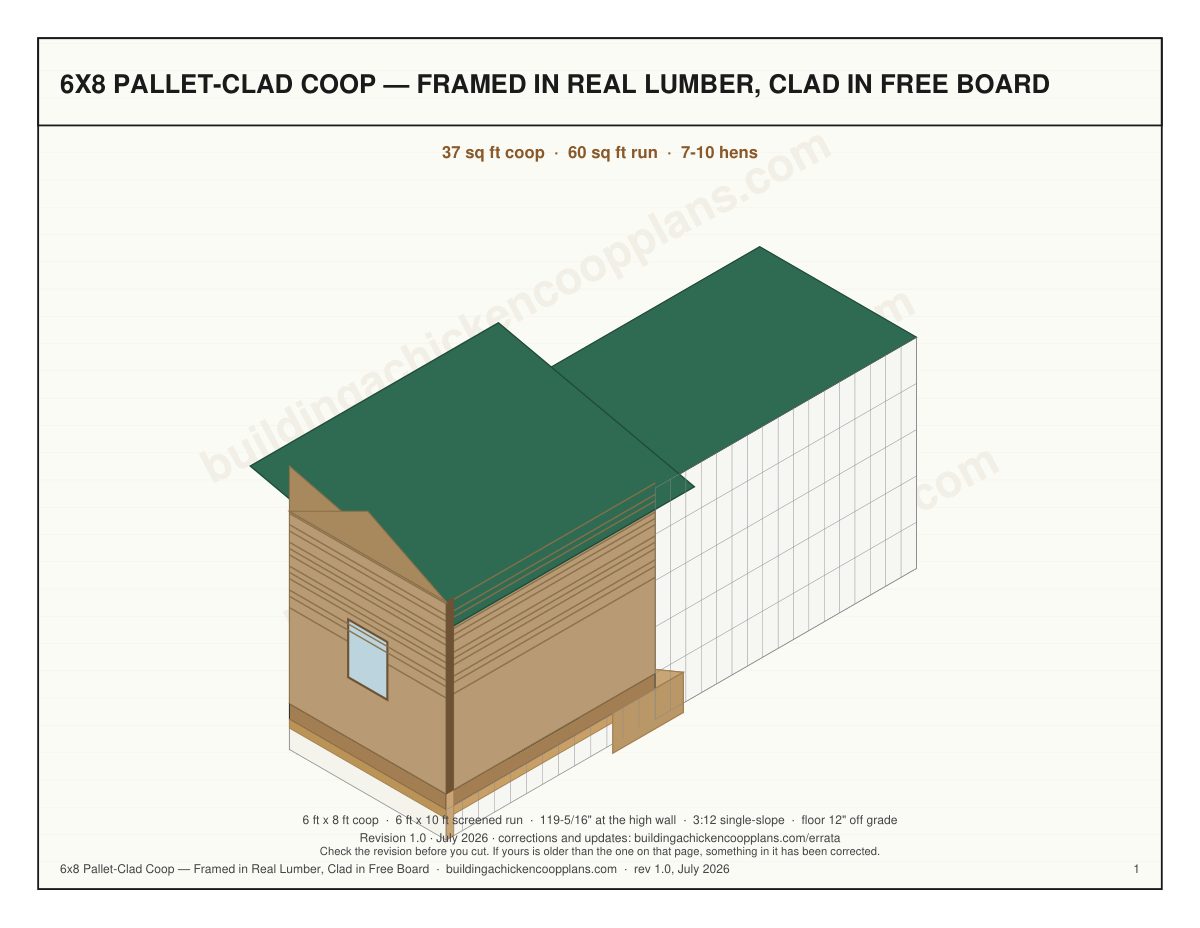
6x8 Pallet-Clad Coop — Framed in Real Lumber, Clad in Free Board: 37 sq ft of coop and 60 sq ft of screened run for 7-10 hens. Dimensioned drawings, a complete material list, and every cut length across 20 assembly steps. Intermediate build, five to seven days (38-50 hrs), plus about 10 hrs stripping pallets.
Every dimension, spec table and cut list below is free on this page. Complete 49-page book: Full plans on Etsy.
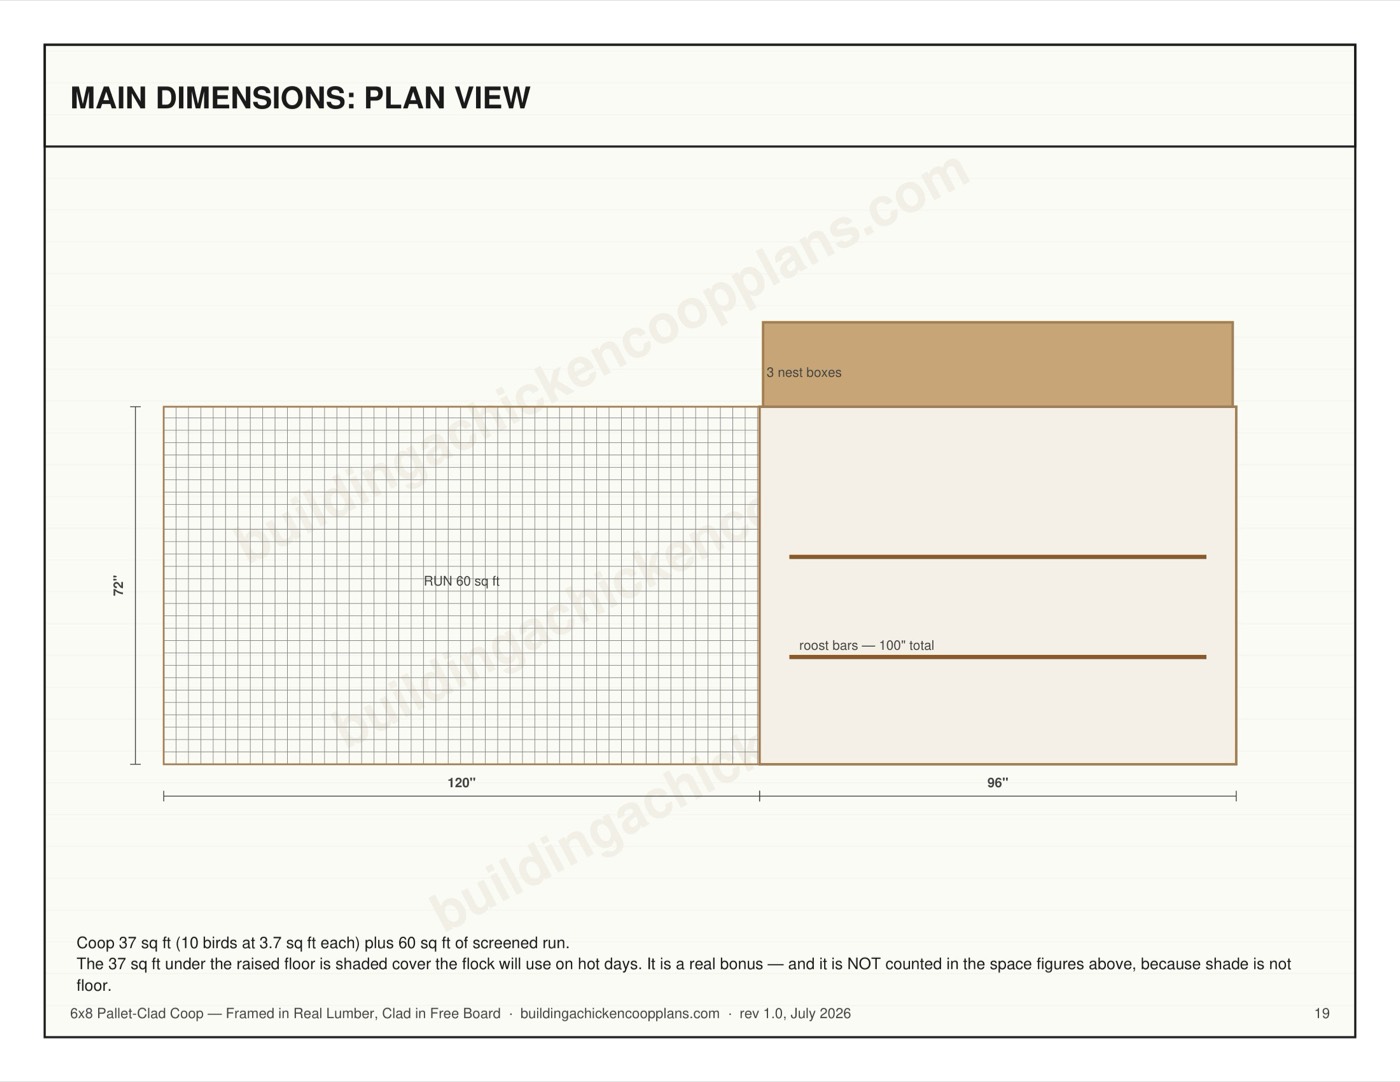
| Coop footprint | 6 ft × 8 ft — 37 sq ft of bird floor |
|---|---|
| Run | 6 ft × 10 ft (60 sq ft), screened |
| Overall length | 216" coop + run |
| Peak height | 119-5/16" (18" roof rise) |
| Interior wall height | 72" |
| Floor height | 12" off grade — screened bay underneath |
| Capacity | 7-10 hens |
| Nest boxes | 3 in a 45" bank |
| Roost bar | 100" minimum (10" per bird) |
| Ventilation | 3.3 sq ft across 3 windows |
| Floor framing | 7 joists at 16" OC, 66" clear span |
| Build time | Five to seven days (38-50 hrs), plus about 10 hrs stripping pallets |
| Difficulty | Intermediate |
| Materials cost | $2,850–$3,800 at 2026 prices |
Sample sheets from the complete 49-page plan book — dimensioned drawings, cut tables and build references drawn at print quality. The previews below are watermarked; the book is not. Everything published on this page stays free.
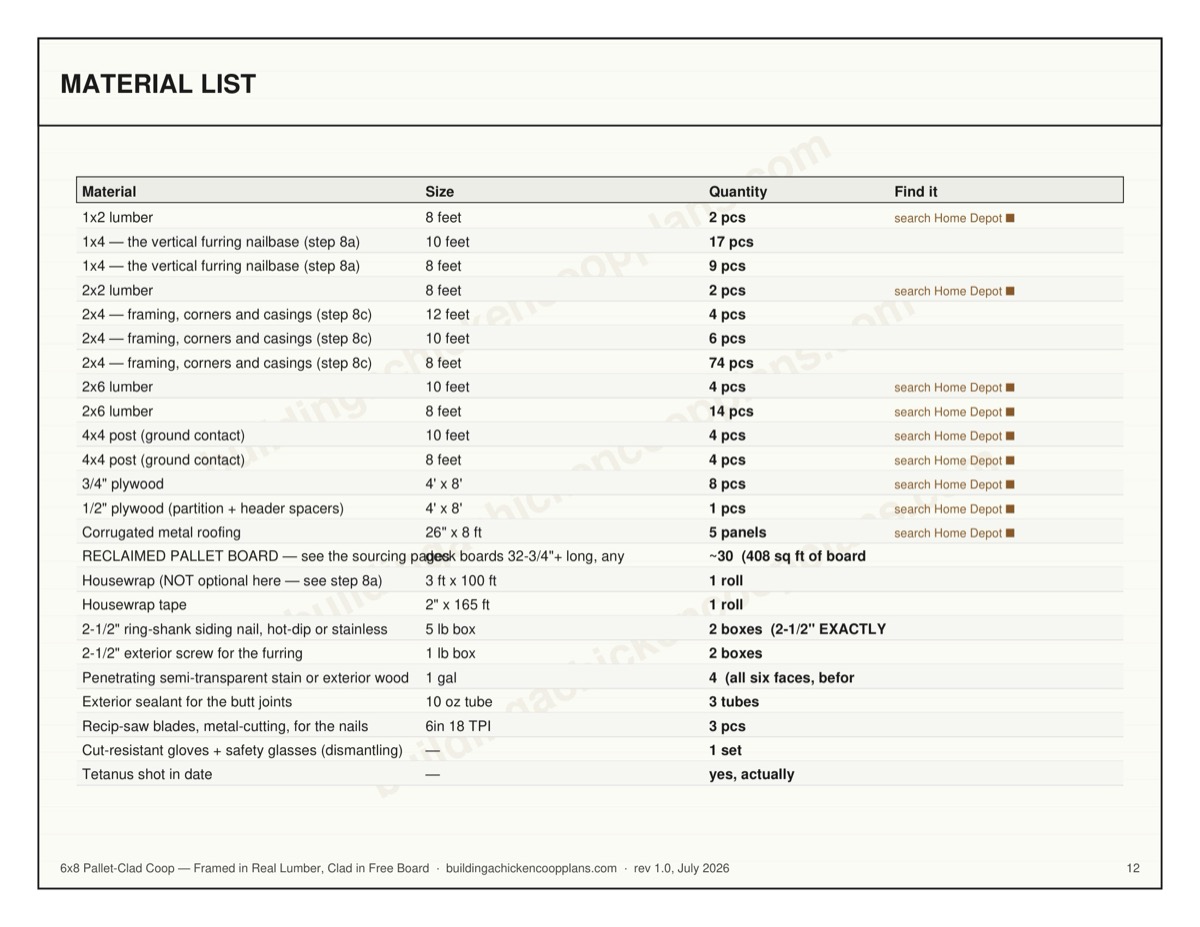
The complete bill of materials. Quantities carry no waste allowance — add two or three extra boards if you are new to framing.
| Material | Size | Quantity |
|---|---|---|
| 1x2 lumber | 8 feet | 2 pcs |
| 1x4 — the vertical furring nailbase (step 8a) | 10 feet | 17 pcs |
| 1x4 — the vertical furring nailbase (step 8a) | 8 feet | 9 pcs |
| 2x2 lumber | 8 feet | 2 pcs |
| 2x4 — framing, corners and casings (step 8c) | 12 feet | 4 pcs |
| 2x4 — framing, corners and casings (step 8c) | 10 feet | 6 pcs |
| 2x4 — framing, corners and casings (step 8c) | 8 feet | 74 pcs |
| 2x6 lumber | 10 feet | 4 pcs |
| 2x6 lumber | 8 feet | 14 pcs |
| 4x4 post (ground contact) | 10 feet | 4 pcs |
| 4x4 post (ground contact) | 8 feet | 4 pcs |
| 3/4" plywood | 4' x 8' | 8 pcs |
| 1/2" plywood (partition + header spacers) | 4' x 8' | 1 pcs |
| Corrugated metal roofing | 26" x 8 ft | 5 panels |
| RECLAIMED PALLET BOARD — see the sourcing pages | deck boards 32-3/4"+ long, any pallet size | ~30 (408 sq ft of board to harvest; about 10 hrs to strip) |
| Housewrap (NOT optional here — see step 8a) | 3 ft x 100 ft | 1 roll |
| Housewrap tape | 2" x 165 ft | 1 roll |
| 2-1/2" ring-shank siding nail, hot-dip or stainless | 5 lb box | 2 boxes (2-1/2" EXACTLY — see step 8a, a 3in nail comes out the back of the stud) |
| 2-1/2" exterior screw for the furring | 1 lb box | 2 boxes |
| Penetrating semi-transparent stain or exterior wood oil | 1 gal | 4 (all six faces, before hanging) |
| Exterior sealant for the butt joints | 10 oz tube | 3 tubes |
| Recip-saw blades, metal-cutting, for the nails | 6in 18 TPI | 3 pcs |
| Cut-resistant gloves + safety glasses (dismantling) | — | 1 set |
| Tetanus shot in date | — | yes, actually |
| Roof screws, neoprene washer | 1-1/2" | 200 pcs |
| Drip edge / eave closure strip | 10 ft | 4 pcs |
| 1/4" hardware cloth, 19 ga | 36" roll | 100 ft + 25 ft + 25 ft (129 ft needed) |
| Fender washers + screws for cloth | 1" washer | 516 pcs |
| Heavy-duty staples | 1/2" | 1 box (1000) |
| Coop windows | 18" x 23" | 3 |
| Pier blocks | solid concrete deck block | 10 pcs |
| Gravel, compacted under each block | 3/4" clean | 9 cu ft |
| Coarse sand or 3/8in drain rock (run floor) | 3-4in deep | 1 cu yd |
| 2-1/2" exterior screws | 5 lb box | 4 boxes |
| 1-1/2" exterior screws | 5 lb box | 2 boxes |
| 4" structural screws | — | 24 pcs |
| 3/8" x 4" lag bolts (run to coop) | — | 8 pcs |
| Exterior caulk | 10 oz tube | 3 tubes |
| Hinges | — | 10 (4 openable parts, buy in pairs) |
| Two-action latches | — | 5 |
Nominal vs actual: the list uses nominal sizes (2×4), the drawings use finished sizes (1-1/2" × 3-1/2"). Check your own stock before cutting.
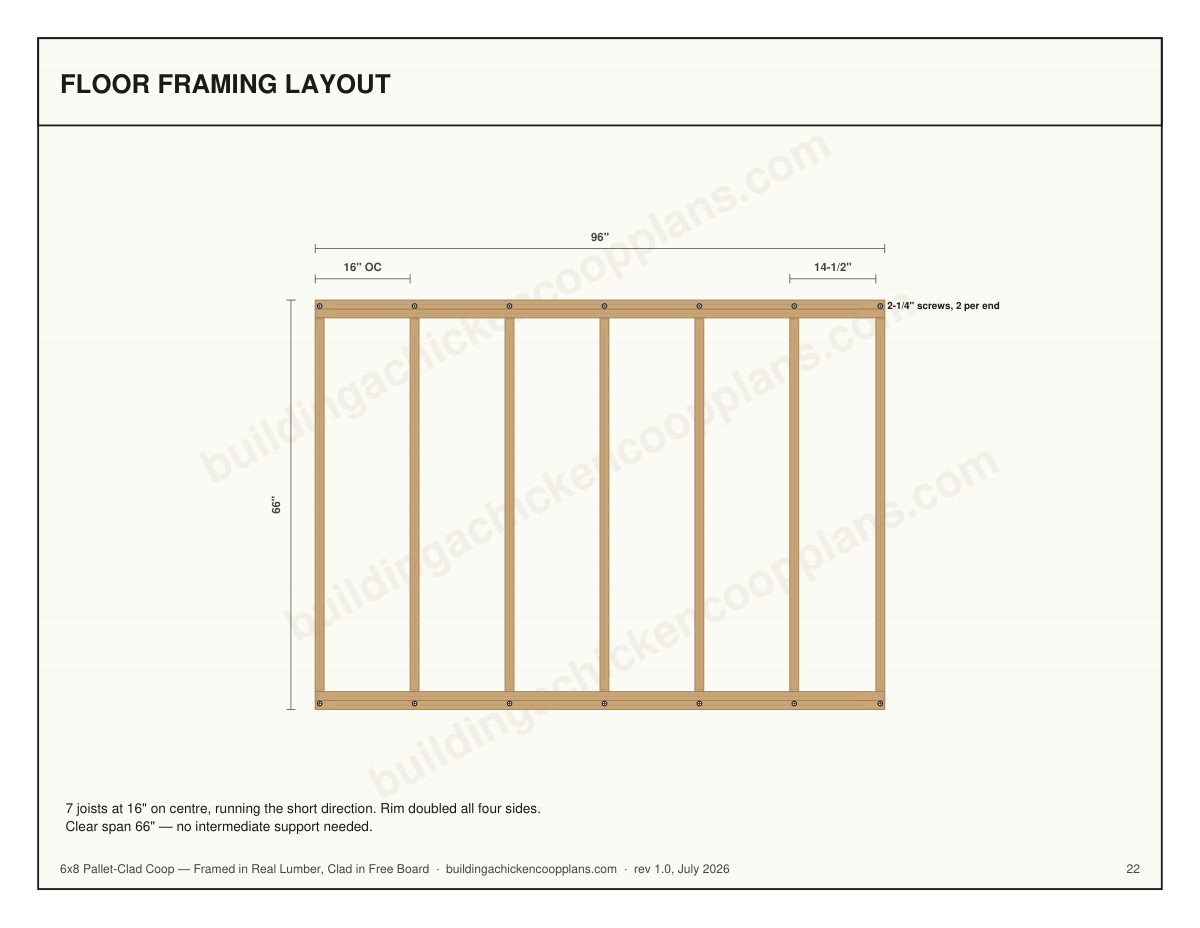
7 joists at 16" on centre running the short direction, rim doubled on all four sides, 66" clear span — comfortably inside the published span tables, so no intermediate support is needed. True 16" spacing means plywood seams land on framing.
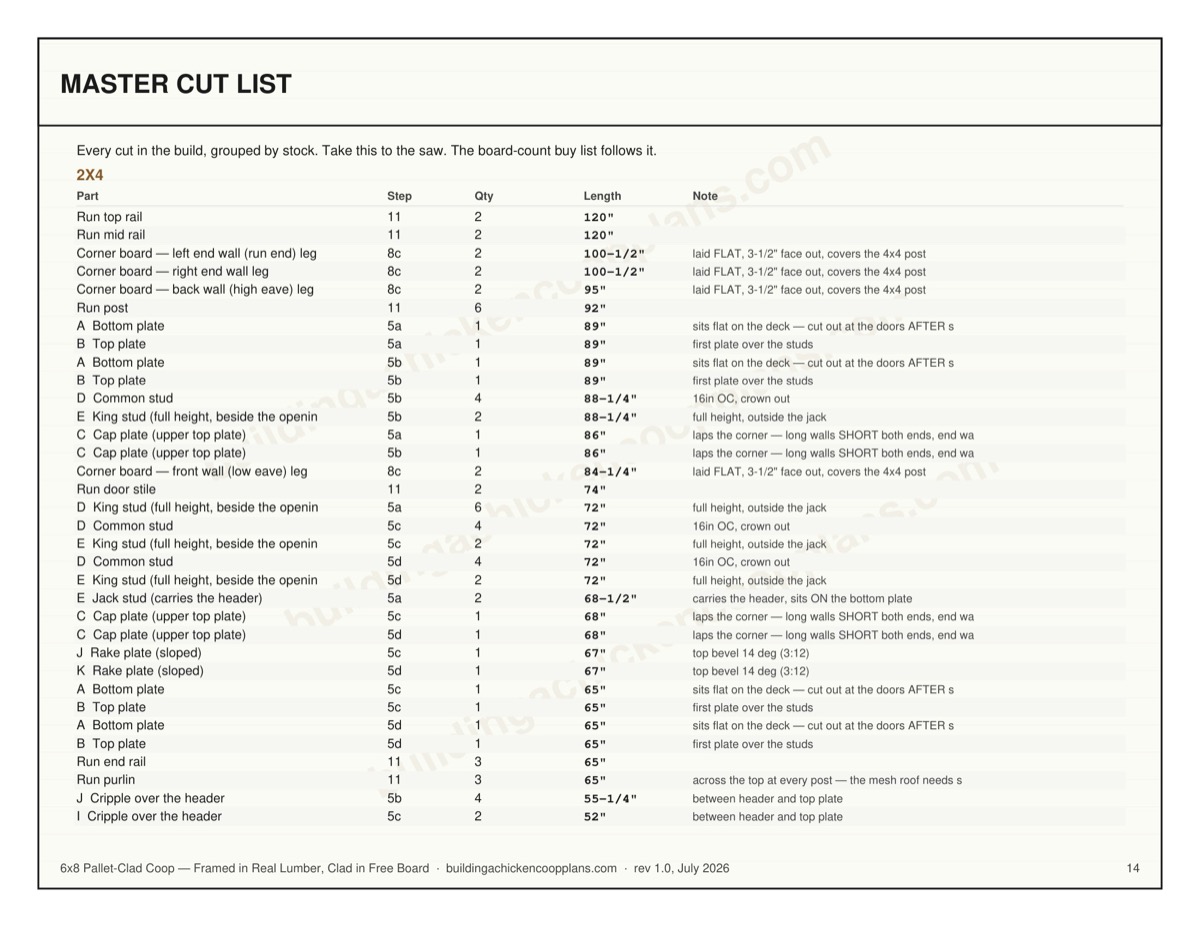
Every cut length below is computed from the same geometry that draws the PDF, so the numbers on this page and the numbers in the plan set cannot disagree.
Four 4x4 posts cut to 94-3/4" carry the structure from grade to the top plate. Setting the floor 12" up keeps the frame out of ground moisture and hands the flock the shaded space underneath.
| Part | Qty | Length | Stock | Note |
|---|---|---|---|---|
| Post A | 4 | 94-3/4" | 4x4 |
The base ring ties the four posts into a rigid square at grade. Use the 4-inch screws here — this joint carries the racking load for the life of the coop.
| Part | Qty | Length | Stock | Note |
|---|---|---|---|---|
| Base support A (front/back) | 2 | 65" | 4x4 | |
| Base support B (sides) | 2 | 89" | 4x4 | |
| Base blocking | 8 | 20-1/2" | 2x4 |
Joists sit 12" above grade on 16" centres, running the short direction across 66" in 2x6, with the rim doubled on all four sides. At 66" the 2x6 joists span well inside the 8 ft 4 in that AWC DCA6 Table 2 allows at 16-inch centres, so no intermediate girder is needed. Crown every joist up before you fasten it. Where the datum is. Every height in this set is measured from the TOP OF THE PIER BLOCK — the surface the posts actually stand on, not the soil. Set the blocks first, level them to each other with a string line, and treat that plane as zero. If the blocks sit 4in proud of the dirt the finished coop is 4in taller than the numbers here, which is fine; measuring one post from the block and the next from the ground is not. Fixing the floor frame to the posts. This is the joint everything above stands on and it is the one most plans leave to guesswork. Build the rim rectangle first, square it to the diagonals, then drop it over the four posts so the rim sits ON the base ring and CLOSES the outside face of each post. Fasten each corner with two 4in structural screws driven through the rim into the post, one 1-1/2in down from the top of the rim and one 1-1/2in up from the bottom, offset from each other so they are not in the same grain line. Eight screws in total, four corners. Predrill — a 4in screw close to the end of a 2x6 will split it otherwise.
| Part | Qty | Length | Stock | Note |
|---|---|---|---|---|
| Rim joist (long sides) | 4 | 96" | 2x6 | doubled |
| Floor joist | 7 | 66" | 2x6 | 16" OC, last bay short |
Deck the floor in 3/4" plywood, notched 3-1/2" square at each corner so it drops cleanly around the posts. Fasten with 1-1/2 inch screws every 8 inches on the joists.
| Part | Qty | Length | Stock | Note |
|---|---|---|---|---|
| Floor panel | 1 | 72" x 96" | 3/4" plywood | notch corners |
Every wall is framed FLAT ON THE DECK and then stood up. That is the whole trick: you are working on a level surface, gravity holds the parts where you put them, and you can push the frame square before a single screw goes in. Studs run 16" on centre so 4-foot sheet goods break on a stud. Build order matters. Front wall, back wall, then the two end walls. The long walls go up first and get braced to the deck; the end walls then drop between them and lock the box square. If you stand a short wall first it has nothing to brace against. Every wall gets three plates: a bottom plate, a top plate, and a cap plate over the top. The cap plate is not a second top plate for strength — it is there to LAP the corner. Hold the long walls' cap plate back 1-1/2" at BOTH ends, and run the end walls' cap 1-1/2" long at BOTH ends. On this coop that is a 86" cap on a 89" long wall and a 68" cap on an 65" end wall. The end-wall caps then run over the long-wall caps at all four corners and tie the walls into one ring. A butt joint at every corner is a box that racks. Cut the bottom plate CONTINUOUS through every door opening. Frame it, stand it, brace it, and only then saw the plate out of the doorway with a handsaw. It is what keeps the wall square while you move it.
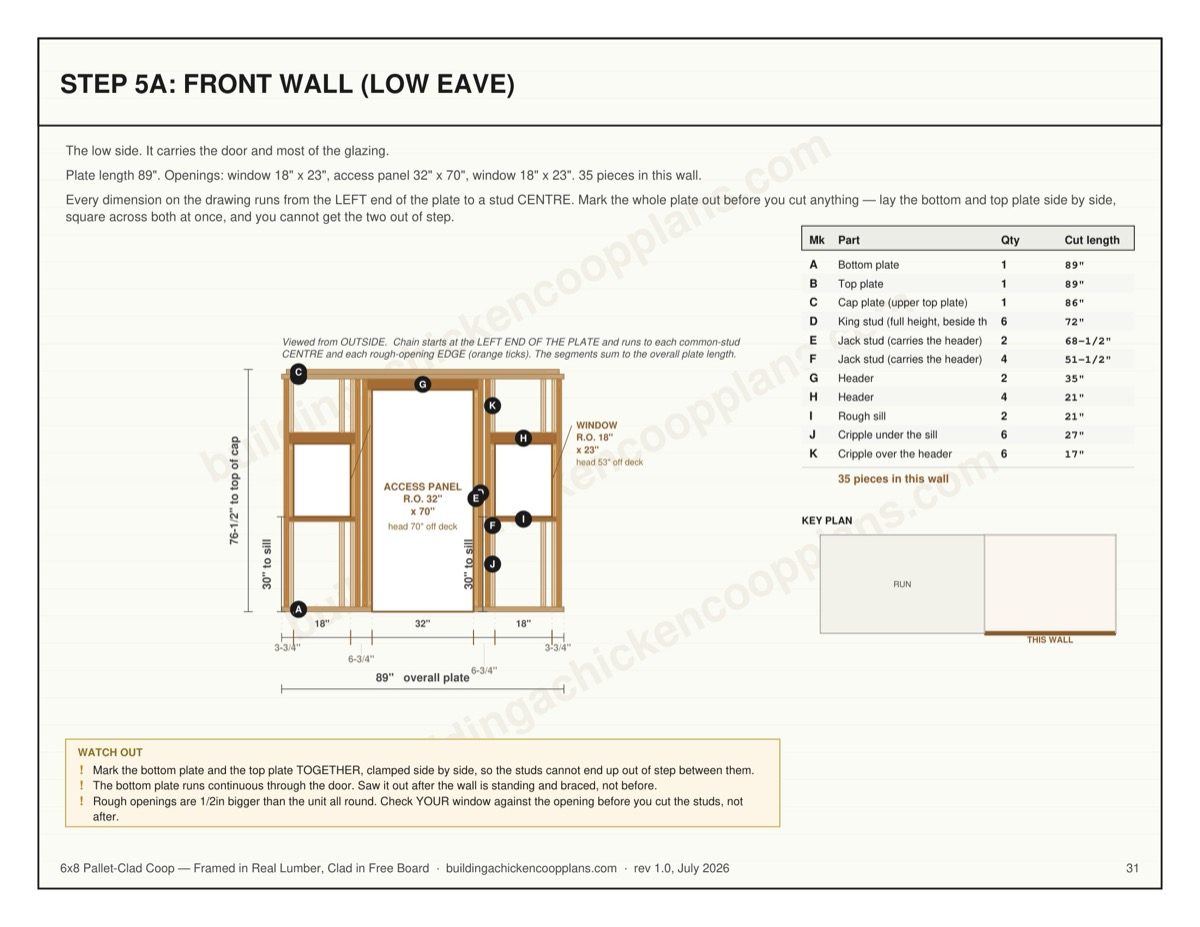
The low side. It carries the door and most of the glazing. Plate length 89". Openings: window 18" x 23", access panel 32" x 70", window 18" x 23". 35 pieces in this wall. Every dimension on the drawing runs from the LEFT end of the plate to a stud CENTRE. Mark the whole plate out before you cut anything — lay the bottom and top plate side by side, square across both at once, and you cannot get the two out of step.
| Part | Qty | Length | Stock | Note |
|---|---|---|---|---|
| A Bottom plate | 1 | 89" | 2x4 | sits flat on the deck — cut out at the doors AFTER standing |
| B Top plate | 1 | 89" | 2x4 | first plate over the studs |
| C Cap plate (upper top plate) | 1 | 86" | 2x4 | laps the corner — long walls SHORT both ends, end walls LONG both ends |
| D King stud (full height, beside the opening) | 6 | 72" | 2x4 | full height, outside the jack |
| E Jack stud (carries the header) | 2 | 68-1/2" | 2x4 | carries the header, sits ON the bottom plate |
| F Jack stud (carries the header) | 4 | 51-1/2" | 2x4 | carries the header, sits ON the bottom plate |
| G Header | 2 | 35" | 2x4 | two pieces + a 1/2in plywood spacer = 3-1/2in thick, flush both faces |
| H Header | 4 | 21" | 2x4 | two pieces + a 1/2in plywood spacer = 3-1/2in thick, flush both faces |
| I Rough sill | 2 | 21" | 2x4 | rough sill under the window |
| J Cripple under the sill | 6 | 27" | 2x4 | between bottom plate and rough sill |
| K Cripple over the header | 6 | 17" | 2x4 | between header and top plate |
The HIGH side — its studs are longer than the front wall's by the full rise of the roof. The nest bank hangs outside it and the vent strip runs along the top, so keep the top bay clear. Plate length 89". Openings: nest bank opening 45" x 13". 22 pieces in this wall. Every dimension on the drawing runs from the LEFT end of the plate to a stud CENTRE. Mark the whole plate out before you cut anything — lay the bottom and top plate side by side, square across both at once, and you cannot get the two out of step.
| Part | Qty | Length | Stock | Note |
|---|---|---|---|---|
| A Bottom plate | 1 | 89" | 2x4 | sits flat on the deck — cut out at the doors AFTER standing |
| B Top plate | 1 | 89" | 2x4 | first plate over the studs |
| C Cap plate (upper top plate) | 1 | 86" | 2x4 | laps the corner — long walls SHORT both ends, end walls LONG both ends |
| D Common stud | 4 | 88-1/4" | 2x4 | 16in OC, crown out |
| E King stud (full height, beside the opening) | 2 | 88-1/4" | 2x4 | full height, outside the jack |
| F Jack stud (carries the header) | 2 | 27-1/2" | 2x4 | carries the header, sits ON the bottom plate |
| G Header | 2 | 48" | 2x6 | two pieces + a 1/2in plywood spacer = 3-1/2in thick, flush both faces |
| H Rough sill | 1 | 48" | 2x4 | rough sill under the window |
| I Cripple under the sill | 4 | 13" | 2x4 | between bottom plate and rough sill |
| J Cripple over the header | 4 | 55-1/4" | 2x4 | between header and top plate |
The run attaches to this wall and the pop door passes through it. Seen from outside, the roof runs DOWNHILL left to right. Plate length 65". Openings: pop door 12" x 14". 21 pieces in this wall. Every dimension on the drawing runs from the LEFT end of the plate to a stud CENTRE. Mark the whole plate out before you cut anything — lay the bottom and top plate side by side, square across both at once, and you cannot get the two out of step.
| Part | Qty | Length | Stock | Note |
|---|---|---|---|---|
| A Bottom plate | 1 | 65" | 2x4 | sits flat on the deck — cut out at the doors AFTER standing |
| B Top plate | 1 | 65" | 2x4 | first plate over the studs |
| C Cap plate (upper top plate) | 1 | 68" | 2x4 | laps the corner — long walls SHORT both ends, end walls LONG both ends |
| D Common stud | 4 | 72" | 2x4 | 16in OC, crown out |
| E King stud (full height, beside the opening) | 2 | 72" | 2x4 | full height, outside the jack |
| F Jack stud (carries the header) | 2 | 16-1/2" | 2x4 | carries the header, sits ON the bottom plate |
| G Header | 2 | 15" | 2x4 | two pieces + a 1/2in plywood spacer = 3-1/2in thick, flush both faces |
| H Rough sill | 1 | 15" | 2x4 | rough sill under the window |
| I Cripple over the header | 2 | 52" | 2x4 | between header and top plate |
| J Rake plate (sloped) | 1 | 67" | 2x4 | top bevel 14 deg (3:12) |
| K Rake stud (sloped top wall) | 1 | 16-1/16" | 2x4 | top bevel 14 deg (3:12) |
| L Rake stud (sloped top wall) | 1 | 12-1/16" | 2x4 | top bevel 14 deg (3:12) |
| M Rake stud (sloped top wall) | 1 | 8-1/16" | 2x4 | top bevel 14 deg (3:12) |
| N Rake stud (sloped top wall) | 1 | 4-1/16" | 2x4 | top bevel 14 deg (3:12) |
Fixed wall with a window. This wall MIRRORS the left end: seen from outside, the roof runs UPHILL left to right. Plate length 65". Openings: window 18" x 23". 25 pieces in this wall. Every dimension on the drawing runs from the LEFT end of the plate to a stud CENTRE. Mark the whole plate out before you cut anything — lay the bottom and top plate side by side, square across both at once, and you cannot get the two out of step.
| Part | Qty | Length | Stock | Note |
|---|---|---|---|---|
| A Bottom plate | 1 | 65" | 2x4 | sits flat on the deck — cut out at the doors AFTER standing |
| B Top plate | 1 | 65" | 2x4 | first plate over the studs |
| C Cap plate (upper top plate) | 1 | 68" | 2x4 | laps the corner — long walls SHORT both ends, end walls LONG both ends |
| D Common stud | 4 | 72" | 2x4 | 16in OC, crown out |
| E King stud (full height, beside the opening) | 2 | 72" | 2x4 | full height, outside the jack |
| F Jack stud (carries the header) | 2 | 51-1/2" | 2x4 | carries the header, sits ON the bottom plate |
| G Header | 2 | 21" | 2x4 | two pieces + a 1/2in plywood spacer = 3-1/2in thick, flush both faces |
| H Rough sill | 1 | 21" | 2x4 | rough sill under the window |
| I Cripple under the sill | 3 | 27" | 2x4 | between bottom plate and rough sill |
| J Cripple over the header | 3 | 17" | 2x4 | between header and top plate |
| K Rake plate (sloped) | 1 | 67" | 2x4 | top bevel 14 deg (3:12) |
| L Rake stud (sloped top wall) | 1 | 16-1/16" | 2x4 | top bevel 14 deg (3:12) |
| M Rake stud (sloped top wall) | 1 | 12-3/16" | 2x4 | top bevel 14 deg (3:12) |
| N Rake stud (sloped top wall) | 1 | 8-3/16" | 2x4 | top bevel 14 deg (3:12) |
| O Rake stud (sloped top wall) | 1 | 4-3/16" | 2x4 | top bevel 14 deg (3:12) |
A single-slope shed roof at 3:12 — 18" of fall across the 72" width, which is the minimum pitch exposed-fastener corrugated metal will shed reliably. There is no ridge and no opposing rafter pair, so there is no outward thrust and no rafter tie is required — the load lands straight down on the two side walls. That is the quiet advantage of a shed roof over a gable, and it is why this is the simplest roof in our line to frame. Why the rafter is 2x6 and not something shallower. It spans the full 72" width in one piece with nothing under the middle of it, and at 24" centres that is what the span table allows: 2021 IRC Table R802.4.1(4), Spruce-Pine-Fir No.2, 30 psf ground snow, no ceiling attached, 10 psf dead load, gives 117" for a 2x6 — and 117" for a 2x6, which is why a 2x6 is not on this list unless the building is narrower. Span is measured on the HORIZONTAL, so the slope costs you nothing here; the width does. Deeper is not optional and shallower is not a saving, it is a sag.
| Part | Qty | Length | Stock | Note |
|---|---|---|---|---|
| Shed rafter | 5 | 83-3/16" | 2x6 | birdsmouth both ends, 9" tail |
| Rafter blocking | 8 | 22-1/2" | 2x6 | between rafters — a row at the LOW wall and a row at the HIGH wall |
3/4" plywood over the rafters, then corrugated metal sheets. Metal over shingles because it sheds snow, lasts decades and never needs a tear-off. Lap the sheets one full corrugation.
| Part | Qty | Length | Stock | Note |
|---|---|---|---|---|
| Roof deck panel | 3 | 4' x 8' sheet | 3/4" plywood | lay the 8-ft dimension UP the slope; seams land on a rafter |
| Metal roof panel | 5 | 8 ft x 26" | corrugated steel | 26in wide, 24in coverage; one piece eave to ridge, no lap partway up |
This step is the reason a reclaimed board is allowed on this building at all. Read it before you hang anything. On the standard coop the lap siding IS the weather barrier: milled to one thickness, lapped a known amount, and that lap is what keeps water out of the wall. A reclaimed pallet board cannot do that job and this plan does not ask it to. Here the housewrap is the weather barrier and the pallet boards are a rainscreen — a ventilated, replaceable, decorative screen hung 3/4 inch in front of it. Everything good about this design falls out of that one decision. Boards of different thicknesses stop being a defect and become the finish. Widths stop mattering. A board that splits or rots in four years is a five-minute swap that never touches the wrap or the frame — the cladding is a wear part on this coop, and it is meant to be. And the 3/4 inch of moving air behind it is the only thing keeping alive a wood whose species you do not know and whose decay resistance you therefore cannot look up. Housewrap first, over the bare studs, and it is not optional here. IRC R703.2 lets an unconditioned accessory building skip the water-resistive barrier only where the wall covering is *siding attached directly to studs*. Furred cladding is not, so the exemption does not apply to this design. Lap it 6 inches horizontally, upper sheet OVER lower, and tape the seams. Then one vertical 1x4 furring strip laid flat over every stud, 16" on centre, screwed through the wrap into the stud. Snap a line down each stud on the wrap before you start. Now the fastener, and this is the part that is genuinely different. IRC R703.3.4 wants at least 1-1/2" of penetration into studs or blocking. A 2x4 is 1-1/2" deep — so on a wall with nothing behind the siding, "fully penetrated" and "the point is now sticking into the coop at hen height" are the same event. With a milled board you can thread that needle, because you know how thick it is. Your boards are somewhere between 3/8" and 13/16" and you will not know which until you pick one up. One nail length has to work for all of them: - to reach 1-1/2" through the FATTEST board, the nail must be at least 2-5/16" - to stop short of the back of the stud under the THINNEST board, it must be no more than 2-5/8" Straight onto studs those two come out as "at least 2-5/16"" and "no more than 1-7/8"" — there is no such nail. Cladding a board of unknown thickness directly to a 2x4 wall cannot be done to code without putting points inside the coop. The 3/4" of furring is what opens the window, and a 2-1/2" ring-shank sits in the middle of it with margin at both ends: 1-11/16" of bite under the thickest board, 2-1/8" under the thinnest, against 2-1/4" of wood to bury it in. That is the whole reason the furring is there. It is not trim. Leave a 2" break in each furring strip about 4 feet up, and hold every strip 2" clear of the bottom. Vertical furring drains on its own, but the gap at the foot is what lets the cavity dry from below, and a strip run tight to the rim joist dams it.
| Part | Qty | Length | Stock | Note |
|---|---|---|---|---|
| Furring strip — front wall (low eave) | 7 | 84-1/4" | 1x4 | laid FLAT and VERTICAL, one over every stud, 16" OC. Trim to the rake on site. |
| Furring strip — back wall (high eave) | 7 | 95" | 1x4 | laid FLAT and VERTICAL, one over every stud, 16" OC. Trim to the rake on site. |
| Furring strip — left end wall (run end) | 5 | 100-1/2" | 1x4 | laid FLAT and VERTICAL, one over every stud, 16" OC. Trim to the rake on site. |
| Furring strip — right end wall | 5 | 100-1/2" | 1x4 | laid FLAT and VERTICAL, one over every stud, 16" OC. Trim to the rake on site. |
284 sq ft of board face over 196 sq ft of wall. That is the whole cladding order, and it is an AREA on purpose. This plan cannot tell you how many boards you need, because it does not know how wide yours are, and it is not going to print a count that looks exact and is not. Work to the area, and stop when the wall is covered. Horizontal courses, bottom up, each one lapping the one below by 1". On milled siding you snap a chalk line for every course and the boards follow it. Here it is the other way round: the LAP is the number you gauge, and the course line is whatever falls out of it. Cut a scrap block to 1", use it to set the top edge of every board off the one below, and the wall stays level on its own even though no two boards are the same width. Check against a level every third course; if it has drifted, take it back over the next few courses by easing the lap — you have about half an inch of slop to play with and no more. One nail per board per furring strip, just above the lap. Above the lap, so the nail passes through this board only. Nail through both and you have pinned two boards together across the grain; they still swell, they now cannot move, and the lower one splits. WHERE THE JOINTS GO — the one piece of arithmetic in this skin. A pallet deck board is 40" long, because it is the pallet's 40in width. Your wall is framed at 16" on centre, and a butt joint in horizontal cladding has to land on wood. So joints can only fall on a stud CENTRE — two ends meeting over a 1-1/2" stud get 3/4in of bearing each, which is one nail each and no more, and a joint anywhere else leaves one of those two ends holding nothing. The furthest stud centre you can reach inside 40" is the one at 32in, so the longest piece on this building is 32-3/4" and about a fifth of every board's length goes in the bin. That is not waste you can plan away; it is what a 40in board costs on a 16in wall. Two layouts per wall, alternating up the wall so no joint ever sits on the joint below. The CLADDING LAYOUT page draws both of them on both wall widths, with every joint marked — work from it alongside this table. 89" wall — course A: 32-3/4" + 32" + 24-1/4" (joints at 32-3/4", 64-3/4") course B: 16-3/4" + 32" + 32" + 8-1/4" (joints at 16-3/4", 48-3/4", 80-3/4") 65" wall — course A: 32-3/4" + 32-1/4" (joints at 32-3/4") course B: 16-3/4" + 32" + 16-1/4" (joints at 16-3/4", 48-3/4") Alternate A, B, A, B going up. The joints in A and the joints in B share no position on either wall, which is the whole point — a stack of butt joints is a seam. Course B costs you a couple of short pieces (an 8-1/4" and a 16-3/4 on the long wall); that is the price of the stagger and it is cheaper than the seam. Nothing shorter than 8" goes on the wall. Below that there is no room for a nail at each end and the piece will work loose. STOP THE BACK WALL 5-1/2" SHORT OF THE CAP PLATE. Every other wall runs its top course tight up under the plate. The back wall does not, and this is the one place on the building where doing the obvious thing ruins it. The top bay of that wall is the continuous vent strip — 5-1/2" x 86", 3.3 sq ft, the entire permanent ventilation of this coop. Snap a line 5-1/2" below the underside of the cap plate and let the last course die on it. Hardware cloth goes over the gap in step 12; it is never glazed, never blocked and never closed for winter. Clad tight all round and you have built a sealed box, and a sealed box in January is wet, then ammoniated, then a respiratory problem. Butt the joints tight and run a bead of exterior sealant down each one as you go. Not because the joint has to be watertight — the wrap behind it is what keeps water out of the wall — but because an open butt joint on a south wall wicks and stays wet, and that is where a board of unknown species starts to go.
| Part | Qty | Length | Stock | Note |
|---|---|---|---|---|
| Pallet cladding — COVERAGE, not a count | 0 | 284 sq ft | reclaimed pallet board | 284 sq ft of board FACE. Longest piece 32-3/4"; nothing shorter than 8". |
Corner boards go on FIRST and the cladding butts into them — one 2x4 laid FLAT on each face at every corner, covering the 3-1/2" face of the post behind it. Flat 2x4 and not the 1x4 you would use on milled siding, and the reason is arithmetic: 3/4" of furring plus a board puts your cladding face between 1-1/8" and 1-9/16" out from the stud line, and a flat 2x4 puts the corner at 1-1/2". The two land within an eighth of an inch of each other. They will not be dead flush, and that is not a defect. Depending on which board happens to land at a corner, the cladding will sit anywhere from 3/8" shy of the corner board to 1/16" proud of it. On this finish the variation IS the look — it is why you chose reclaimed board over a sheet of T1-11 — and a plan that drew you a crisp flush corner here would only convince you that you had done it wrong. Casing round every opening, in the same flat 2x4. The doors and the window need a square, consistent edge to close against, and the one thing random-width board cannot give you is a straight line where you need one. NOW HOW LONG IT LASTS — AND THE ANSWER IS NOT THE ONE YOU HAVE READ. You will be told that pallet wood rots because it is red oak or low-grade pine and neither is durable. That comes from the natural-durability tables, and those tables are about wood in contact with the ground. They are the wrong tables for a wall, and using them here would have you specify a species you cannot identify anyway: the pallet trade buys 61% of its hardwood as *mixed species, no species separation*, and the design software's own species class for "Eastern oaks" contains red oak and white oak together. You will never know what your boards are. The right study exists and it was run on almost exactly this part. The USDA Forest Products Laboratory put untreated 3/4 x 3 x 6in boards — a pallet deck board, in effect — on a test fence for twenty-two years. Above ground, red oak sapwood and heartwood both came out at more than twenty years, estimated average life 25 years, and NO species tested fell into the non-resistant class at all. Bare pallet oak on a ventilated wall is not a four-year material. And then the finding this whole design is built around. In the same study, the same red oak, made into a joint that traps water and dries slowly, lasted six years against twenty-plus for the open boards. Same wood. Same fence. Same weather. Nearly a 4x difference, and the only variable was whether water could get out. So the durability strategy on this coop is not species and it is not a coating. It is the detailing, and you have already built most of it: the 3/4in ventilated gap behind the boards, the drainage break in the furring, the cladding held clear of grade, and the wrap doing the water management instead of the wood. Two things are still on you: Seal every cut end, and back-coat every board before it goes up. End grain is where the six-year joint failed and this skin has three or four cut ends in every course instead of one every nine feet. This is the cheapest thing in the plan and it is the one people skip. Use a penetrating semi-transparent stain or a wood oil, not paint and not a solid stain. Rough-sawn reclaimed board will not hold a film coat evenly across pieces of different age, density and absorbency; a film that fails in patches peels and then traps water underneath it, which is worse than no film at all. A penetrating finish cannot peel because there is nothing to peel. Recoat the weather walls every two to three years. You still get the grey-brown reclaimed look — you just also get to keep the boards. One species note that runs opposite to the folklore. In that same above-ground study the oaks made the twenty-year group and southern yellow pine did not. If you are choosing between a pile of pale softwood boards and a pile of heavy hardwood ones, the hardwood is the better bet on a wall — which is the reverse of what nearly everyone assumes.
| Part | Qty | Length | Stock | Note |
|---|---|---|---|---|
| Corner board — front wall (low eave) leg | 2 | 84-1/4" | 2x4 | laid FLAT, 3-1/2" face out, covers the 4x4 post |
| Corner board — back wall (high eave) leg | 2 | 95" | 2x4 | laid FLAT, 3-1/2" face out, covers the 4x4 post |
| Corner board — left end wall (run end) leg | 2 | 100-1/2" | 2x4 | laid FLAT, 3-1/2" face out, covers the 4x4 post |
| Corner board — right end wall leg | 2 | 100-1/2" | 2x4 | laid FLAT, 3-1/2" face out, covers the 4x4 post |
Every opening you framed in step 5 now gets something to close it. Cut each slab a quarter inch smaller than its rough opening on all four sides — 3/4in plywood swells in the wet and a door cut to the exact opening size will bind by November. Then close that gap with a stop. A quarter inch is the clearance the door needs and it is also, exactly, the gap this plan tells you a least weasel fits through. Run a 1x2 stop around the inside of every door opening so the slab closes against it and the gap is blocked, not open. On the pop door, staple a strip of hardware cloth behind the stop as well. Access panel on the front wall (low eave): slab 31-1/2" x 69-1/2" in a 32" x 70" opening — a 1/4in gap all round. 3 hinges, out, hinged on the left as you face it from outside. Pop door on the left end wall (run end): slab 11-1/2" x 13-1/2" in a 12" x 14" opening — a 1/4in gap all round. 2 hinges, out, hinged on the left as you face it from outside. Every plywood door over 30in tall gets a Z-brace on the back: a rail top and bottom and one diagonal running from the bottom hinge corner up to the top latch corner. That diagonal is in compression and it is the only thing stopping the door sagging into a parallelogram. Run it the wrong way and it does nothing. Hinge side and swing. All doors here swing OUT, hinged on the left as you face them from outside. Out, because a door that opens inward sweeps the bedding and gets blocked by it; left, so every latch on the coop is in the same place and you are not hunting for it in the dark with an armful of feed.
| Part | Qty | Length | Stock | Note |
|---|---|---|---|---|
| Access panel slab | 1 | 31-1/2" x 69-1/2" | 3/4" plywood | 3 hinges, opens out |
| Access panel batten rail | 2 | 30" | 1x4 | top and bottom, 1in in from each edge |
| Access panel batten diagonal | 1 | 66-7/16" | 1x4 | BOTTOM HINGE corner up to TOP LATCH corner; mitre both ends to suit |
| Pop door slab | 1 | 11-1/2" x 13-1/2" | 3/4" plywood | 2 hinges, opens out |
An exterior nest bank 45" long and 17 inches deep, hung off the side wall with a hinged lid. 3 compartments — one per three to four hens. Collecting eggs from outside means you never disturb a sitting bird.
| Part | Qty | Length | Stock | Note |
|---|---|---|---|---|
| Nest bank floor | 1 | 45" x 17" | 3/4" plywood | |
| Nest bank back | 1 | 45" x 14" | 3/4" plywood | screws to the wall studs |
| Nest bank front | 1 | 45" x 10" | 3/4" plywood | leaves a 4in lip so eggs stay in |
| Nest bank end | 2 | 17" x 14" | 3/4" plywood | closes each end of the bank |
| Nest divider | 2 | 17" x 14" | 3/4" plywood | |
| Nest lid | 1 | 45" x 18" | 3/4" plywood | hinged |
| Nest bank frame | 4 | 45" | 2x4 |
The pop-door slab was already cut in step 8d to fit the opening you framed in step 5c — do not cut another one. This step hangs it and builds the ramp. Measure the ramp drop on site. It runs from the pop-door sill, 22-1/4" above grade, down to the FINISHED run surface — which is the sand or drain rock you placed in step 11, not bare ground. On a level site that is about 43-1/16" of ramp at a comfortable angle, but cut it to what you measure, not to what is printed here.
| Part | Qty | Length | Stock | Note |
|---|---|---|---|---|
| Ramp | 1 | 43-1/16" x 10" | 3/4" plywood | trim to your measured drop |
| Ramp cleat | 10 | 10" | 1x2 | every 4in, so a hen has grip |
The 6 ft x 10 ft screened run frames off the coop wall, 92" tall. 3 posts a side on roughly 4-foot centres, with a top rail and a mid rail so the hardware cloth has something to fasten to at every course. The mid rail goes at 32 inches, not higher — the cloth comes off a 36-inch roll, so a course run up from the ground reaches 36 inches and has to land ON a rail with a lap to spare. Set the run posts the same way you set the coop posts in step 1 — on the same pier blocks, at the same height, checked with the same string line. A run on a different footing system than the coop it hangs off will move against it and open a gap at the joint, which is exactly where a predator starts. Fixing the run to the coop: the two run rails that meet the coop are lag-bolted into the corner posts of the run-end wall, not screwed into siding. Two 3/8in x 4in lag bolts per rail, drilled with a 1/4in pilot, one 3in above the rail's bottom edge and one 3in below its top. Siding is a skin; it holds nothing. The run door is 33" wide — two 2x4 stiles plus 26" rails between them. Hang it in the end bay furthest from the coop so you are not squeezing past the ramp with a bucket. Purlins across the top at every post. A quarter-inch mesh roof spanning eight feet unsupported sags into a hammock and a raccoon can bear it down far enough to get a leg through. The purlins are what the roof mesh fastens to. Get the water out before you put the birds in. A run that ponds turns into mud, mud turns into the coccidiosis and bumblefoot problems that cost people their flock, and no amount of hardware cloth fixes it. Three things, in order of how much they matter: grade the run to fall away from the coop — an inch of drop for every eight feet is enough and it costs you nothing but a rake; keep the run surface above the surrounding grade, not level with it, so it sheds instead of collects; and top it with 3 to 4 inches of coarse sand or 3/8in drain rock, not topsoil and not straw. Coarse sand drains, dries fast and can be raked clean like a litter box. Do this before the apron goes in — you cannot regrade under a buried mesh skirt.
| Part | Qty | Length | Stock | Note |
|---|---|---|---|---|
| Run post | 6 | 92" | 2x4 | |
| Run top rail | 2 | 120" | 2x4 | |
| Run mid rail | 2 | 120" | 2x4 | |
| Run end rail | 3 | 65" | 2x4 | |
| Run purlin | 3 | 65" | 2x4 | across the top at every post — the mesh roof needs something to span to |
| Run brace | 4 | 33" | 2x4 | 45 deg corner braces, 33in on the long points |
| Run door stile | 2 | 74" | 2x4 | |
| Run door rail | 3 | 26" | 2x4 | finished door 33" wide |
The step that decides whether you still have a flock in two years. Quarter-inch hardware cloth over every opening, screwed through fender washers rather than only stapled. Quarter-inch, not half-inch. A least weasel squeezes through a half-inch opening; quarter-inch mesh stops it. That is the whole reason for the spec (Univ. of Kentucky Extension ID-245), and half-inch mesh — while genuinely raccoon-proof — does not stop weasels, mink or snakes. Chicken wire stops nothing: a raccoon reaches straight through the hexagonal gaps. Bury a 12-inch apron down and out around the whole run perimeter, turned outward at the bottom into an L. Sources for both numbers: Univ. of Kentucky Cooperative Extension ID-245 and Virginia Cooperative Extension 2902-1092. The windows get cloth too. An open 18 x 23 window is a hole a raccoon walks through, and it is the ventilation you rely on in summer, so it has to stay open at night. Staple a panel of cloth to the INSIDE of every window opening before the unit goes in — behind the glazing, not over it, so the window still shuts on a clean frame. Same for the continuous vent strip along the top of the back wall and the nest-bank opening.
| Part | Qty | Length | Stock | Note |
|---|---|---|---|---|
| Run walls | 1 | 67 lin ft | 1/4" hardware cloth | |
| Run roof | 1 | 20 lin ft | 1/4" hardware cloth | |
| Buried apron, 12in down and 12in out | 1 | 22 lin ft | 1/4" hardware cloth | |
| Window screens | 1 | 5 lin ft | 1/4" hardware cloth | |
| Continuous eave vent strip | 1 | 2 lin ft | 1/4" hardware cloth | |
| Nest opening and pop-door surround | 1 | 3 lin ft | 1/4" hardware cloth | |
| Under-floor skirt | 1 | 10 lin ft | 1/4" hardware cloth |
10 birds NEED 100 inches of perch at 10 inches each. Why 10 and not the 6 you have read everywhere. Six inches — 15cm — is in EU Directive 1999/74/EC, the UK Welfare of Farmed Animals Regulations, the Canadian NFACC code, the UEP and Certified Humane standards and the USDA organic rule. Eight instruments, one number, and all eight copied it from the 1999 directive. Then somebody measured a hen: Giersberg, Spindler and Kemper (2019) put a perching brown layer's body width at 14.8cm and a dual-purpose hen's at 16.0cm. At 15cm a bird has nothing to spare, so the standards that claim 6 inches lets a whole flock roost at once are wrong on their own arithmetic. EFSA's 2023 review recommends 7-1/16" per hen and that is the only figure here with evidence under it. We build to 10, which clears both. The cut list below BUILDS 147 inches — 3 bars at 49". Those are two different numbers and this plan states both, because a plan that prints the requirement and calls it the built total is contradicting its own cut table. Use a rounded or slightly flattened bearing surface 1 to 2 inches across rather than a thin dowel or a full 3-1/2 inch flat face: it spreads footpad pressure and lowers bumblefoot risk. So mount the 2x4 ON EDGE, 1-1/2 inch face up, and ease the top corners round. Laid flat it presents a 3-1/2 inch face, which is the thing the sentence above tells you to avoid — the bar is the same board either way and the plan has to say which. (One exception, and it is not yours unless you are in hard-freeze country: keepers in deep-winter climates deliberately lay the bar flat so a hen can cover her toes with her breast feathers against frostbite. Below about zone 5 that trade is not worth the footpad pressure.) Set the top of each bar 20" off the floor, 11-13/16" apart, and at least 7-7/8" off the wall. Those last two are not eyeballed: 30cm between perches at the same height and 20cm from a perch to a wall are in EU Directive 1999/74/EC and the UK Welfare of Farmed Animals Regulations, and EFSA derives the 30 from the length of a sitting hen — 15cm of her each side of the bar. Stagger them like stair treads rather than stacking them, so the birds underneath do not get rained on. No bar sits over a nest box. 49" of bar does not hold itself up. Each bar gets 1 leg(s) under it at 24-1/2", so no length of bar spans more than 48" between supports. A roost bar is a 2x4 on edge, and no span table published anywhere lists a 2x4 in bending — which is the same reason the floor under you is framed in 2x6. Wall cleats at the two ends are the whole support on the smaller coops in this line and they are not enough here. Directly beneath the bars goes a removable droppings board — birds put out most of a night's manure while roosting, and catching it on a board you slide out and scrape turns the daily clean into a two-minute job. Never use wire for this: droppings stick to mesh and it becomes impossible to clean.
| Part | Qty | Length | Stock | Note |
|---|---|---|---|---|
| Roost bar | 3 | 49" | 2x4 | MOUNT ON EDGE — 1-1/2in face up, top corners eased round |
| Roost support | 4 | 14" | 2x4 | wall cleats |
| Roost bar leg | 3 | 16-1/2" | 2x4 | 1 per bar at 24-1/2" — a 49" bar is not held up by its ends alone |
| Droppings board | 1 | 51" x 24" | 3/4" plywood | removable, sealed or lined |
| Droppings board rail | 2 | 51" | 2x2 | slides out on these |
The 6-page preview PDF is a free download with no email required, and everything published on this page stays free — every dimension, the spec table, the complete material list and all 20 assembly steps with their cut tables. The complete 49-page plan book — every wall on its own sheet with its own cut table, a board-by-board cut plan and a material buy list — is $4.99 in our Etsy shop.
7-10 hens. At 37 sq ft of floor, 7 birds get about 5 sq ft each, with 60 sq ft of screened run on top of that. The top of the range (10) assumes the birds spend their days outside rather than shut in.
Everything on this page — dimensioned plan and elevation drawings, the complete bill of materials (40 line items) and all 20 assembly steps with per-step cut tables — plus what a web page can't carry: every wall framed on its own sheet, a board-by-board cut plan, a buy list you can hand to the lumber yard, and stop-and-measure checkpoints at each stage. The free 6-page preview PDF shows the design overview and main dimensions. On-page specs are computed from the same geometry that draws the PDFs, so the numbers can never disagree.
Complete 49-page book: Full plans on Etsy.
Different size? See all chicken coop plans, or check the size calculator first.