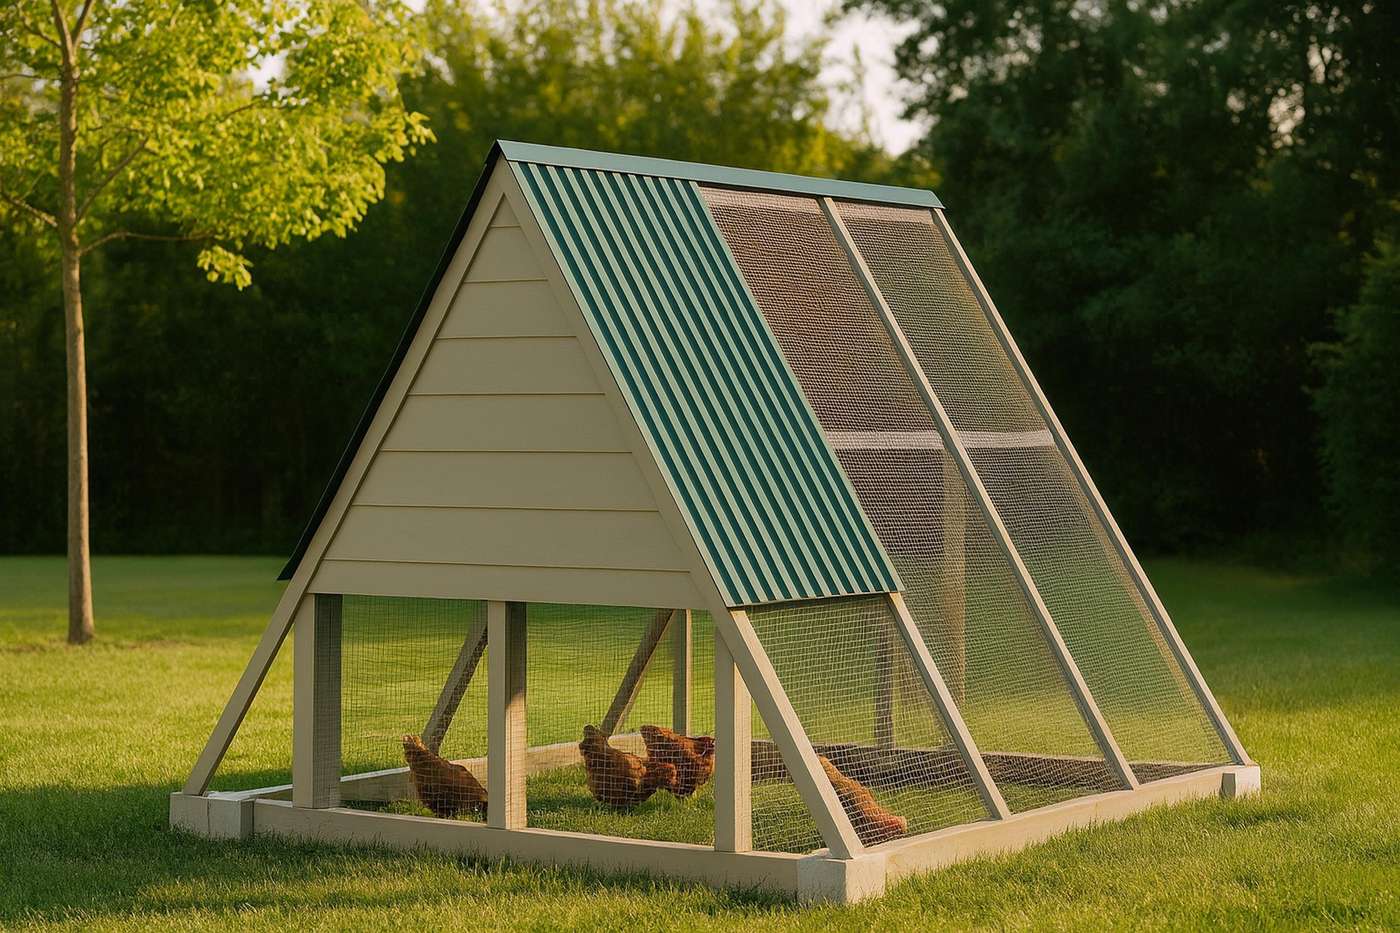
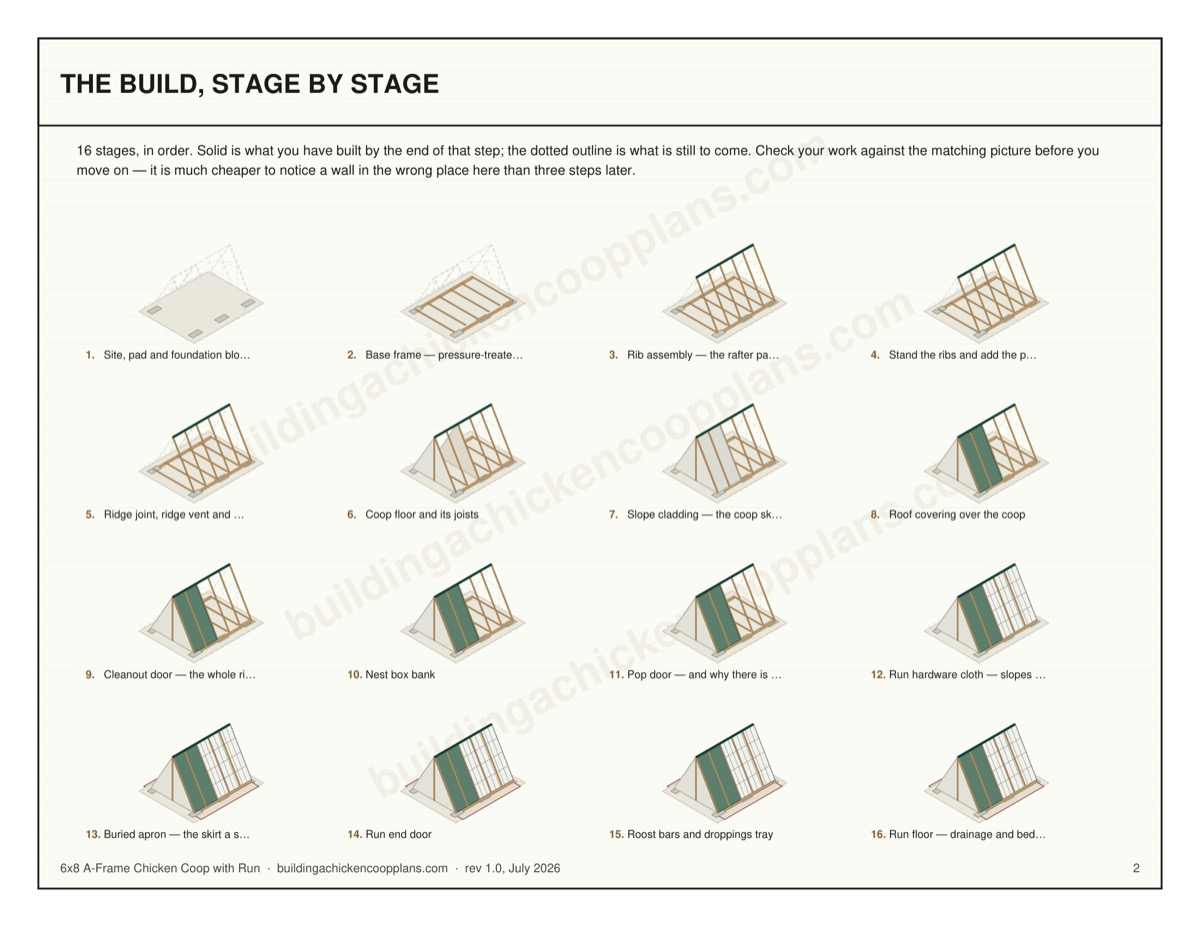
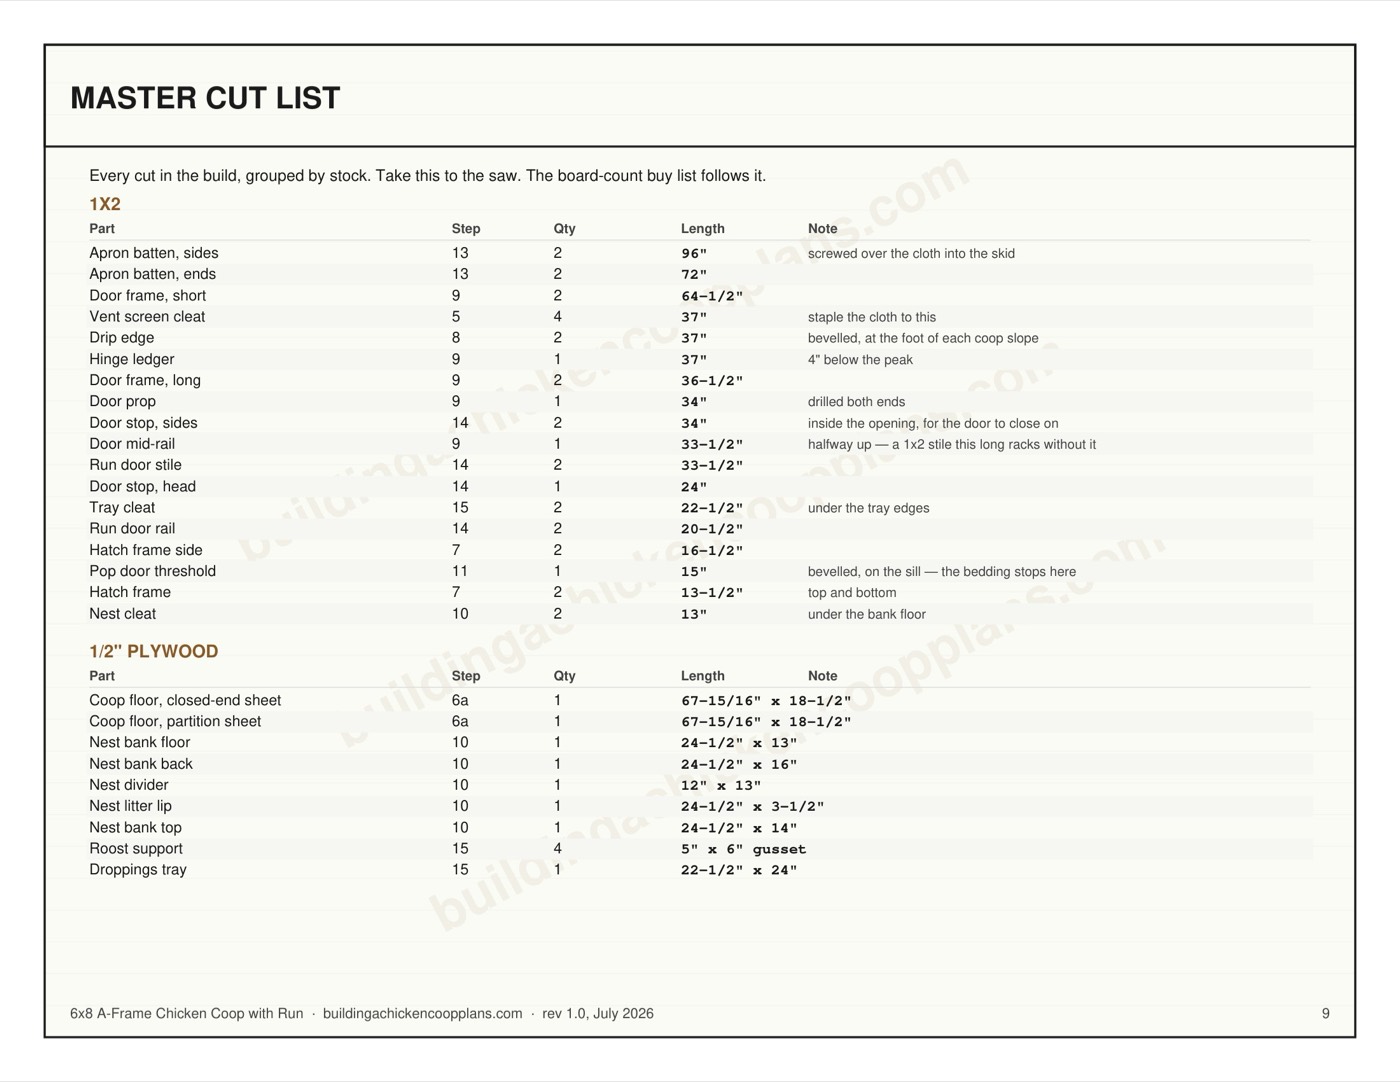
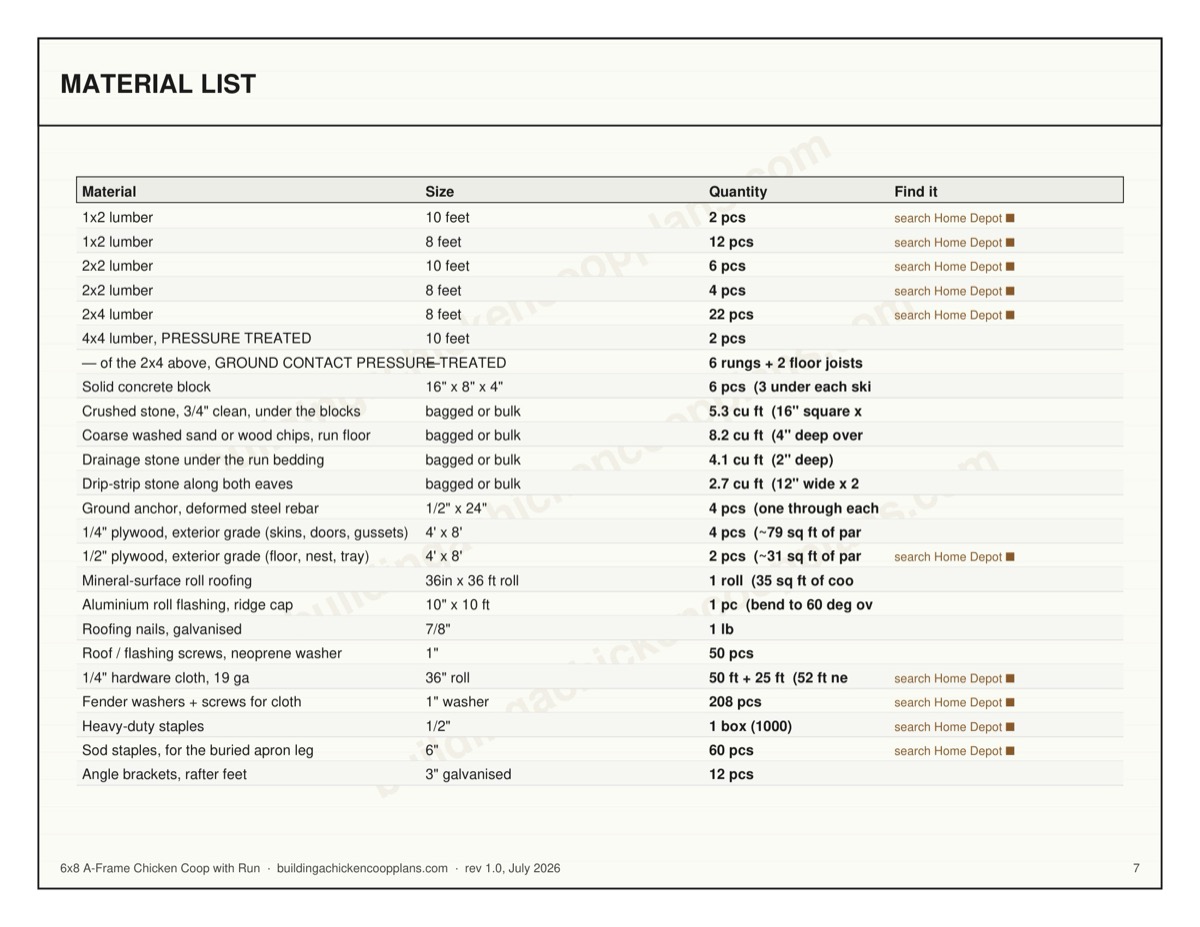
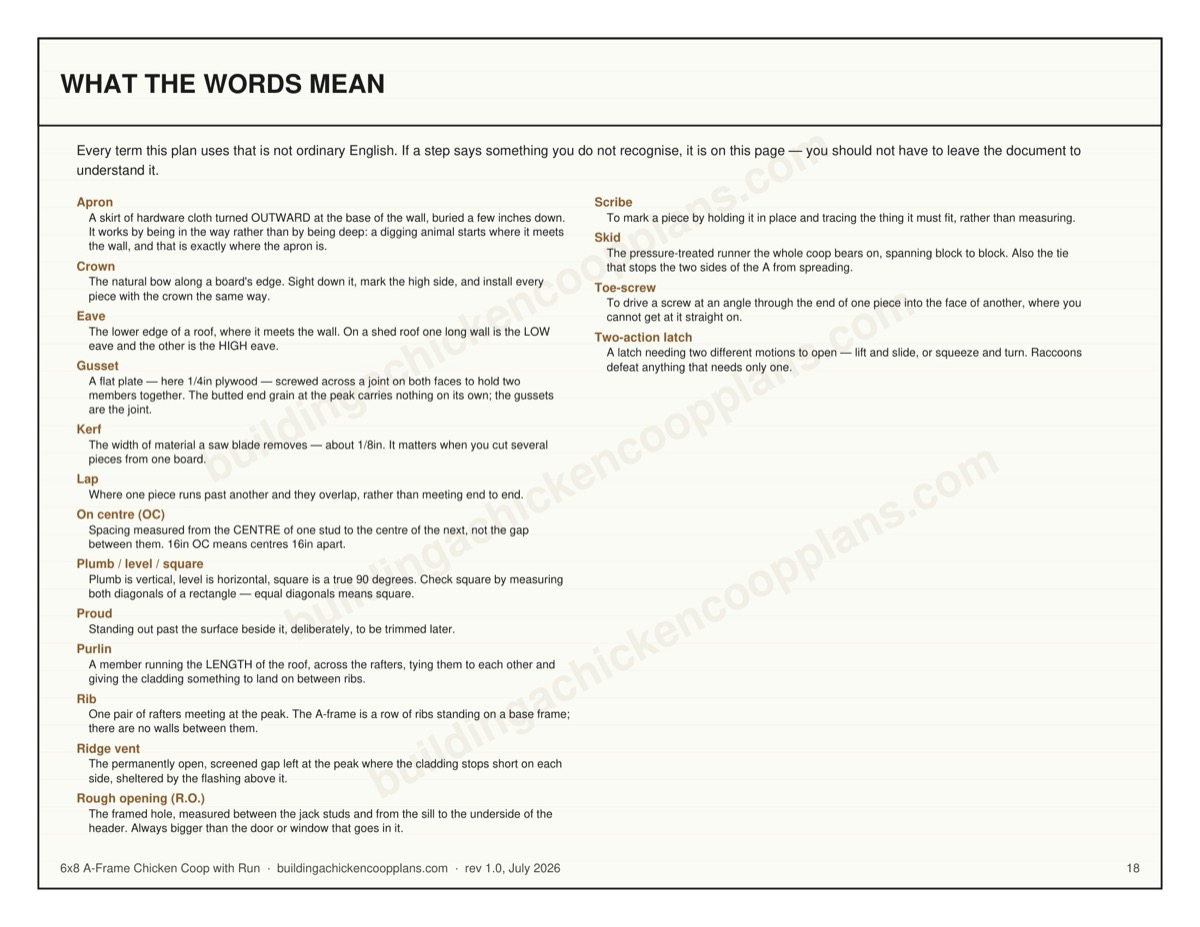
Every cut length below is computed from the same geometry that draws the PDF, so the
numbers on this page and the numbers in the plan set cannot disagree.
1
Site, pad and foundation blocks
This one does not move, so the ground under it is a permanent part of the structure and it is worth a morning.
Pick a spot that DRAINS. The single thing that kills a fixed coop is standing water: wet ground under a run is mud, mud is coccidia and bumblefoot, and no amount of good carpentry above it fixes it. Slope away from the site, never toward it, and never put it at the bottom of a lawn.
Clear a rectangle a foot bigger than 6 ft x 8 ft all round and take the turf off. Set 6 solid concrete blocks — 3 under each skid, at 4", 48", 92" from the closed end. Nothing spans more than 44" between blocks.
Each block sits on a 16" square of 6"-deep crushed stone, tamped hard in two lifts. Solid blocks, not hollow ones: a hollow core cracks under a point load and it is a mouse hotel.
Then get all 6 tops in ONE plane. String a line, use a long level on a straight board, and take stone out rather than packing soil in.
| Part | Qty | Length | Stock | Note |
| Solid concrete block | 6 | 16" x 8" x 4" | Concrete block | |
| Crushed stone, tamped under each block | 1 | 5.3 cu ft | Crushed stone | |
2
Base frame — pressure-treated skids, rungs and ground anchors
The base frame is the foundation, the floor frame and the tie that stops the A from spreading, all in one — the same job it does on the tractor, in ground-contact timber because it lives on stone for twenty years.
Cut two skids 96" long from PRESSURE-TREATED 4x4 and lay them flat on the blocks, 72" apart at the outside faces. The 4x4 is not the tractor's 2x4 on edge: same 3-1/2" of height, but 3-1/2" of width, and that is why every rung here is 65" and not 69".
Cut 6 rungs 65" long, also pressure treated, and screw them between the skids on edge, flush with the skid tops — one at each rib position, so every rafter foot lands on solid framing.
Anchor it. Drill a 5/8" hole down through each corner of the frame and drive a 24" steel rebar pin flush. The finished coop weighs about 545 lb and shows 41.6 sq ft of side elevation to the wind. It is a sail with nothing but its own weight holding it down, and 4 pins cost less than a lunch.
| Part | Qty | Length | Stock | Note |
| Skid | 2 | 96" | 4x4 | PRESSURE TREATED, ground contact |
| Base rung | 6 | 65" | 2x4 | PRESSURE TREATED, on edge between the skids |
| Ground anchor | 4 | 1/2" x 24" | Rebar | |
3
Rib assembly — the rafter pairs
A rib is two rafters meeting at the peak. Build all 6 of them flat on the ground before you stand any, off one set of marks, so they are identical.
Every rafter is the same part: a 2x4 72" on the long edge — exactly 6 ft — cut at 30 degrees off square at BOTH ends, with the two cuts PARALLEL, not mirrored. Set the saw once and cut all 12.
2x4 here, where the tractor uses 2x2. The strut got 50 per cent longer and slenderness is what governs a compression member: at 2x2 and 72" the ratio is 48 against a limit of 50, which is inside it with nothing in hand, and this roof holds snow all winter instead of being dragged into a shed. The tractor's 2x2 bought 40 lb off something a person lifts every morning. Nobody lifts this.
Stand a pair on edge with the 30-degree top cuts butted plumb against each other, then screw a peak gusset across the joint on each face. The gussets ARE the joint — butted end grain carries nothing on its own.
| Part | Qty | Length | Stock | Note |
| Rafter | 12 | 72" | 2x4 | 30 deg both ends, cuts parallel |
| Peak gusset | 12 | 9" x 14" | 1/4" plywood | |
4
Stand the ribs and add the purlins
Stand each rib on its rung, outside faces of the rafter feet flush with the outside of the skids, and fix each foot with an angle bracket plus one screw skewed through the bevel. Brace it upright as you go.
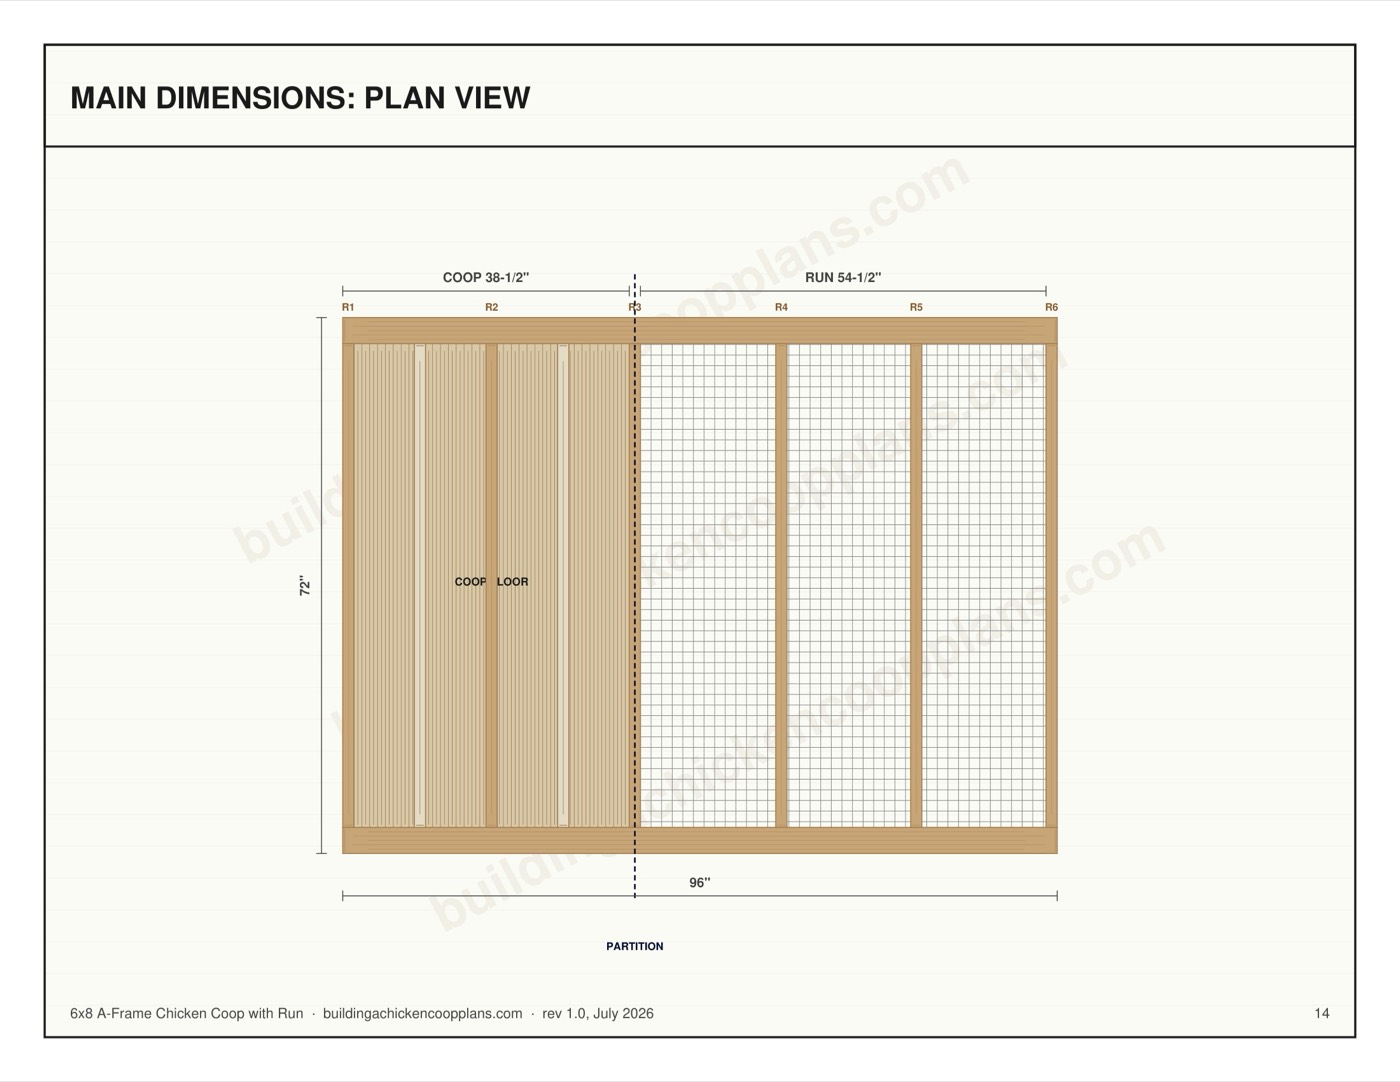
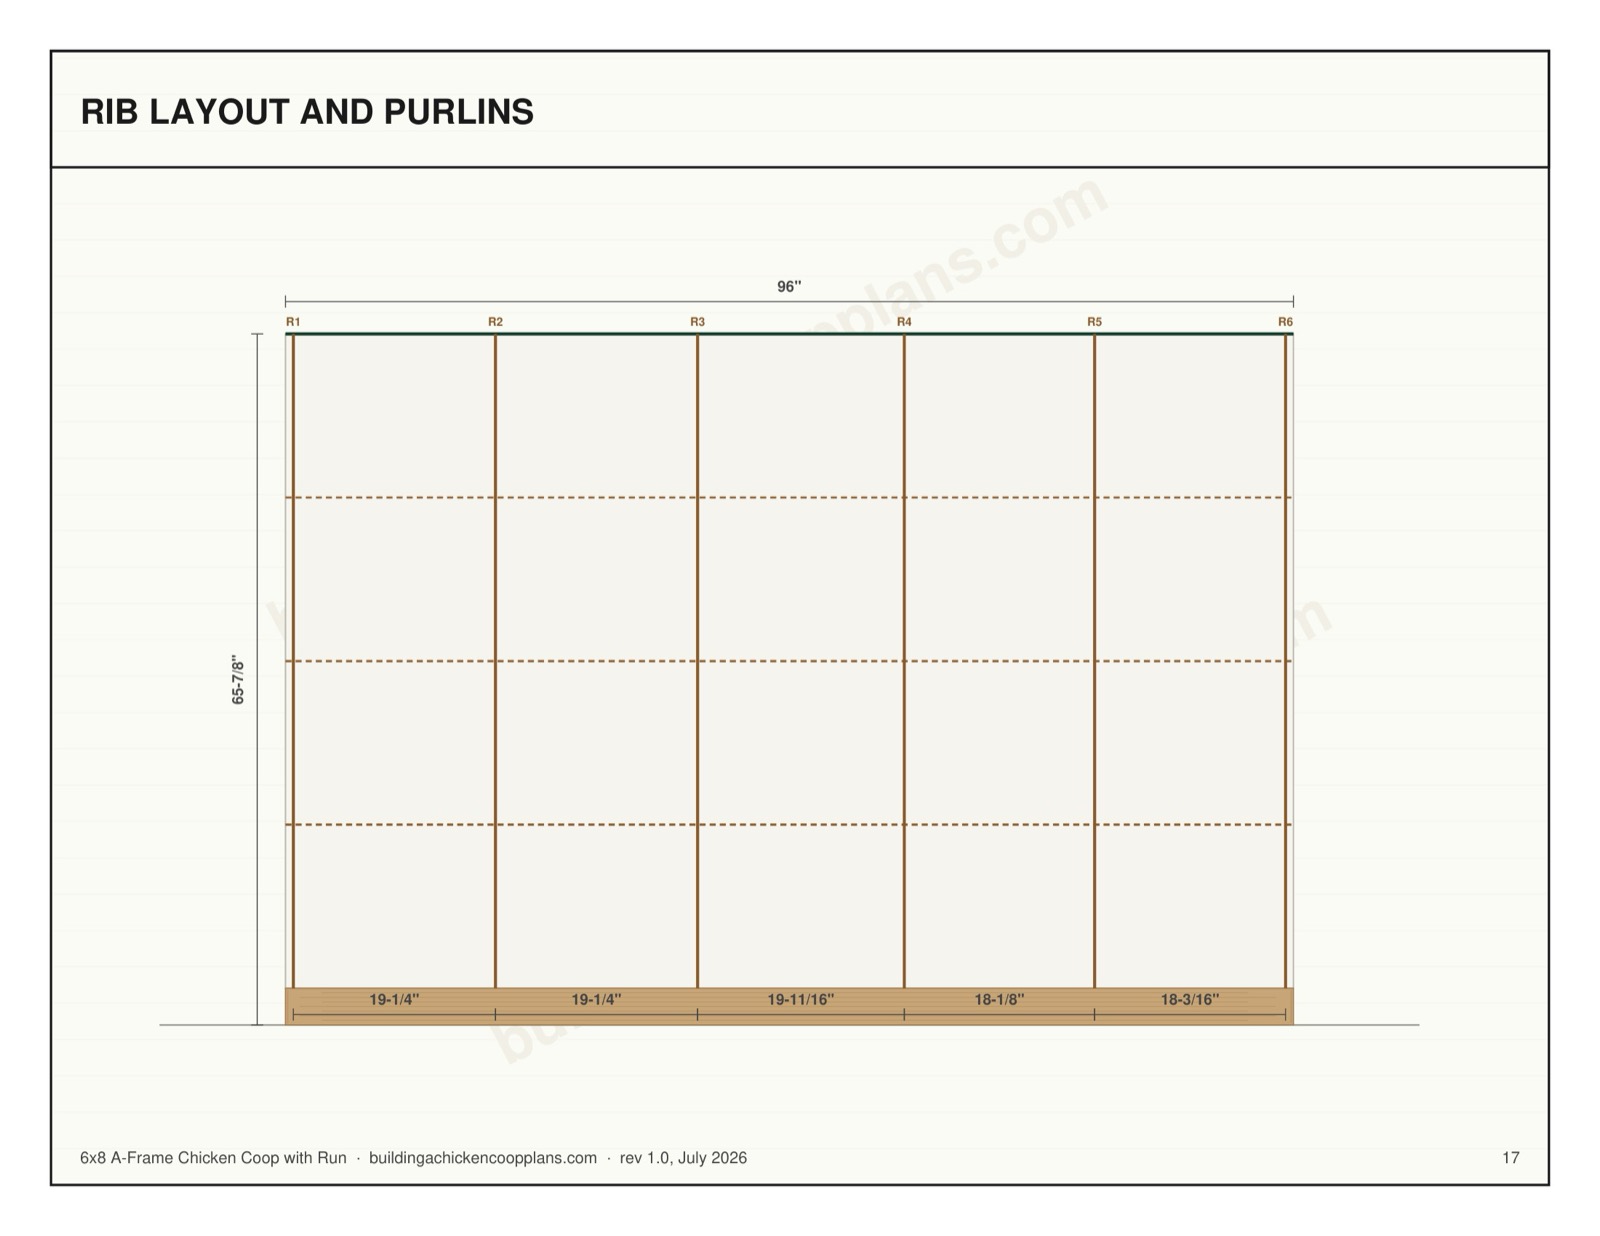
Rib spacing runs 19-1/4", 19-1/4", 19-11/16", 18-1/8", 18-3/16" from the closed end. They are not evenly spaced on purpose: a rib has to land at 38-1/2" so the partition has framing to screw to. Nothing exceeds 24".
Then run 6 purlins the full 96", 3 per side, screwed to the INSIDE faces of the rafters. Three a side, not the tractor's two: the slope is 72" here and both the skin and the cleanout door want a fixing at least every two feet.
Inside, not outside — the slope panels and the big door have to lie flat on the outside face, and a purlin out there is what stops a door ever closing.
| Part | Qty | Length | Stock | Note |
| Purlin | 6 | 96" | 2x2 | inside face of the rafters, full length |
| Rafter foot bracket | 12 | 3" | Angle bracket | |
5
Ridge joint, ridge vent and flashing
The peak is a 60-degree vee, sharper than any ridge cap sold for a house roof. Bend your own from 10in aluminium roll flashing over the edge of a board.
The flashing does two jobs. It sheds rain off the butted rafter joint, and it shelters the ridge vent: the coop cladding stops 4" short of the peak on each side, and that continuous gap — 37" long, both sides, 2.1 sq ft in total — is the ventilation.
4" a side here, where the tractor has 3". The floor under it grew with the square of the base and a slot only grows with length, so holding 3" would have landed this exactly on the extension figure with nothing in hand.
Screen it with hardware cloth stapled to the rafter edges BEFORE the flashing goes on. Screw the flashing to the cladding 2" below its top edge, on a bead of sealant, so the fasteners sit above the water line.
| Part | Qty | Length | Stock | Note |
| Ridge flashing | 2 | 10" x 48" | Aluminium flashing | |
| Vent screen cleat | 4 | 37" | 1x2 | staple the cloth to this |
6a
Coop floor and its joists
The closed end gets a solid floor; the run end stays open to the ground.
Floor joists first. The rungs sit at the rib positions, which are set by the panels and the partition, not by the floor — and they come out further apart than 1/2in plywood will carry. Drop 2 more 65" pieces in on edge at 9-5/8", 28-7/8" from the closed end. No run of floor then spans more than 9-5/8", against the 16" that grade of ply is rated for.
The floor is two sheets, not one: it is 67-15/16" across and plywood is 48in wide, so it lands the long way and the seam falls on the centreline of the middle rung, 18-1/2" in from the closed-end rib. 67-15/16" x 18-1/2" and 67-15/16" x 18-1/2".
That 67-15/16" is narrower than the 72" outside width and narrower than the gap between the skids, because the rafters lean in over the floor. Measure it in place.
Screw a floor cleat along the inside of each skid under the sheet edges, so the long edges bear on something too.
| Part | Qty | Length | Stock | Note |
| Floor joist | 2 | 65" | 2x4 | PRESSURE TREATED, flush with the rung tops |
| Coop floor, closed-end sheet | 1 | 67-15/16" x 18-1/2" | 1/2" plywood | |
| Coop floor, partition sheet | 1 | 67-15/16" x 18-1/2" | 1/2" plywood | |
| Floor cleat | 2 | 37" | 2x2 | inside the skid, under the floor edge |
6b
The closed end and the partition — two triangles, two centre posts
This is the biggest single difference from the 4-ft tractor, and it is the one thing that does not scale: a 72" triangle does not come off a 48in sheet.
Cut the closed end panel and the partition as pairs of right triangles 36" by 62-3/8", and join each pair over a centre post. The post is not a workaround for the joint — it is what a 1/4in skin this wide needs anyway, and it gives the pop door a jamb.
The end post is a 62-3/8" 2x4 running rung to peak, its top cut to a point with the same 30-degree saw setting as the rafters. Two cuts, one setting, and it beds straight into the vee.
The partition's post cannot run the full height — the pop door is on the centreline. Frame the pop opening first, 12" wide by 14" tall sitting on the floor, with two 14-1/2" jambs and a 15" header across them. Then stand a 47-7/8" post on that header up to the peak. The two partition halves land on the jambs below the header and on the post above it.
Both panels are notched around the 6 purlins that pass through them.
| Part | Qty | Length | Stock | Note |
| End centre post | 1 | 62-3/8" | 2x4 | 30 deg BOTH ways at the top — a point, same saw setting |
| Partition centre post | 1 | 47-7/8" | 2x4 | pointed top, foot on the pop-door header |
| Pop door jamb | 2 | 14-1/2" | 2x2 | either side of the opening |
| Pop door header | 1 | 15" | 2x2 | across the jambs |
| Closed end panel half | 2 | 36" x 62-3/8" right triangle | 1/4" plywood | |
| Partition panel half | 2 | 36" x 62-3/8" right triangle | 1/4" plywood | |
7
Slope cladding — the coop skin and the egg hatch
Only the coop section gets skinned. The run stays open mesh, which is the point of the shape.
The left slope panel is one piece, 37" by 68", screwed to the outside faces of the coop ribs and to the three purlins behind them. Its top edge stops 4" below the peak for the vent.
Cut the egg hatch opening in it now, hard against the closed end, 14" along the length by 20" up the slope. The hatch opens the outer wall of the near nest box and lets you reach over the divider into the far one, so both boxes are served by one opening — and you collect eggs without opening the coop.
The right slope is not clad here. That whole panel is the cleanout door, and it goes on in step 9.
| Part | Qty | Length | Stock | Note |
| Left coop slope panel | 1 | 37" x 68", hatch cut out | 1/4" plywood | |
| Egg hatch slab | 1 | 13-1/2" x 19-1/2" | 1/4" plywood | |
| Hatch frame | 2 | 13-1/2" | 1x2 | top and bottom |
| Hatch frame side | 2 | 16-1/2" | 1x2 | |
8
Roof covering over the coop
Mineral-surface roll roofing over the two coop slopes — 35 sq ft, comfortably inside one 36in roll.
Metal is the usual answer on a coop that stays put, and it is the wrong one here. The peak is a 60-degree vee and nobody sells a ridge cap for that angle, so the cap is bent from flat flashing — and flat flashing has to bed on a flat deck, not on corrugations. Roll roofing over the plywood gives the flashing something to seal against.
Roll it UP the slope, not along it, so no seam runs downhill. Nail the top edge where the flashing will cover it, work down, and lap the lower course over the upper by 4" on a bead of lap cement.
The right slope gets its roofing AFTER the cleanout door is built, on the door itself.
| Part | Qty | Length | Stock | Note |
| Roll roofing, left slope | 1 | 37" x 68" | Roll roofing | |
| Roll roofing, cleanout door | 1 | 37" x 68" | Roll roofing | |
| Drip edge | 2 | 37" | 1x2 | bevelled, at the foot of each coop slope |
9
Cleanout door — the whole right coop slope
The single most useful thing on the coop. The entire right slope of the coop section lifts, so you clean, catch a bird or change bedding from outside standing up, instead of crawling in.
Build the slab 36-1/2" by 67-1/2" out of 1/4in ply on a 1x2 perimeter frame, plus a mid-rail halfway up. The tractor's door has no mid-rail and does not need one; this one is 67-1/2" up the slope and a 1x2 stile that long racks into a parallelogram on its own.
Hang it on three hinges along the top edge, to a 1x2 ledger screwed to the rafters 4" below the peak. Two two-action latches at the bottom edge, into the skid. Two-action, both: raccoons open hooks, and this door is the whole side of the coop.
Fit the prop and use it. This slab with its roofing on weighs enough to hurt you, and it comes down on the back of your neck while your hands are full of bedding. That is the accident this design has to design out.
| Part | Qty | Length | Stock | Note |
| Cleanout door slab | 1 | 36-1/2" x 67-1/2" | 1/4" plywood | |
| Door frame, long | 2 | 36-1/2" | 1x2 | |
| Door frame, short | 2 | 64-1/2" | 1x2 | |
| Door mid-rail | 1 | 33-1/2" | 1x2 | halfway up — a 1x2 stile this long racks without it |
| Hinge ledger | 1 | 37" | 1x2 | 4" below the peak |
| Door prop | 1 | 34" | 1x2 | drilled both ends |
10
Nest box bank
2 boxes across the closed end, sitting on the coop floor. There is no wall to hang them from, so they stand on it and they genuinely take 2.2 sq ft of floor — already out of the capacity figure on the cover.
The bank is 24-1/2" across and 13" deep, with 1 divider. The sloping sides are the outer walls of the outer boxes, so only the partition BETWEEN boxes gets plywood.
A litter lip 3-1/2" tall across the front keeps the shavings in, so the opening a hen steps through is 12" tall with its sill 4" off the floor. Slope the top so nobody roosts on it and fouls the eggs.
At the top of that opening the triangle is 50-1/16" wide, so the bank drops in with room either side.
| Part | Qty | Length | Stock | Note |
| Nest bank floor | 1 | 24-1/2" x 13" | 1/2" plywood | |
| Nest bank back | 1 | 24-1/2" x 16" | 1/2" plywood | |
| Nest divider | 1 | 12" x 13" | 1/2" plywood | |
| Nest litter lip | 1 | 24-1/2" x 3-1/2" | 1/2" plywood | |
| Nest bank top | 1 | 24-1/2" x 14" | 1/2" plywood | |
| Nest cleat | 2 | 13" | 1x2 | under the bank floor |
11
Pop door — and why there is no ramp
The pop door is the hens' way between the coop floor and the run, and it is the only opening that gets shut every single night.
The opening is already framed in the partition, 12" by 14", sitting on the floor between the two jambs. Hang the slab on the RUN side so it swings against the frame and cannot be pushed inwards: two hinges and a two-action latch.
No ramp. The tractor needs one because its floor stands 4" above the grass. Here the run is bedded up to the top of the skid in step 16, which leaves the coop floor 1/2" above the finished run surface — a doorstep, not a drop. Screw a bevelled threshold on the sill instead; it is what stops the run bedding being kicked into the coop.
If you ever let the run bedding wear down, the step grows. Top it up.
| Part | Qty | Length | Stock | Note |
| Pop door slab | 1 | 12-1/2" x 14-1/2" | 1/4" plywood | |
| Pop door threshold | 1 | 15" | 1x2 | bevelled, on the sill — the bedding stops here |
12
Run hardware cloth — slopes and the end triangle
1/4in hardware cloth, 19 gauge. Never chicken wire — chicken wire keeps chickens in and keeps nothing at all out; a raccoon opens it with its fingers.
Cover both run slopes, 72" up the slope by 54-1/2" long, and the end triangle, cutting the door opening out of it as you go.
Fasten with staples every 2in AND fender washers every 8in along every edge. Staples alone pull through — that is the failure everyone finds out about the morning after. Overlap adjoining pieces by 2in and washer through both layers.
Screen the ridge vent the same way if you have not already: two strips 37" by 8", stapled to the rafter edges under the flashing.
This is the cloth ABOVE ground. What stops something digging under it is the next step, and on a coop that does not move it is a different answer from the tractor's.
| Part | Qty | Length | Stock | Note |
| Run slope cloth | 2 | 72" x 54-1/2" | Hardware cloth | |
| Run end cloth | 1 | 72" x 62-3/8" triangle, door opening cut out | Hardware cloth | |
| Ridge vent cloth | 2 | 37" x 8" | Hardware cloth | |
13
Buried apron — the skirt a stationary coop must have
This is the predator strategy, and it is the one thing that genuinely could not be done on the tractor.
A tractor gets dragged across the lawn, so nothing can be buried under it and the answer there is a mesh floor the birds stand on. This coop never moves, which means it gets the better answer: an apron, and an apron beats a mesh floor because the birds are on real ground and the cloth is not being walked on and dragged over grass until it opens up.
Cut a 27-1/2" strip and fold it into an L with three legs. Up the outside face of the skid, 3-1/2" — the skid stands that proud on its blocks and the cloth has to close it. Then 12" straight down BELOW GRADE against a spade-cut trench. Then 12" turned outward at ninety degrees, flat, and buried.
The whole 28 ft perimeter — all four sides, including under the coop end. Screw the top leg through a 1x2 batten into the skid so the edge cannot be lifted, then pin the flat leg down with sod staples and cover it with the turf you took off in step 1.
The apron works by being IN THE WAY, not by being deep. A digging animal starts where it meets the wall, hits cloth it cannot see the edge of, and gives up. That is why the outward leg matters at least as much as the buried one, and why the corners have to lap rather than butt.
Then cover the outward leg on the two long sides with a drip strip — 12" wide by 2" deep of the same crushed stone, 2.7 cu ft. This is the one thing on the coop that exists only because it stopped moving. A 60-degree roof throws its entire catchment onto a line a few inches off the skid, and on the tractor that line is somewhere new every morning. Here it is the same line for twenty years: turf there dies, the backfill scours out and exposes the apron, and the skid never dries. The two ends need nothing — they are gables and shed nothing.
| Part | Qty | Length | Stock | Note |
| Buried apron cloth | 1 | 27-1/2" x 28 ft run | Hardware cloth | |
| Apron batten, sides | 2 | 96" | 1x2 | screwed over the cloth into the skid |
| Apron batten, ends | 2 | 72" | 1x2 | |
| Sod staple | 1 | 6", 60 pcs | Sod staple | |
| Drip-strip stone, both eaves | 1 | 2.7 cu ft, 12" wide x 2" deep | Crushed stone | |
14
Run end door
A stationary coop needs a way IN to the run. You cannot tip this one up and you cannot reach the far corner from outside, so the far end triangle carries a door: 24" wide by 34" tall, which is a crouch, not a walk.
That size is set by the triangle, not by taste. At 34" up, the sloping sides leave 29-1/4" of clear width, so a 24" leaf goes in with room for jambs and nothing wider does.
Frame the opening with two 34" jambs standing on the base rung and a 27" header across them, all notched to the end rib. Build the leaf as a 1x2 frame covered with the same hardware cloth — light, and it does not blind you to what is in the run.
Hinge it on ONE side, swinging OUT, with door stops inside the opening so it cannot be pushed in. One two-action latch at a height a raccoon standing on the ground can reach — which is all of them, so it has to be two-action.
| Part | Qty | Length | Stock | Note |
| Run door jamb | 2 | 34" | 2x2 | plumb, foot on the base rung |
| Run door header | 1 | 27" | 2x2 | across the jambs |
| Run door stile | 2 | 33-1/2" | 1x2 | |
| Run door rail | 2 | 20-1/2" | 1x2 | |
| Run door cloth | 1 | 24" x 34" | Hardware cloth | |
| Door stop, sides | 2 | 34" | 1x2 | inside the opening, for the door to close on |
| Door stop, head | 1 | 24" | 1x2 | |
15
Roost bars and droppings tray
2 bars, running the length of the coop, straddling the centreline 12" apart. Two, not one: 5 hens need 50in of perch and one bar delivers 35-1/2".
A 2x2 with the top two corners eased — flat side up, not a dowel. A hen grips with a flat foot, and in cold weather she has to be able to sit down ON her feet to cover them; a round bar leaves her toes out and is how you get frostbite in a coop that is otherwise fine.
Set the TOPS of the bars 18-1/2" above the COOP FLOOR — not off the grass. The floor is 4" up already (3-1/2" of skid and 1/2" of ply), so the same bar is 22-1/2" off the grass and the peak is 65-7/8".
Floor to the peak is 61-7/8", which leaves 43-3/8" to the peak line — but no bird sits on the centreline. Each bar is 6" out from it, and in a 60-degree triangle every inch sideways costs 1.73in of height, so what a hen on a bar actually has over her head is 29-15/16". That is the number on the check line and the one your tape will read.
That height keeps the birds above the nest bank top, so they roost on the bar rather than in the eggs.
Slide the droppings tray underneath on two cleats — 22-1/2" by 24", wide enough to catch under both bars. It is not the full 35-1/2" of the bars: the first 13" of that floor is where the nest bank stands. Pull it out, tip it on the compost, slide it back.
| Part | Qty | Length | Stock | Note |
| Roost bar | 2 | 35-1/2" | 2x2 | top corners eased |
| Roost support | 4 | 5" x 6" gusset | 1/2" plywood | |
| Droppings tray | 1 | 22-1/2" x 24" | 1/2" plywood | |
| Tray cleat | 2 | 22-1/2" | 1x2 | under the tray edges |
16
Run floor — drainage and bedding
A fixed run turns to bare mud in one wet season if you leave it as lawn, and mud is where worms, coccidia and bumblefoot start. This step is not optional and it is not decoration.
Scrape the run area between the skids — 65" by 54-1/2" — down 2-1/2" below grade. Lay 2" of clean drainage stone, then 4" of coarse washed sand or coarse wood chips over it: 4.1 cu ft and 8.2 cu ft.
Those depths are chosen so the finished surface comes up FLUSH with the top of the skid, which is what leaves the pop door a 1/2" step instead of a drop. Bed on top of grade instead and the run floor ends up above the sill and the bedding walks into the coop.
Coarse washed sand, not play sand and not builder's sand. Play sand is fine dust and the birds breathe it. Rake it over once a week and take the solids out; done that way the run does not smell and does not need replacing for years.
| Part | Qty | Length | Stock | Note |
| Drainage stone, run floor | 1 | 4.1 cu ft (2" deep) | Crushed stone | |
| Coarse sand or wood chips, run floor | 1 | 8.2 cu ft (4" deep) | Bedding | |