CoopCraft

Free PDF · 22 pages · No email

4x8 A-Frame Chicken Tractor Plans

10 sq ft of coop and 16 sq ft of screened run for 2-3 hens. Dimensioned drawings, a complete material list, and every cut length across 14 assembly steps. Beginner build, two weekends (14-20 hrs).

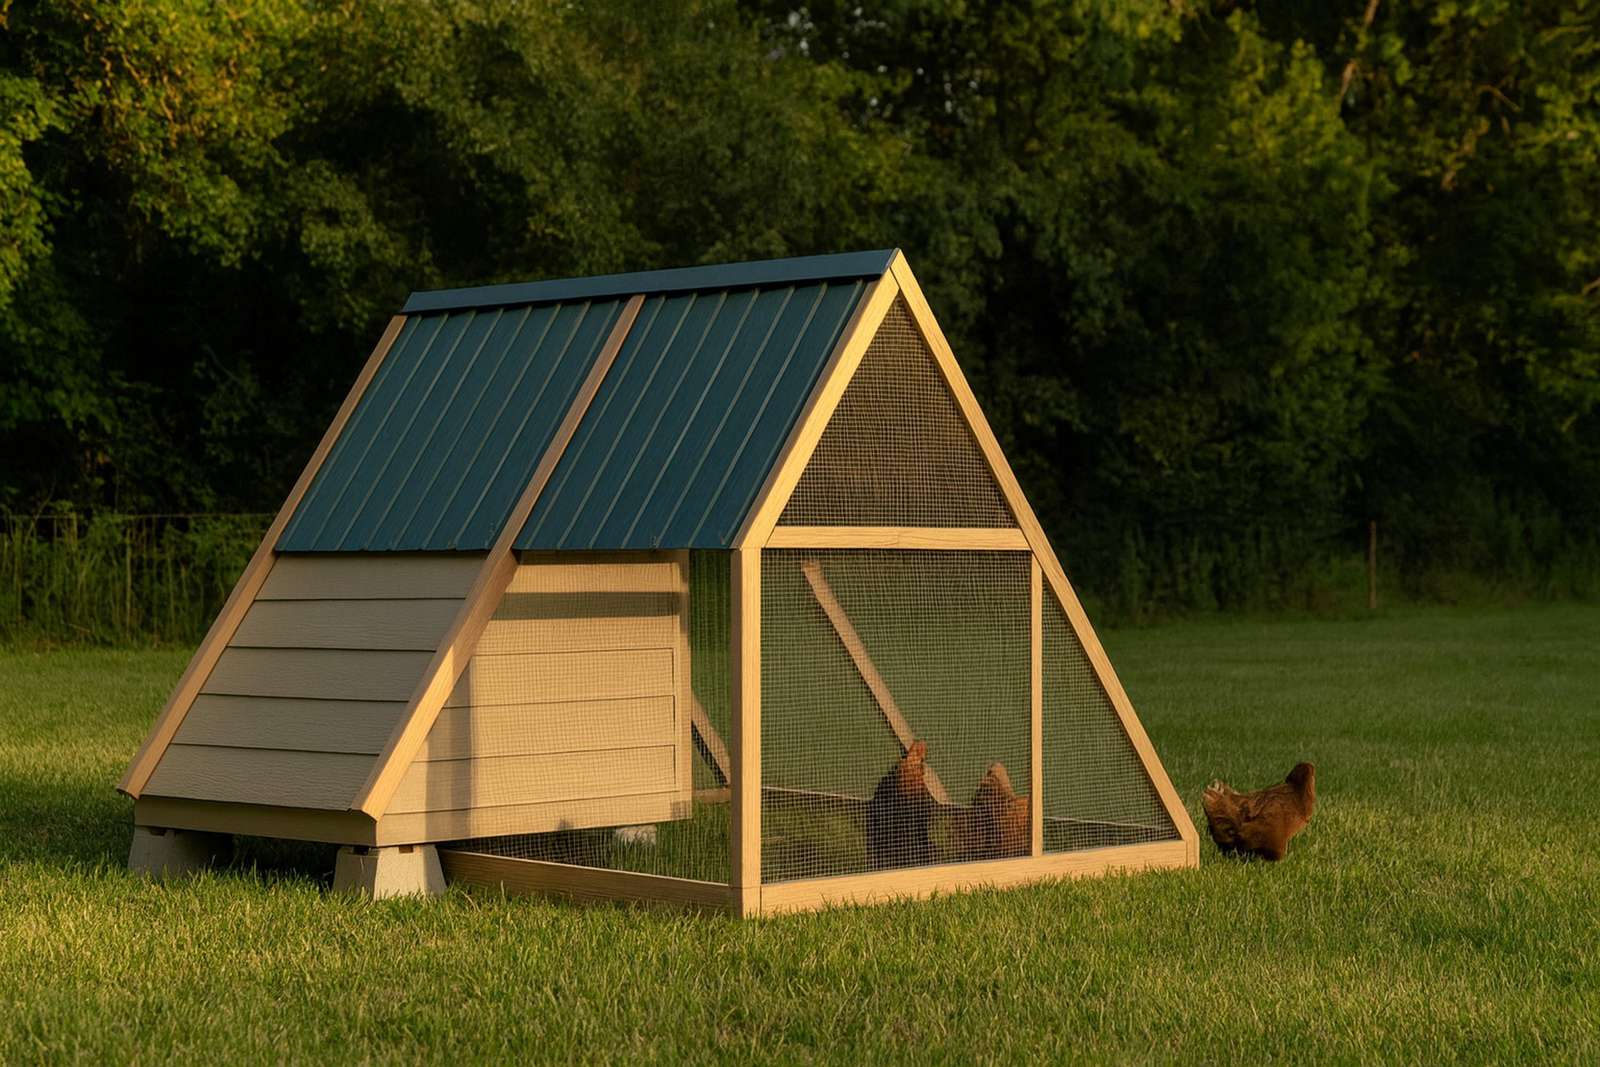
4x8 A-Frame Chicken Tractor plans — isometric view

Specifications

Coop footprint 4 ft × 3.3333333333333335 ft (10 sq ft)
Run footprint 4 ft × 4.416666666666667 ft (16 sq ft), screened
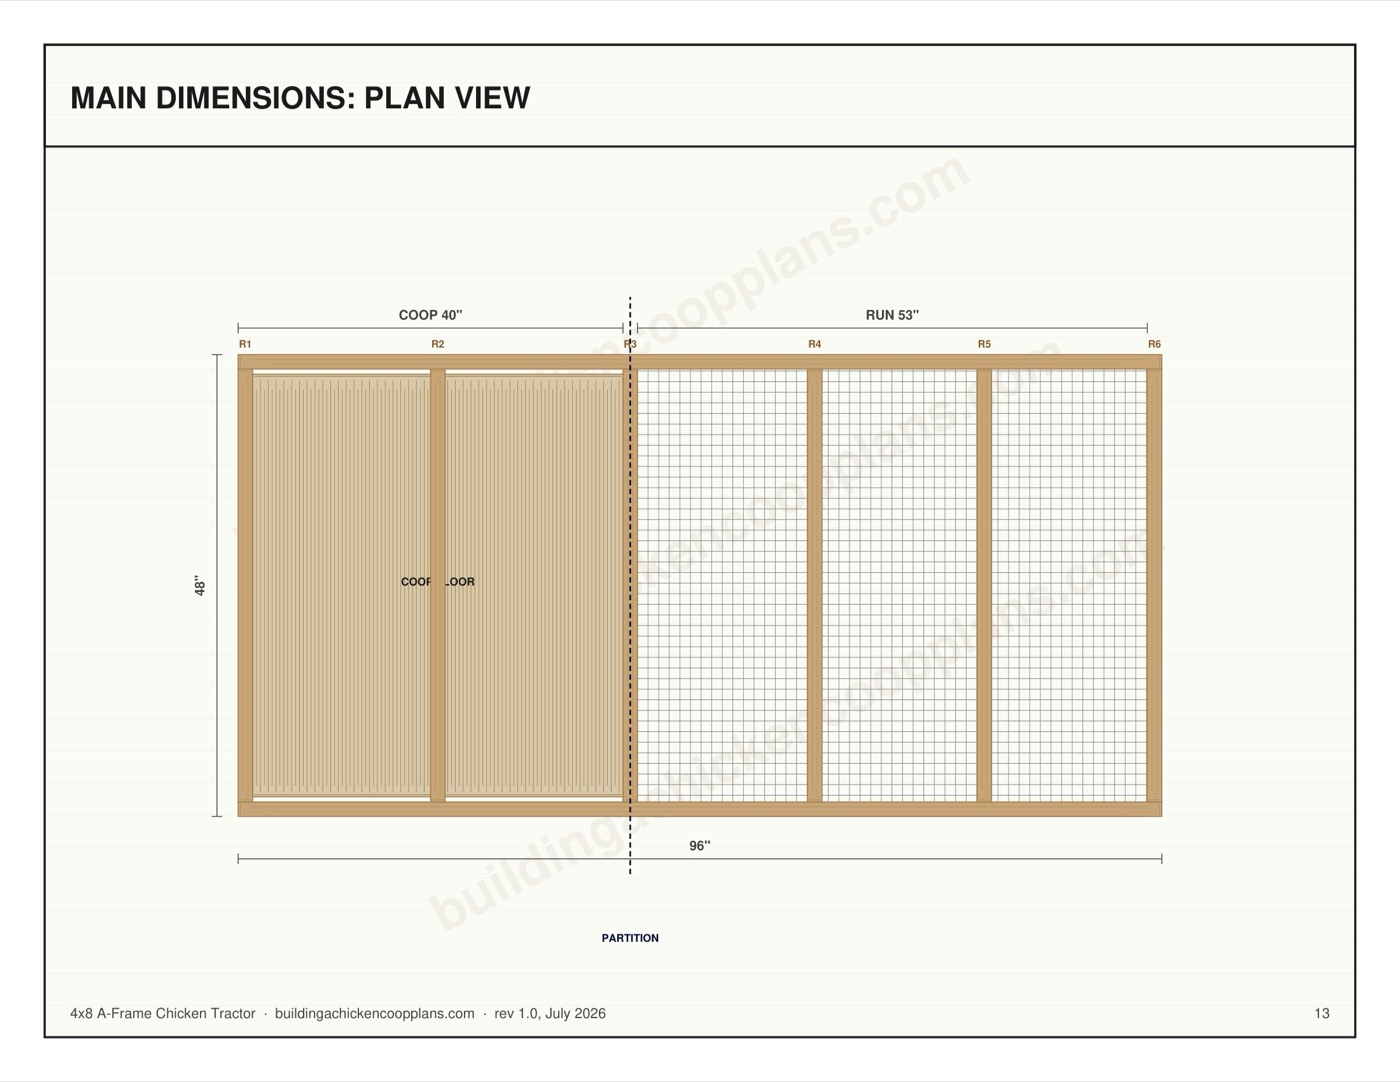
Overall length 96" coop + run
Ridge height 45-1/16" (12:12 gable, 41-9/16" rise)
Access reach-in — 38-1/2" × 45" hinged panel
Interior wall height 0"
Floor height 0" off grade — screened bay underneath
Capacity 2-3 hens at 4 sq ft per bird
Nest boxes 2 in a 24-1/2" exterior bank
Roost bar 30" total (10" per bird)
Ventilation 1.6 sq ft across 0 windows
Floor framing 4 joists at 16" OC, 0" clear span
Build time Two weekends (14-20 hrs)
Difficulty Beginner
Materials cost $675–$875 at 2026 prices

Material List

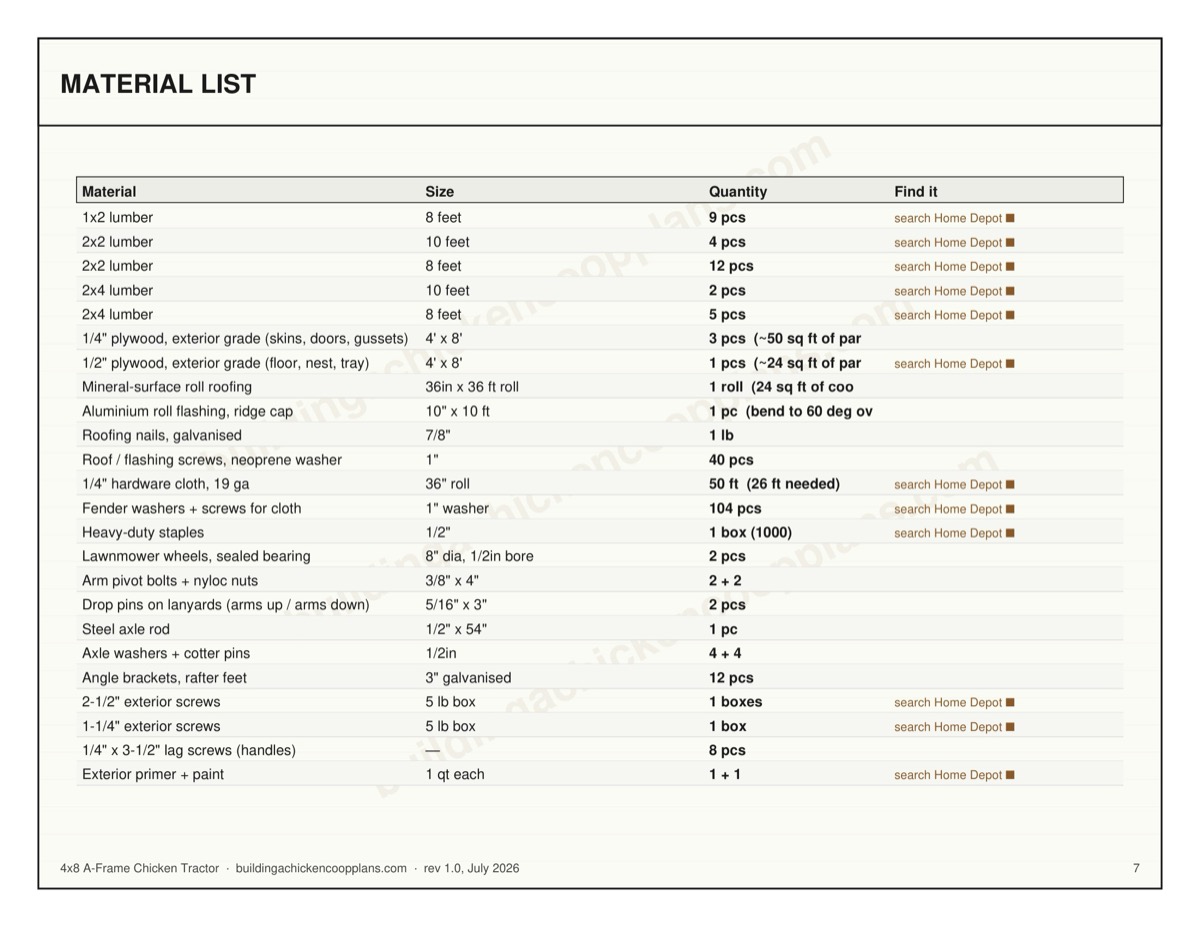
The complete bill of materials. Quantities carry no waste allowance — add two or three extra 2×4s if you are new to framing.

Material Size Quantity
1x2 lumber 8 feet 9 pcs
2x2 lumber 10 feet 4 pcs
2x2 lumber 8 feet 12 pcs
2x4 lumber 10 feet 2 pcs
2x4 lumber 8 feet 5 pcs
1/4" plywood, exterior grade (skins, doors, gussets) 4' x 8' 3 pcs (~50 sq ft of parts)
1/2" plywood, exterior grade (floor, nest, tray) 4' x 8' 1 pcs (~24 sq ft of parts)
Mineral-surface roll roofing 36in x 36 ft roll 1 roll (24 sq ft of coop slope)
Aluminium roll flashing, ridge cap 10" x 10 ft 1 pc (bend to 60 deg over the peak)
Roofing nails, galvanised 7/8" 1 lb
Roof / flashing screws, neoprene washer 1" 40 pcs
1/4" hardware cloth, 19 ga 36" roll 50 ft (26 ft needed)
Fender washers + screws for cloth 1" washer 104 pcs
Heavy-duty staples 1/2" 1 box (1000)
Lawnmower wheels, sealed bearing 8" dia, 1/2in bore 2 pcs
Arm pivot bolts + nyloc nuts 3/8" x 4" 2 + 2
Drop pins on lanyards (arms up / arms down) 5/16" x 3" 2 pcs
Steel axle rod 1/2" x 54" 1 pc
Axle washers + cotter pins 1/2in 4 + 4
Angle brackets, rafter feet 3" galvanised 12 pcs
2-1/2" exterior screws 5 lb box 1 boxes
1-1/4" exterior screws 5 lb box 1 box
1/4" x 3-1/2" lag screws (handles) 8 pcs
Exterior primer + paint 1 qt each 1 + 1
Hinges 9 (4 openable parts)
Two-action latches 5

Nominal vs actual: the list uses nominal sizes (2×4), the drawings use finished sizes (1-1/2" × 3-1/2"). Check your own stock before cutting.

Floor Framing

4 joists at 16" on centre running the short direction, rim doubled on all four sides, 0" clear span — comfortably within a 2×4's range, so no intermediate support is needed. True 16" spacing means plywood seams land on framing.

4x8 A-Frame Chicken Tractor floor framing layout

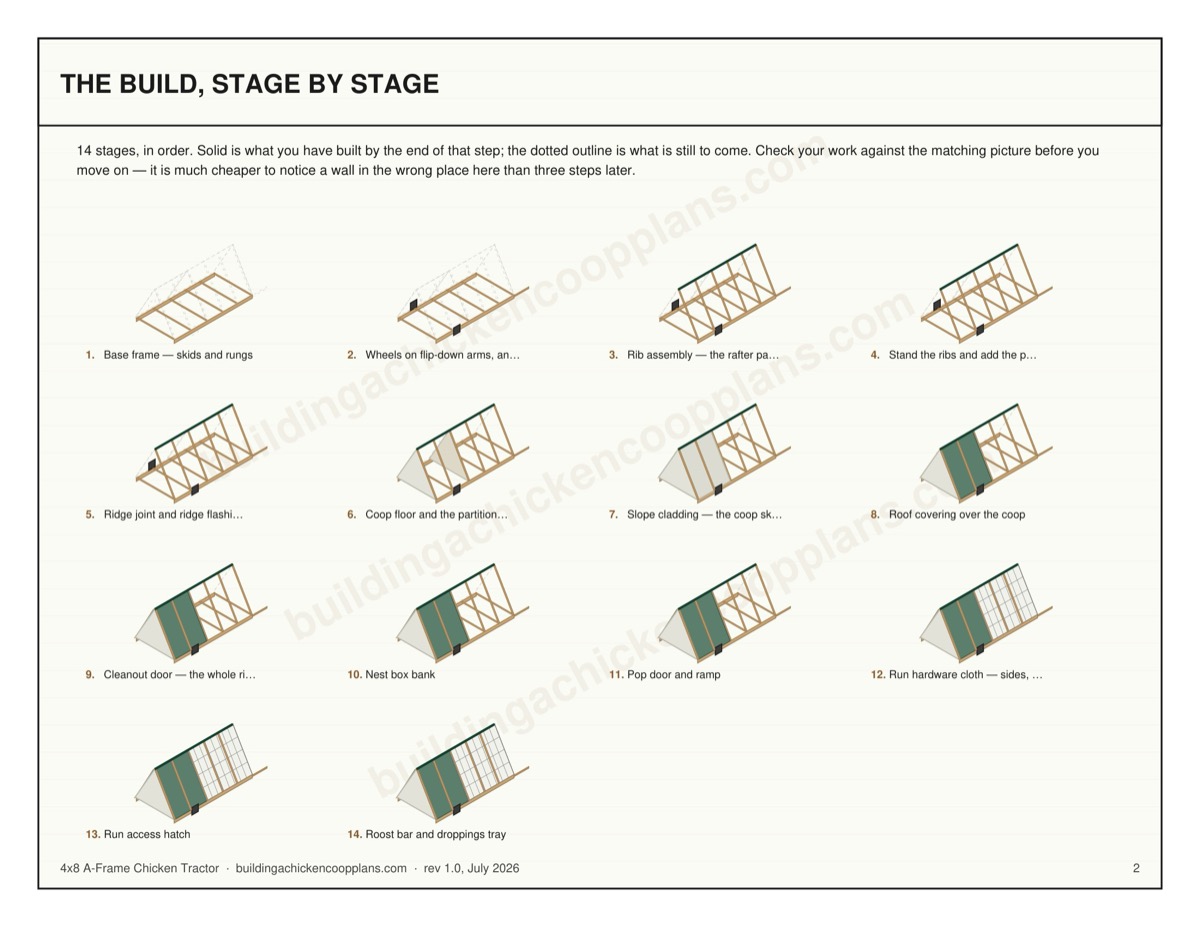
The 14 Assembly Steps

Every cut length below is computed from the same geometry that draws the PDF, so the numbers on this page and the numbers in the plan set cannot disagree.

1

Base frame — skids and rungs

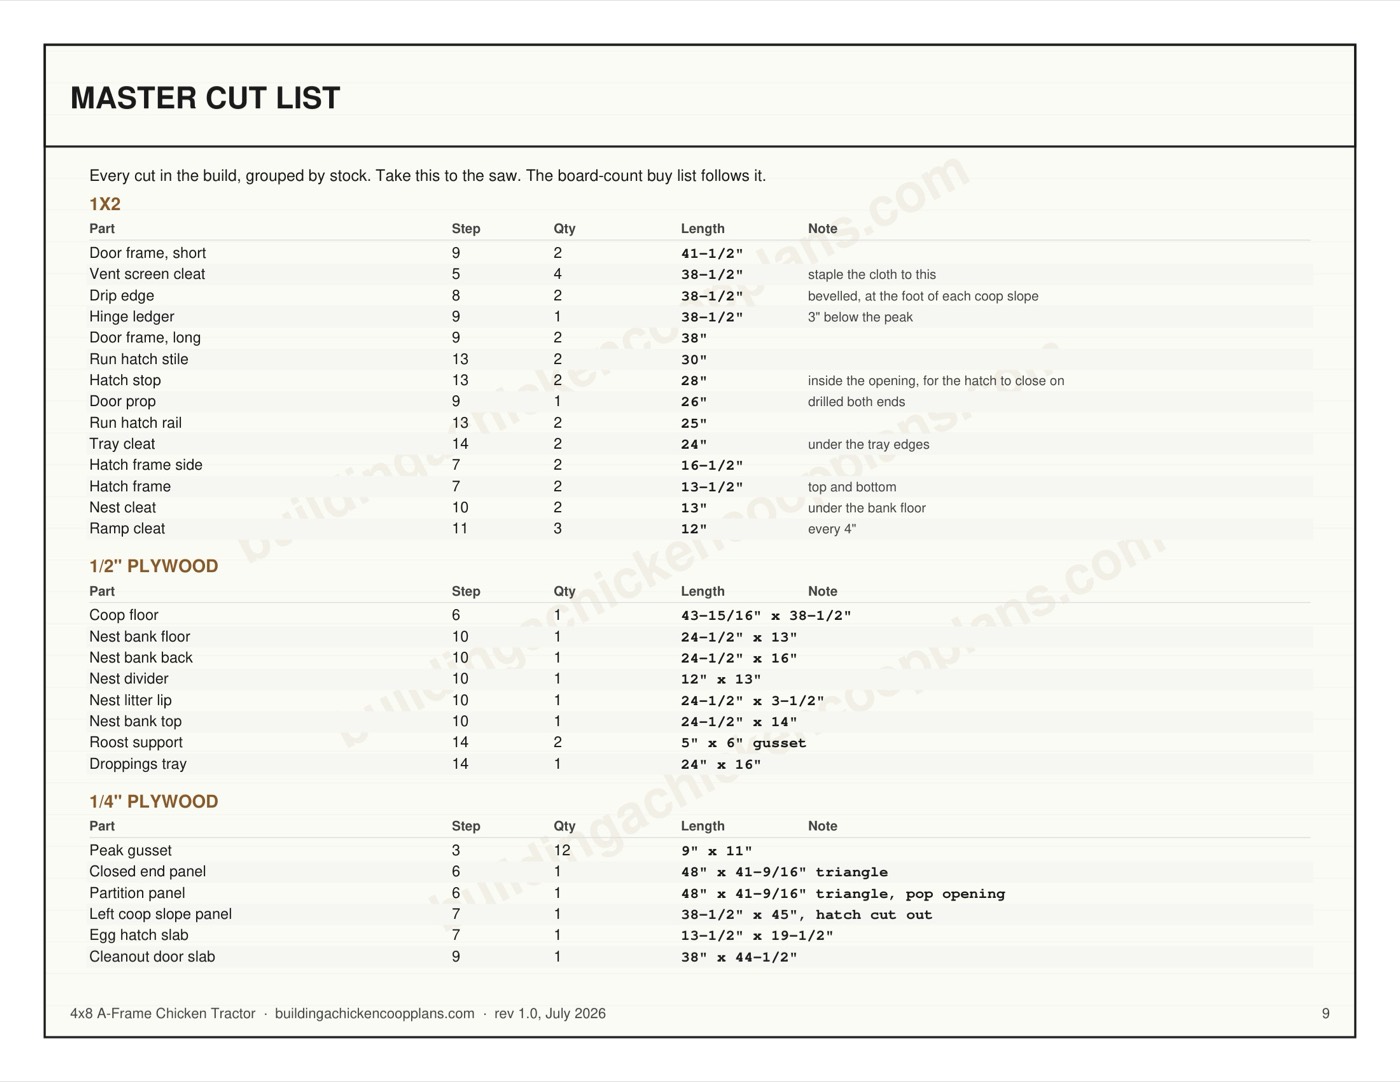
The base is the foundation, the floor frame and the tie that stops the A from spreading, all in one. There are no piers and no posts: a tractor that needs levelling is a tractor nobody moves. Cut two skids 96" long and lay them on edge, 48" apart at the outside faces. Cut 6 rungs 45" long and screw them between the skids, on edge, flush with the skid tops — one at each rib position so every rafter foot lands on solid framing. Run the skids crown up and put the better face outward. They drag on grass for years; a cupped skid collects water in the hollow and rots from the top.

Part Qty Length Stock Note
Skid 2 96" 2x4 on edge, full length
Base rung 6 45" 2x4 on edge, between the skids
2

Wheels on flip-down arms, and the lift handle

The wheels go on before anything heavy does, because after the cladding you will not want to roll it over. Each wheel hangs off a wheel arm 14" long, bolted through a pivot block on the outside of the skid. Flip the arms DOWN and pin them and the coop end rises onto the wheels; flip them UP and pin them and it settles back flat on both skids with the tyres 3/4" clear of the grass. That is worth the two extra parts. Wheels bolted permanently below the skids hold one end of the coop off the ground all night, which is a gap running the full 48" width under the end the birds sleep in. Wheels bolted level with the skids never touch the ground at all — lift one end of a rigid frame and it pivots about the other end, so a wheel in the middle only rises. Set the arms so the wheels touch down 23-1/8" from the closed end. The finished centre of mass works out at 36-1/8", and the wheels have to land AHEAD of it — behind it the coop end hangs past the axle and the handle end lifts on its own. At the far end, lag a handle 42" long to the outside of each skid, projecting 18" past it, and join the two with a grip bar.

Part Qty Length Stock Note
Wheel arm 2 14" 2x4 pivot bolt one end, 1/2in axle hole the other
Arm pivot block 2 6" 2x4 outside the skid
Lift handle 2 42" 2x4 lagged to the skid, 4 lags each
Grip bar 1 45" 2x2 between the handle ends
Axle rod 1 1/2" x 54" Steel
3

Rib assembly — the rafter pairs

A rib is two rafters meeting at the peak. Build all 6 of them flat on the ground before you stand any of them, off one set of marks, so they are identical. Every rafter is the same part: a 2x2 48" on the long edge, cut at 30 degrees off square at BOTH ends, with the two cuts PARALLEL, not mirrored. Set the saw once and cut all 12. Two come out of one 8-ft length if you alternate the offcut end. 2x2, not 2x4. The base rung ties the two feet together, so each rafter is a strut in a closed triangle carrying its load along its own length rather than bending across it. Framing this in 2x4 puts about 40 lb onto something you pick up every morning, and a tractor nobody moves is just a small dirty coop. Stand a pair on edge with the 30-degree top cuts butted plumb against each other and the bottom cuts flat on the floor, then screw a peak gusset across the joint on each face. The gussets are the joint — the butted end grain carries nothing on its own.

Part Qty Length Stock Note
Rafter 12 48" 2x2 30 deg both ends, cuts parallel
Peak gusset 12 9" x 11" 1/4" plywood
4

Stand the ribs and add the purlins

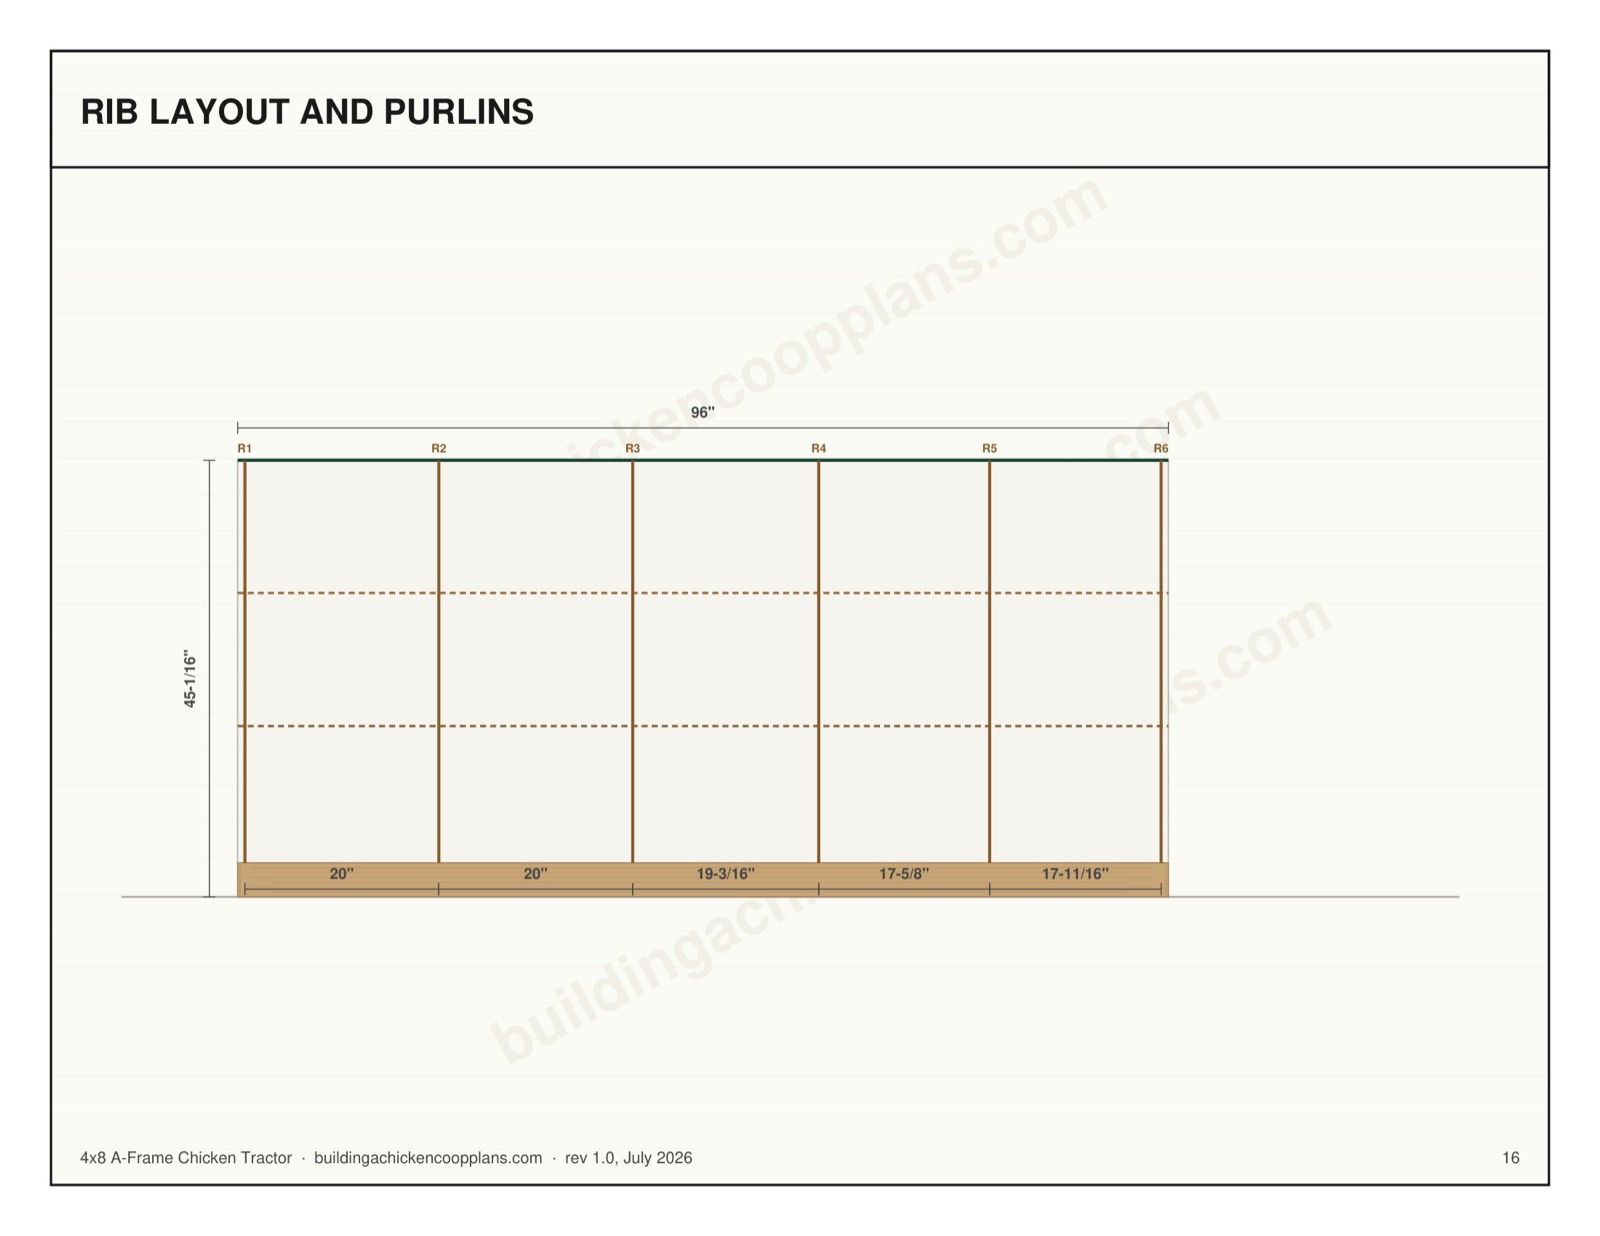
Stand each rib on its rung, outside faces of the rafter feet flush with the outside of the skids, and fix each foot with an angle bracket plus one screw skewed through the bevel. Brace it upright as you go. Rib spacing runs 20", 20", 19-3/16", 17-5/8", 17-11/16" from the closed end. They are not evenly spaced on purpose: the third rib has to land at 40" so the partition has framing to screw to. Nothing exceeds 24". Then run four purlins the full 96", two per side, screwed to the INSIDE faces of the rafters. Inside, not outside — the slope panels and both big doors have to lie flat on the outside face, and a purlin out there is what stops a door from ever closing.

Part Qty Length Stock Note
Purlin 4 96" 2x2 inside face of the rafters, full length
Rafter foot bracket 12 3" Angle bracket
5

Ridge joint and ridge flashing

The peak is a 60-degree vee, which is sharper than any ridge cap sold for a house roof. Bend your own from 10in aluminium roll flashing over the edge of a board. The flashing is doing two jobs. It sheds the rain off the butted rafter joint, and it shelters the ridge vent: the coop cladding stops 3" short of the peak on each side, and that continuous gap — 38-1/2" long, both sides, 1.6 sq ft in total — is the ventilation. Screen it with hardware cloth stapled to the rafter edges before the flashing goes on. Screw the flashing to the cladding 2" below its top edge, on a bead of sealant, so the fasteners are above the water line.

Part Qty Length Stock Note
Ridge flashing 2 10" x 48" Aluminium flashing
Vent screen cleat 4 38-1/2" 1x2 staple the cloth to this
6

Coop floor and the partition wall

The closed end gets a solid floor; the run end stays open to the grass. Drop the coop floor in on the rungs between the closed-end rib and the partition — 43-15/16" wide by 38-1/2" long. That 43-15/16" is narrower than the 48" outside width and narrower than the gap between the skids, because the rafters lean in over the floor. Measure it in place. Cut the partition panel and the closed end panel from 1/4in ply as matching triangles, 48" across the base by 41-9/16" tall. Both are notched around the four purlins that pass through them — four 1-1/2" by 1-1/2" notches per panel. Cut the pop-door opening, 12" wide by 14" tall, in the partition, sitting on the floor and centred.

Part Qty Length Stock Note
Coop floor 1 43-15/16" x 38-1/2" 1/2" plywood
Closed end panel 1 48" x 41-9/16" triangle 1/4" plywood
Partition panel 1 48" x 41-9/16" triangle, pop opening 1/4" plywood
Floor cleat 2 38-1/2" 2x2 inside the skid, under the floor edge
7

Slope cladding — the coop skin

Only the coop section gets skinned. The run stays mesh, which is the point of the whole machine. The left slope panel is one piece, 38-1/2" by 45", screwed to the outside faces of the first three ribs and to the purlins behind them. Its top edge stops 3" below the peak for the vent. Cut the egg hatch opening in it now, hard against the closed end, 14" along the length by 20" up the slope. The hatch opens the outer wall of the near nest box and lets you reach over the divider into the far one, so two boxes are served by one opening. The right slope is not clad here — the whole panel is the cleanout door, and it goes on in step 9.

Part Qty Length Stock Note
Left coop slope panel 1 38-1/2" x 45", hatch cut out 1/4" plywood
Egg hatch slab 1 13-1/2" x 19-1/2" 1/4" plywood
Hatch frame 2 13-1/2" 1x2 top and bottom
Hatch frame side 2 16-1/2" 1x2
8

Roof covering over the coop

Roll roofing, not metal. On a stationary coop metal is the better roof; here every pound is a pound you lift twice a day, and mineral-surface roll goes on flat over plywood at a fraction of the weight and none of the drumming. Roll it up the slope, not along it, so no seam runs downhill. Nail the top edge under where the flashing will land, then work down, and lap the lower course over the upper by 4in on a bead of lap cement. Cover 38-1/2" by 45" on each side — 24 sq ft in total, comfortably inside one 36in roll. The right slope gets its roofing AFTER the cleanout door is built, on the door itself.

Part Qty Length Stock Note
Roll roofing, left slope 1 38-1/2" x 45" Roll roofing
Roll roofing, cleanout door 1 38-1/2" x 45" Roll roofing
Drip edge 2 38-1/2" 1x2 bevelled, at the foot of each coop slope
9

Cleanout door — the whole right coop slope

The single most useful thing on the tractor. The entire right slope of the coop section lifts, so you clean, catch a bird or change bedding standing up instead of crawling in through a hatch. Build the slab 38" by 44-1/2" out of 1/4in ply on a 1x2 perimeter frame — thin ply on a frame, like a screen door. The frame, not the sheet, is what keeps a panel this size from racking into a parallelogram. Hang it on three hinges along its top edge, to a 1x2 ledger screwed to the rafters 3" below the peak. Two two-action latches at the bottom edge, into the skid. Two-action, both of them: raccoons open hooks, and a door this size is the whole side of the coop. Fit a prop so it stays up. A panel this size falling on the back of your neck while your hands are full of bedding is the accident this design has to design out.

Part Qty Length Stock Note
Cleanout door slab 1 38" x 44-1/2" 1/4" plywood
Door frame, long 2 38" 1x2
Door frame, short 2 41-1/2" 1x2
Hinge ledger 1 38-1/2" 1x2 3" below the peak
Door prop 1 26" 1x2 drilled both ends
10

Nest box bank

Two boxes across the closed end, sitting on the coop floor. There is no wall to hang them from, so they stand on the floor and they genuinely take 2.2 sq ft of it — that is already out of the capacity figure on the cover. The bank is 24-1/2" across and 13" deep, with one divider. The sloping sides are the outer walls of the outer boxes, which is what lets two 12" boxes fit at all: at the top of the opening the triangle is only 26-1/16" wide. A litter lip 3-1/2" tall across the front keeps the shavings in, so the opening a hen steps through is 12" tall with its sill 4" off the floor. Slope the top so nobody roosts on it and fouls the eggs.

Part Qty Length Stock Note
Nest bank floor 1 24-1/2" x 13" 1/2" plywood
Nest bank back 1 24-1/2" x 16" 1/2" plywood
Nest divider 1 12" x 13" 1/2" plywood
Nest litter lip 1 24-1/2" x 3-1/2" 1/2" plywood
Nest bank top 1 24-1/2" x 14" 1/2" plywood
Nest cleat 2 13" 1x2 under the bank floor
11

Pop door and ramp

The pop door is the hens' way between the coop floor and the grass, and it is the only opening that gets shut every single night. The opening is already cut in the partition, 12" by 14", sitting on the floor. Hang the slab on the RUN side so it swings against the frame and cannot be pushed inwards, two hinges and a two-action latch. The floor is 4" above the grass, so add a ramp 8-15/16" long with cleats every 4". A hen will jump down happily and then refuse to jump back up at dusk, and you will be the one lifting her in.

Part Qty Length Stock Note
Pop door slab 1 12-1/2" x 14-1/2" 1/4" plywood
Ramp 1 12" x 8-15/16" 1/4" plywood
Ramp cleat 3 12" 1x2 every 4"
12

Run hardware cloth — sides, ends and the floor

This is the predator strategy, and it is different from every other plan in this set. A stationary coop buries an apron 12 inches down. You cannot bury anything under something you drag across the lawn, so the cloth goes UNDER the birds instead and travels with them. 1/4in hardware cloth, 19 gauge. Never chicken wire — chicken wire keeps chickens in and keeps nothing at all out; a raccoon opens it with its fingers. Staple the floor cloth across the underside of the skids and rungs over the whole run section, then both run slopes, then the handle-end triangle. Fasten with staples every 2in AND fender washers every 8in along every edge. Staples alone pull through — that is the failure everyone finds out about the morning after. Total needed is 26 ft off a 36in roll.

Part Qty Length Stock Note
Run floor cloth 1 48" x 53" Hardware cloth
Run slope cloth 2 48" x 53" Hardware cloth
Handle-end cloth 1 48" x 41-9/16" triangle Hardware cloth
Ridge vent cloth 2 38-1/2" x 7" Hardware cloth
13

Run access hatch

One hatch on the right run slope for feed, water and catching a bird without opening the coop. Frame it 28" along the length by 30" up the slope out of 1x2, cover the frame with the same hardware cloth, and hinge it at the TOP so it falls shut on its own if you let go. Sill 8" up the slope, so the bottom rail clears the grass. One two-action latch. Hooks and turn-buttons are not enough on a run panel a raccoon can stand on the ground and work at with both hands.

Part Qty Length Stock Note
Run hatch stile 2 30" 1x2
Run hatch rail 2 25" 1x2
Run hatch cloth 1 28" x 30" Hardware cloth
Hatch stop 2 28" 1x2 inside the opening, for the hatch to close on
14

Roost bar and droppings tray

One bar, running the length of the coop, on the centreline where the headroom is. A 2x2 with the top two corners eased — flat side up, not a dowel. A hen grips with a flat foot and in cold weather she has to be able to sit down ON her feet to cover them; a round bar leaves her toes exposed and is how you get frostbite in a coop that is otherwise fine. Set the TOP of the bar 18-1/2" above the COOP FLOOR — not off the grass. The floor is 4" up already (3-1/2" of skid and 1/2" of ply), so off the grass the same bar is 22-1/2" and the peak is 45-1/16". Floor to the peak is 41-1/16", so the bar leaves 22-9/16" to the peak line. Your tape will read 19-9/16", and that is not an error: the rafters are plumb-cut and butt on the centreline, so the joint hangs 3" below the peak and the tape stops on wood. 19-9/16" of clear air over a sitting hen is the number that matters, and it is the one on the check line. That height also keeps her above the nest bank top so she roosts on the bar rather than in the eggs. The bar delivers 37" of perch for 3 birds; the extension minimum is 6in each. Slide the droppings tray underneath on two cleats. It is 24" long, not the full 37" of the bar: the first 13" of that floor is where the nest bank stands, and the bar passes over the bank's own sloped top there. Pull the tray out, tip it on the compost, slide it back — thirty seconds, and it is the difference between a coop that smells and one that does not.

Part Qty Length Stock Note
Roost bar 1 37" 2x2 top corners eased
Roost support 2 5" x 6" gusset 1/2" plywood
Droppings tray 1 24" x 16" 1/2" plywood
Tray cleat 2 24" 1x2 under the tray edges

Frequently Asked Questions

Are these 4x3.3333333333333335 chicken coop plans free?

Yes — the full 22-page PDF is a free download with no email required. Every dimension, the complete material list and all 14 assembly steps are also published on this page, so you can price the build before downloading anything.

How many chickens fit in a 4x3.3333333333333335 coop?

2-3 hens. At 10 square feet of coop floor this holds 3 birds at the standard 4 square feet each, and the attached run adds 16 square feet on top of the shaded bay under the raised floor.

What does this 4x3.3333333333333335 coop cost to build?

Roughly $675–$875 at 2026 big-box lumber prices, depending on your region and what you pick for siding and roofing. The material list on this page is the full bill of materials — take it to the yard as-is.

How long does it take to build?

Two weekends (14-20 hrs) for someone with basic carpentry skills. Difficulty is rated beginner. Nothing in the plan needs a table saw or pocket-hole joinery — a circular saw, a drill, a level and a square cover the whole build.

Do I need a permit?

Usually not. At 10 square feet of coop this normally sits under the permit threshold, which is commonly 100 to 120 square feet of footprint. Setback rules from property lines still apply in most places, so confirm those.

Why is the floor raised off the ground?

The floor sits 0" up on posts. That keeps the framing out of ground moisture so it does not rot, denies rats and snakes the cavity they would otherwise nest in under a grade-level floor, and gives the birds an extra 10 square feet of dry shaded space that costs nothing to build.

Download the 4x8 A-Frame Chicken Tractor plans

Different size? See all chicken coop plans, or check the size calculator first.