Beginner Guide
$2,347 in Lessons
25 min read
By someone who made every costly mistake possible—so you don’t have to
My First Year Cost Breakdown
Total Avoidable Losses: $2,347
Prevention cost: $900 | ROI: 161%
My first year of chicken keeping cost me $2,347 in avoidable mistakes. I thought I’d done my research. I’d watched YouTube videos, read blogs, and felt confident building what looked like a perfectly adequate chicken coop. Within six months, I’d lost birds to predators, dealt with a respiratory disease outbreak, rebuilt major sections due to material failures, and faced behavioral problems that required expensive solutions.
The worst part? Every single problem was preventable with slightly better planning and a modest additional investment upfront. These weren’t exotic failures or freak accidents—they were predictable consequences of common beginner mistakes that thousands of new chicken keepers make every year.
This guide details the exact mistakes that cost me the most money, why beginners fall into these traps, and specific strategies to avoid them. Whether you’re planning your first coop or already dealing with problems, these hard-learned lessons can save you hundreds or thousands of dollars in rebuild costs, veterinary bills, and replacement birds.
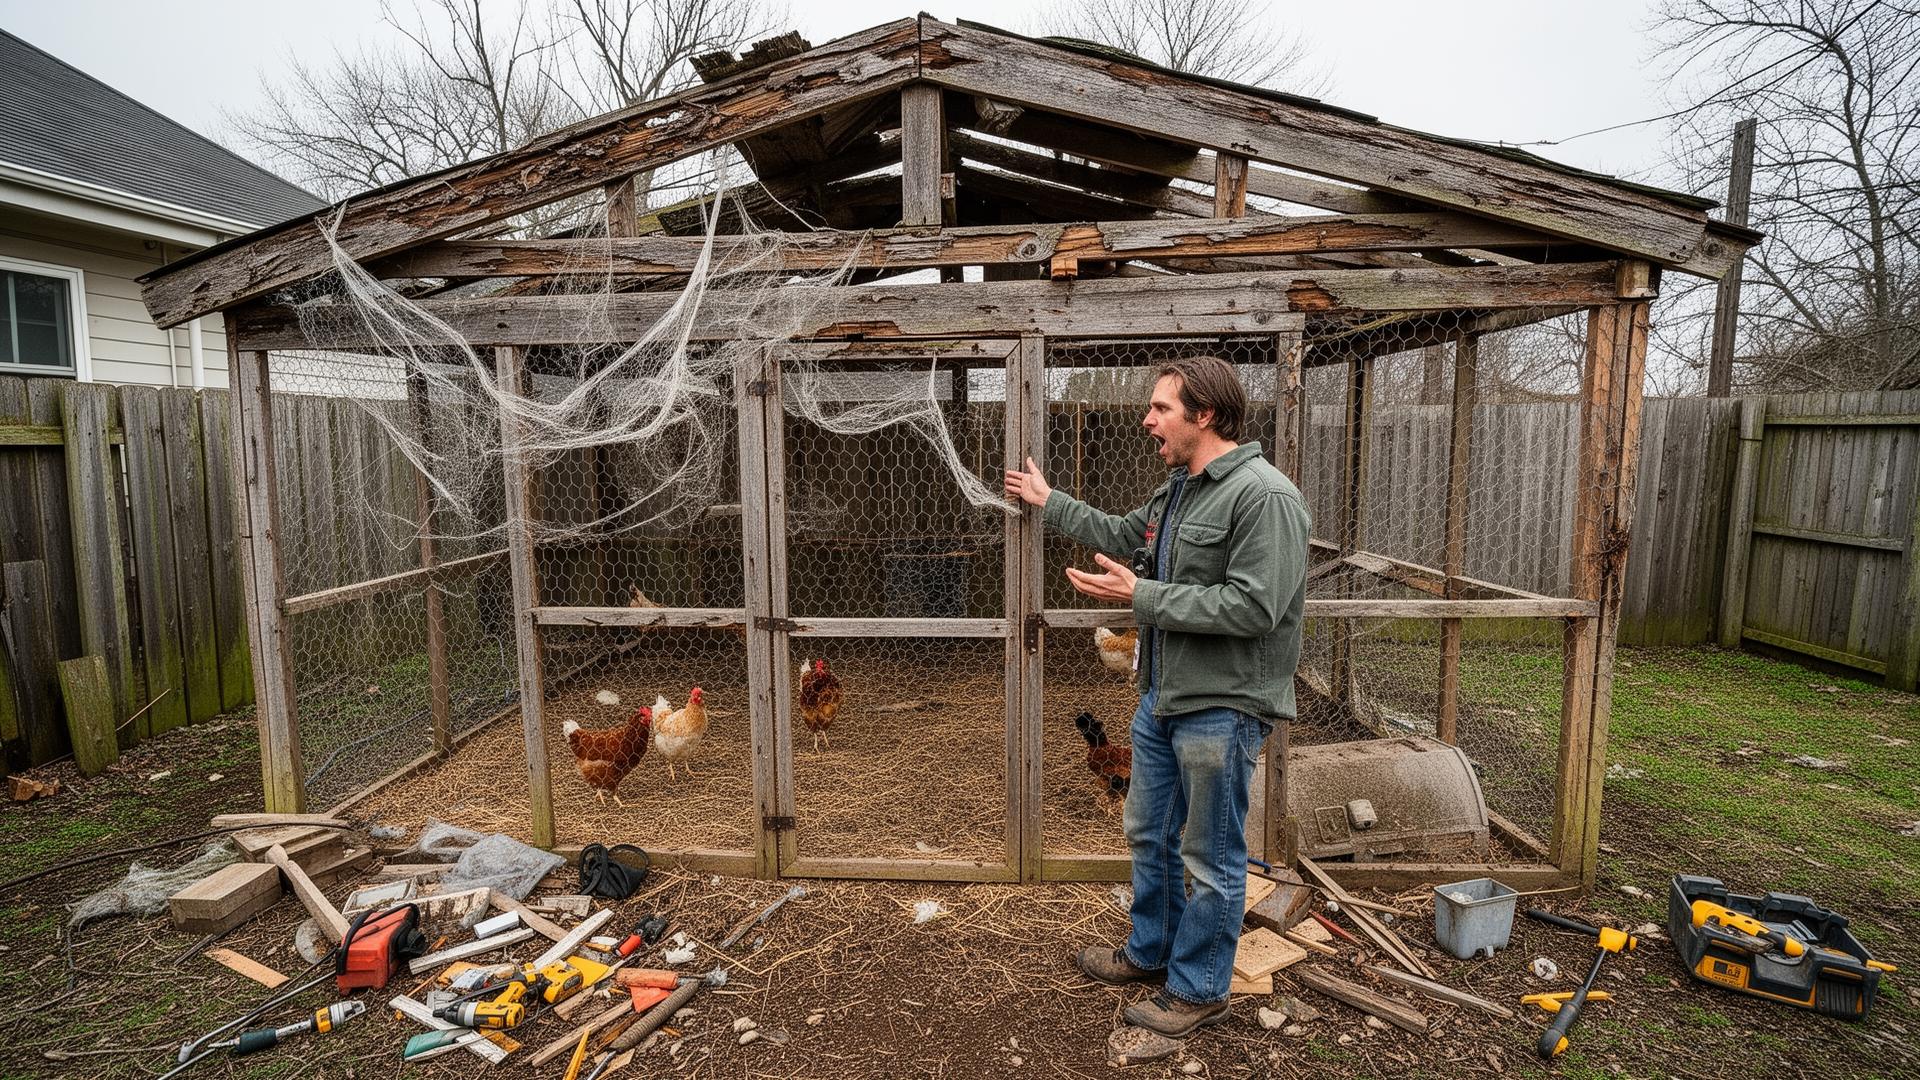
Mistake #1: Inadequate Predator Protection ($750 loss)
The disaster: Three months after completing my “predator-proof” coop, I lost four chickens in a single night to what I later discovered was a raccoon. My total financial loss: $750.
How It Happened
I’d followed online plans that called for chicken wire around the run and a simple hook-and-eye latch on the coop door. It looked secure, and the chickens seemed safe for the first few months. Then I came out one morning to find carnage.
The raccoon had:
- • Torn through the chicken wire like tissue paper
- • Opened the latch by lifting the hook (raccoons have opposable thumbs)
- • Killed four of my six hens, eating parts and leaving the rest
- • Scattered feed everywhere and destroyed two nesting boxes
The Real Cost Breakdown
Category Item Cost
Immediate Losses 4 replacement hens $100
Lost egg production (3 months) $180
Veterinary exam of survivors $85
Cleanup and sanitization $45
Security Upgrades Hardware cloth (100ft) $185
Predator-proof latches $65
Ground barriers $90
TOTAL DAMAGE $750
The Prevention Strategy That Actually Works
Hardware Cloth Specifications
- Material: 1/2-inch galvanized hardware cloth, 19-gauge minimum
- Coverage: All coop and run openings, including windows and vents
- Ground barrier: 12-inch buried barrier or 24-inch ground-level apron
- Cost: $150-250 for typical coop (vs. $15-40 for chicken wire)
Total prevention cost: $200-300 vs. $750 in losses and repairs
Red Flags You’re Vulnerable
- Using chicken wire for predator barriers
- Simple hook-and-eye or sliding bolt latches
- Gaps larger than 1/2 inch anywhere in the structure
- No ground-level barriers against digging
- Thinking “it hasn’t happened yet, so we’re safe”
Mistake #2: Poor Ventilation Design ($425 loss)
The disaster: Six weeks into winter, four of my six chickens developed respiratory infections requiring veterinary treatment. The cause? My “cozy” coop design had created a toxic ammonia environment that destroyed their respiratory health.
How It Happened
Determined to keep my birds “warm and comfortable,” I’d designed what I thought was a snug, draft-free coop. I sealed gaps, added extra insulation, and kept ventilation openings small to “prevent heat loss.” The result was a humid, ammonia-filled death trap.
The signs I missed:
- • Strong ammonia smell when opening the coop (I thought this was normal)
- • Condensation on windows and walls (I figured it was cold weather)
- • Birds staying outside even in cold weather (I thought they were hardy)
- • Wet bedding that never seemed to dry out
The Science-Based Prevention Strategy
Minimum Ventilation Requirements
- Total opening area: 1 square foot per bird near the roofline
- Cross-ventilation: Openings on opposite walls, minimum 3 feet apart
- High placement: Exhaust openings 6-12 inches below roof line
- Weather protection: Overhangs or baffles prevent rain entry
Proper ventilation cost: $100-200 vs. $425+ in health problems
The Ammonia Test Every Beginner Should Know
-
- Squat to bird height (12 inches above bedding) inside your coop
-
- If your eyes, nose, or throat burn, ammonia levels are already dangerous
-
- By the time humans smell ammonia (20 ppm), birds are already being harmed (damage starts at 5 ppm)
Mistake #3: Cheap Materials That Failed ($580 loss)
The disaster: Eighteen months after completing my coop, I was essentially rebuilding it from scratch. Cheap materials had failed across the board, creating safety hazards and requiring complete replacement much sooner than expected.
The Failure Timeline
- Month 6: Particle board roof sheathing began swelling from moisture
- Month 9: Untreated lumber framing showed rot at ground contact points
- Month 12: Cheap hinges failed, leaving doors unsecurable
- Month 15: Chicken wire developed holes, creating predator access
- Month 18: Structural failure required complete rebuild
The Materials Investment Strategy
Never Compromise
- • Pressure-treated foundation
- • Construction-grade framing
- • 19-gauge hardware cloth
- • Quality metal roofing
Important for Longevity
- • Exterior-grade plywood/OSB
- • Cedar or quality siding
- • Real glass windows
Moderate Impact
- • Stainless steel hinges
- • Two-step latches
- • Outdoor-rated screws
Mistake #4: Insufficient Space Planning ($392 loss)
The disaster: I built for 6 birds, started with 4, then added 2 more “because we had room.” Within months, I was dealing with aggressive pecking, reduced egg production, and behavioral problems that required coop expansion and veterinary intervention.
Space Requirements That Actually Work
Flock Size Indoor Min Recommended Outdoor Run Roosting
4 birds 4×4 (16 sq ft) 6×6 (36 sq ft) 8×8 (64 sq ft) 3-4 linear feet
6 birds 4×6 (24 sq ft) 6×8 (48 sq ft) 10×12 (120 sq ft) 5-6 linear feet
10 birds 8×6 (48 sq ft) 8×8 (64 sq ft) 12×16 (192 sq ft) 8-10 linear feet
Early Warning Signs of Space Problems
- Feather pecking or missing feathers (especially on backs, tails)
- Birds unable to access feeders due to blocking by dominant birds
- Excessive noise and commotion during feeding times
- Decreased egg production despite adequate nutrition
- One or more birds consistently isolated from the flock
Mistake #5: Wrong Coop Location ($200 loss)
The disaster: Four months after completing my coop, I realized I’d placed it in the worst possible location on my property. Poor drainage led to muddy conditions, afternoon sun created heat stress, and difficult access made daily care a burden.
What I didn’t account for:
- Drainage patterns: Low spot that collected water from surrounding areas
- Sun exposure: Full afternoon sun with no natural shade
- Wind patterns: Exposed to prevailing winter winds
- Utility access: No nearby electrical for future automation
- Neighbor proximity: Too close to property line, creating complaints
Site Selection Strategy
Do This
- • Observe drainage during heavy rain
- • Choose elevated locations
- • Utilize afternoon shade
- • Ensure easy daily access
- • Check electrical access
Avoid This
- • Standing water after rain
- • No afternoon shade (2-6 PM)
- • Difficult access route
- • Below required setbacks
- • Low-lying flood areas
Prevention Checklist: Avoid These Mistakes
Use this checklist before breaking ground to avoid the $2,347 in mistakes I made.
Predator Protection Checklist
- ☐ Hardware cloth (1/2”, 19-gauge) specified for all openings
- ☐ Two-step predator-proof latches on all doors
- ☐ Ground barriers: 12” buried OR 24” surface apron
- ☐ No gaps larger than 1/2” anywhere in structure
- ☐ Overhead protection from aerial predators
- ☐ Secure feed storage to avoid attracting predators
Ventilation Planning Checklist
- ☐ 1+ square feet of ventilation per bird near roofline
- ☐ Cross-ventilation on opposite walls
- ☐ Ventilation openings positioned above roosting areas
- ☐ Weather protection (overhangs) for all ventilation
- ☐ Adjustable closures for seasonal management
- ☐ All ventilation openings covered with hardware cloth
Material Selection Checklist
- ☐ Pressure-treated lumber for all ground contact
- ☐ Exterior-grade plywood/OSB (never particle board)
- ☐ Hardware cloth specified (never chicken wire for barriers)
- ☐ Galvanized or stainless steel fasteners
- ☐ Quality hinges rated for outdoor use
- ☐ Metal or quality shingle roofing with proper underlayment
Space Planning Checklist
- ☐ 4-6 square feet per bird inside coop
- ☐ 10-15 square feet per bird in outdoor run
- ☐ 8-10 linear inches of roosting space per bird
- ☐ Multiple feeding and watering stations
- ☐ Visual barriers for subordinate bird escape routes
- ☐ Room for future expansion if flock grows
Site Selection Checklist
- ☐ Drainage tested during heavy rain
- ☐ Afternoon shade available or planned
- ☐ Convenient access route in all weather
- ☐ Electrical access within 100 feet
- ☐ Setback requirements verified with city/HOA
- ☐ Neighbor impact considered and discussed
Recovery Strategies: Already Made These Mistakes?
If you’re reading this because you’re already dealing with problems, don’t panic. Most chicken coop mistakes can be fixed, though it’s more expensive than doing it right the first time.
Emergency Triage: What to Fix First
Priority 1 - Immediate Safety Threats:
-
- Predator vulnerabilities: Patch holes, upgrade latches
-
- Structural failures: Shore up collapsing sections
-
- Health emergencies: Address respiratory symptoms
Priority 2 - System Improvements:
-
- Ventilation upgrades: Add exhaust openings
-
- Space expansion: Address overcrowding
-
- Drainage remediation: Install french drains
Prevention vs. Repair: True Cost Analysis
Prevention Category Additional Cost Problems Prevented Savings
Predator protection $200 Flock losses, rebuild costs $750+
Proper ventilation $150 Respiratory diseases $425+
Quality materials $250 Premature failure, rebuilds $580+
Adequate space $300 Behavioral problems $392+
Site selection $0 Relocation, drainage $200+
TOTALS $900 Multiple system failures $2,347+
Return on Investment: 161%
$900 prevents $2,347+ in problems
Warning Signs You’re About to Make Expensive Mistakes
Planning Phase Red Flags
Questions That Reveal Planning Problems:
- “How cheap can I build this?” (instead of “How do I build this right?”)
- “What’s the minimum space I can get away with?” (instead of optimal space)
- “Do I really need hardware cloth?” (if you’re asking, you need it)
- “Can I skip the ventilation for now?” (ventilation isn’t optional)
The Psychology of Expensive Mistakes
- Optimism bias: “Bad things happen to other people, not me”
- Sunk cost fallacy: “I’ve already spent this much, I can’t change now”
- Present bias: Overvaluing immediate savings vs. long-term costs
- Planning fallacy: Underestimating time, cost, and complexity
Conclusion: Learning From My $2,347 Education
My first year of chicken keeping was expensive, frustrating, and embarrassing. I lost birds to preventable predator attacks, spent sleepless nights worrying about sick chickens, and rebuilt major systems multiple times. The $2,347 I spent on avoidable mistakes could have funded a premium coop that would have served me perfectly for decades.
The Five Expensive Mistakes to Avoid:
- 1. Inadequate predator protection: $750 loss → invest $200 in hardware cloth and proper latches
- 2. Poor ventilation design: $425 loss → invest $150 in proper air exchange systems
- 3. Cheap materials that failed: $580 loss → invest $250 in quality materials upfront
- 4. Insufficient space planning: $392 loss → invest $300 in adequate space from day one
- 5. Wrong coop location: $200 loss → invest time in proper site selection (free)
Beyond the financial savings, building correctly from the start means less stress, healthier birds, better egg production, and the satisfaction of creating something that works reliably for years. Your chickens depend on you to provide them with safe, healthy housing—they deserve better than my trial-and-error approach.